Installation Instructions
Overview
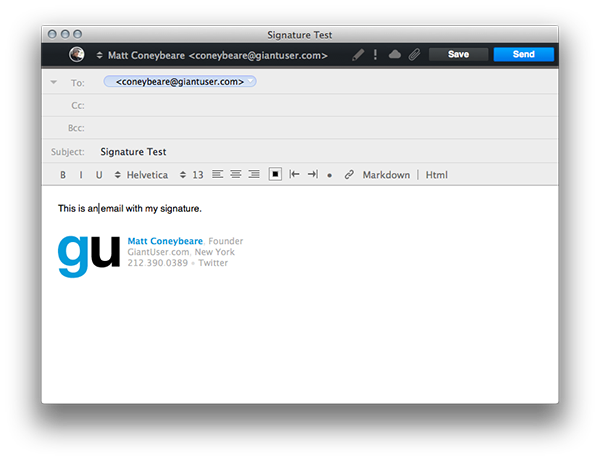
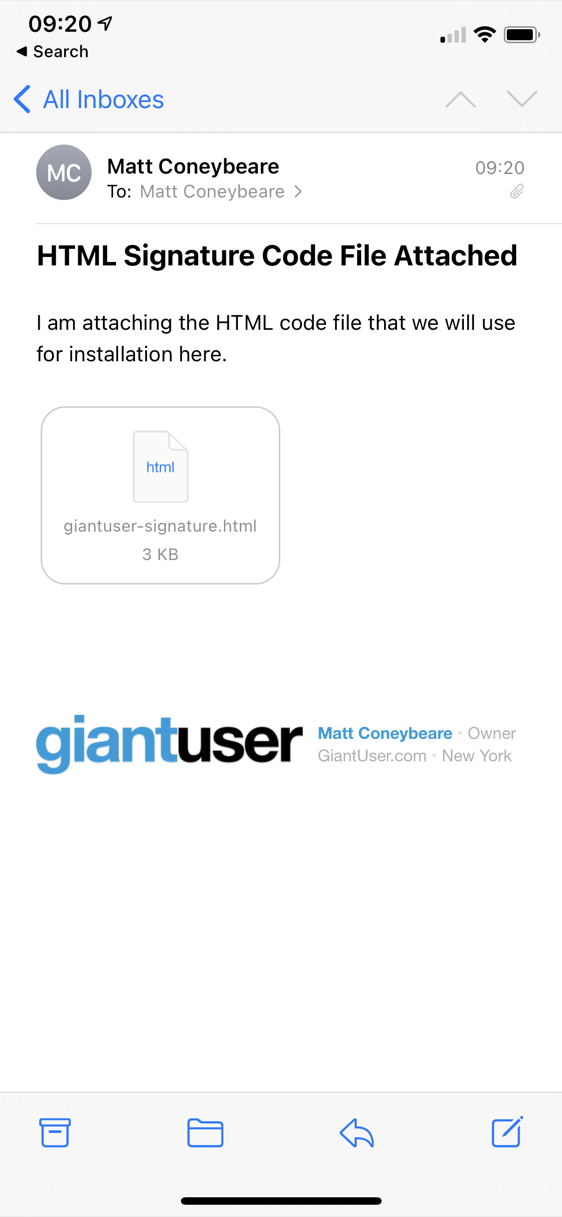
When your signature design and implementation is finished GiantUser will provide you with a packet containing the design files and most importantly, an HTML file containing the code. HTML is essentially a set of instructions that tell a web browser, or email program, how and what to display.
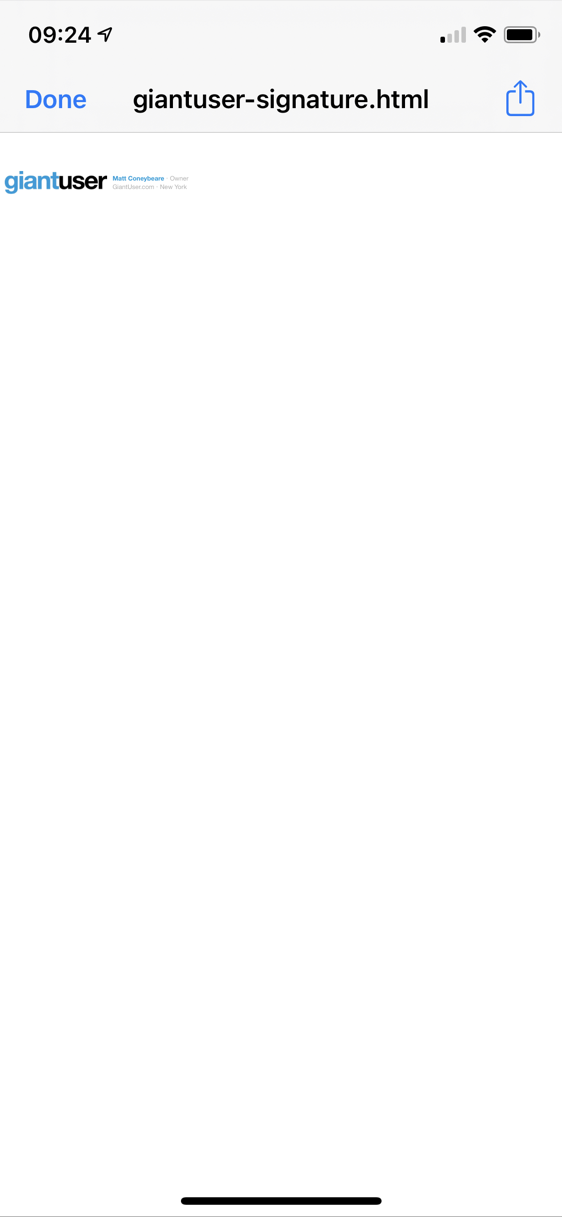
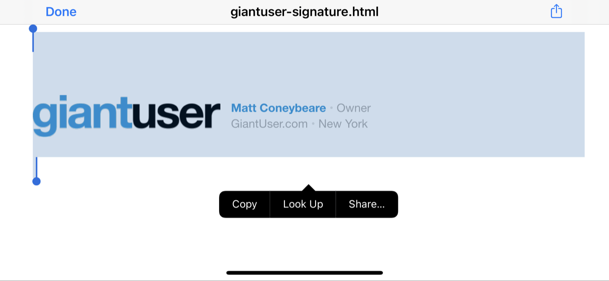
It is not necessary to understand the HTML code to install it in your email program, but if you want to view the HTML code, you can open it in any basic text editor program. If your text editors display the signature design instead of the actual code behind it, you can always see the code by opening the HTML file in your web browser, then view the source of the page. All browsers provide the option to view the page source (code) and it is usually found in the "View" of "Edit" menu of the browser. If you are still having troubles getting the HTML code, you can always rename the file extension from .html to .txt and try to open it that way.
We can't provide instructions for every email program in existence, but now that you have the HTML code necessary to display your signature you should be able to install it in all email programs that support HTML signatures. We have provided step-by-step instructions for some of the most popular email programs. If yours is not listed, and you can't figure it out, try a Google search for "HTML signature" and your email program name. (E.g. "HTML signature Outlook Windows 95").
GiantUser won't leave you stranded! If you need help, contact us and we will do our best to help you get your signature installed.
Apple Mail on 11.X.X (Big Sur)
Apple Mail has a pretty complicated process of installing your signature. Don't worry though! We will walk you through it step-by-step. You will be using the HTML file we provided to you for this process.
Add a Placeholder Signature
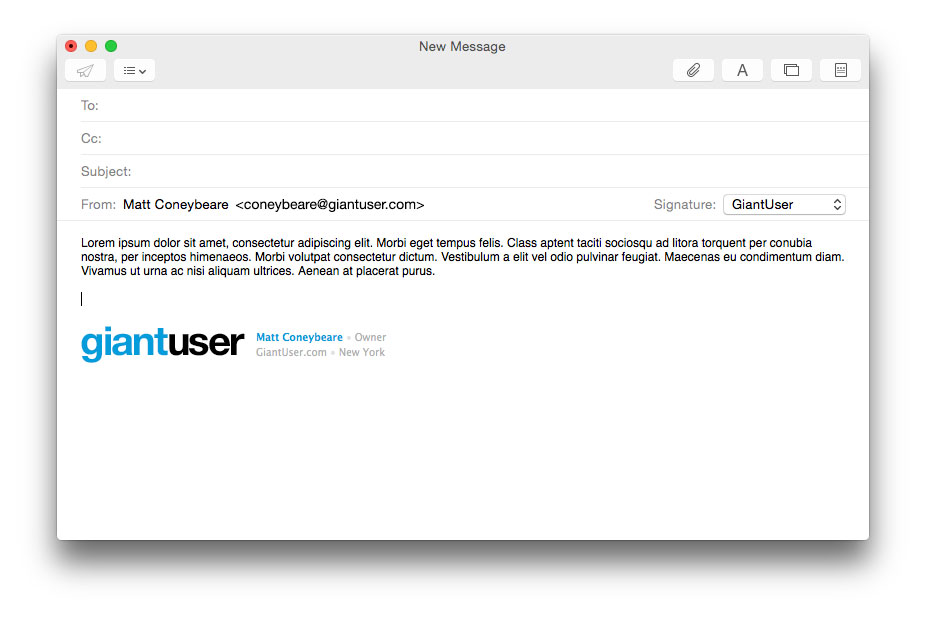
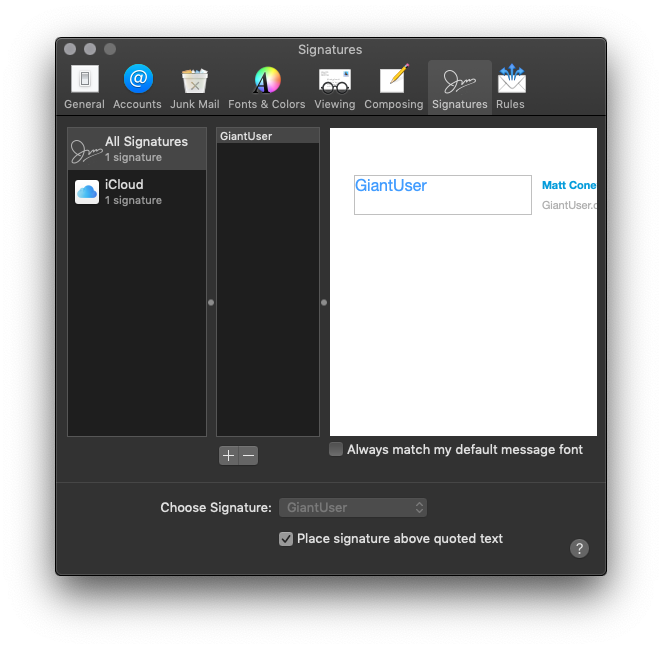
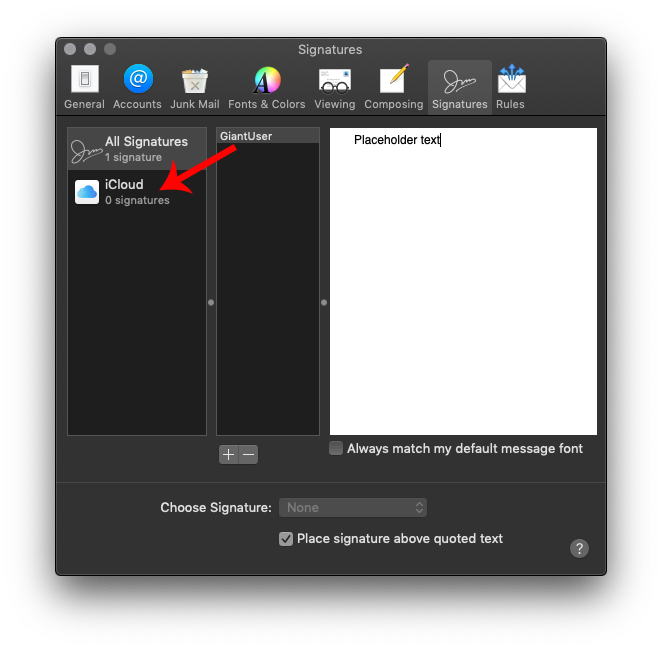
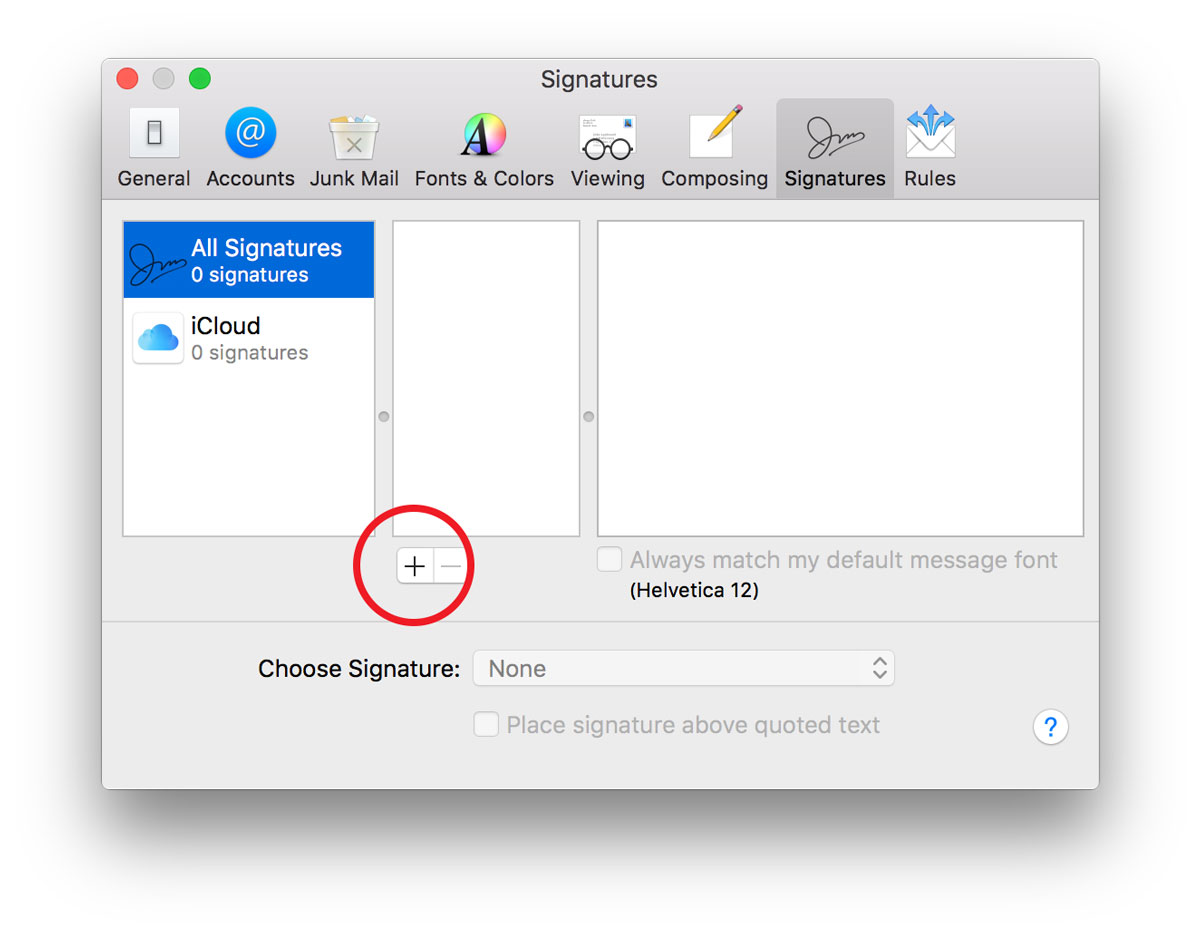
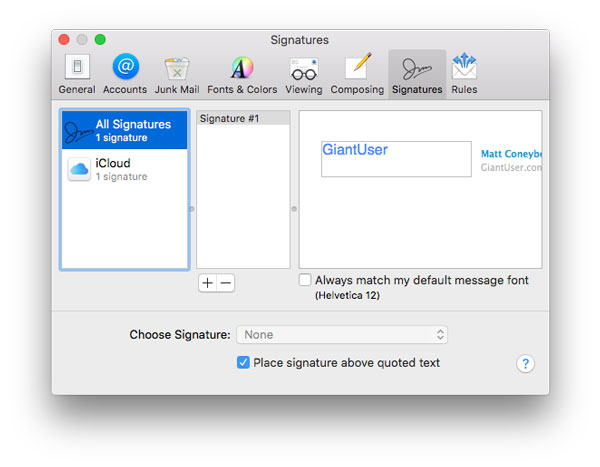
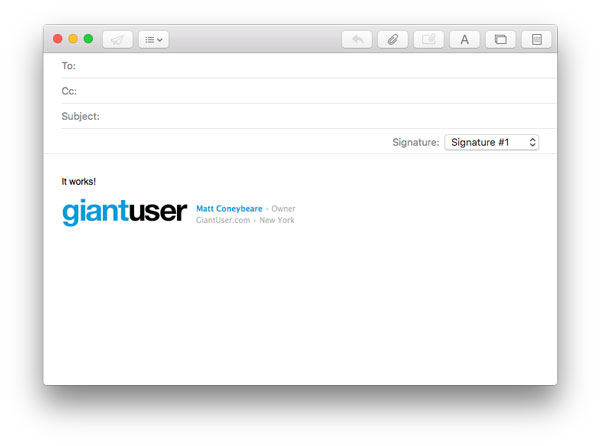
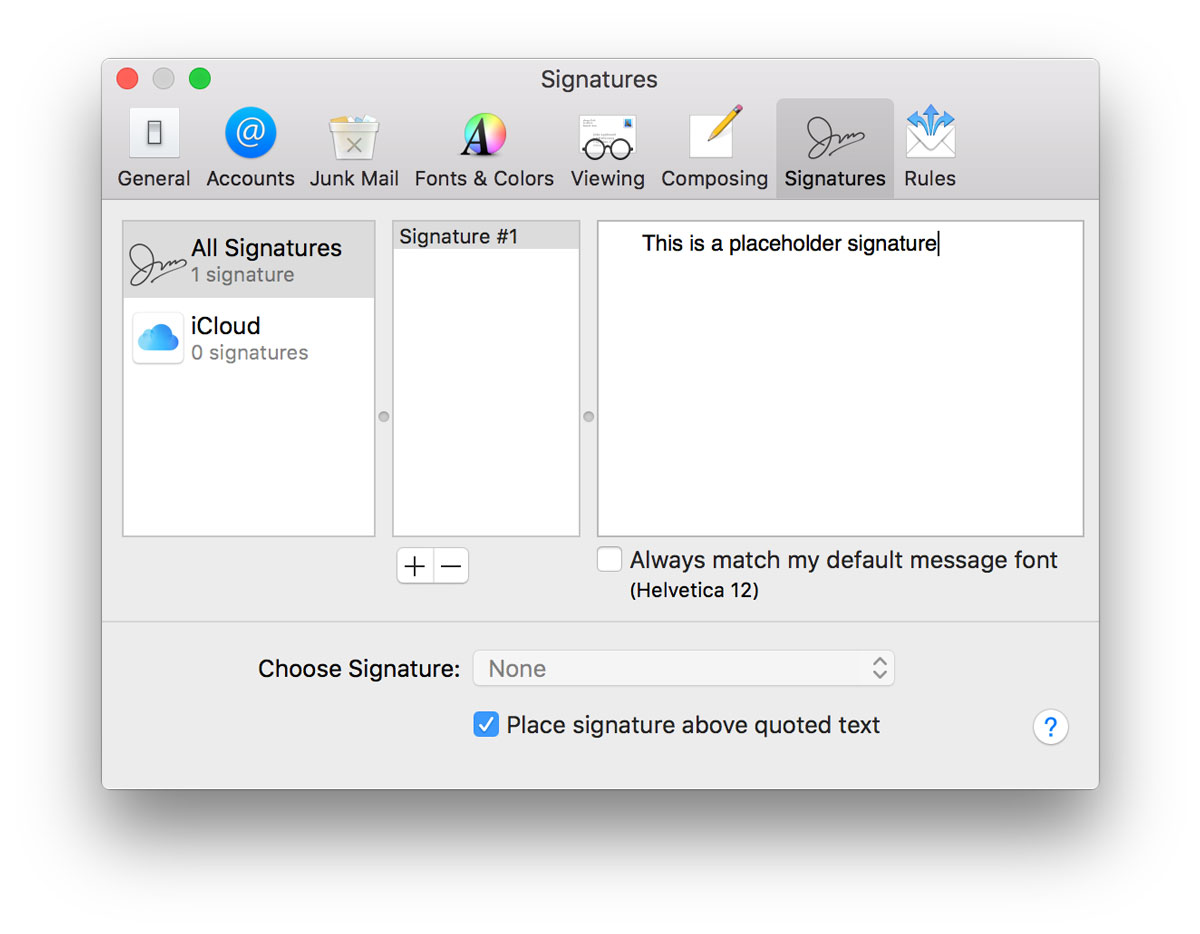
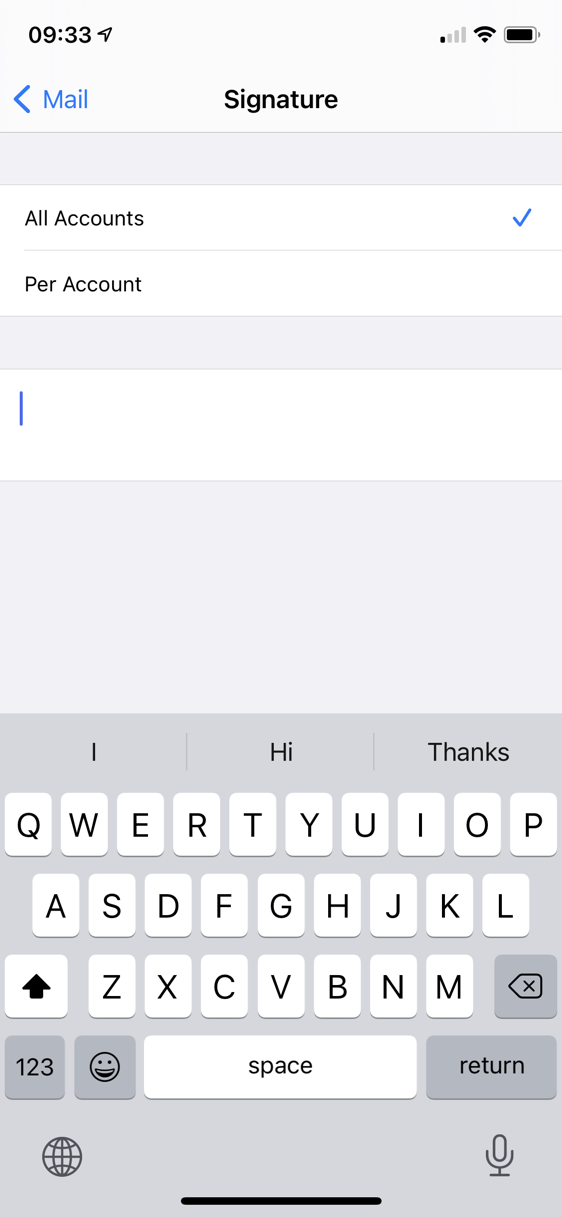
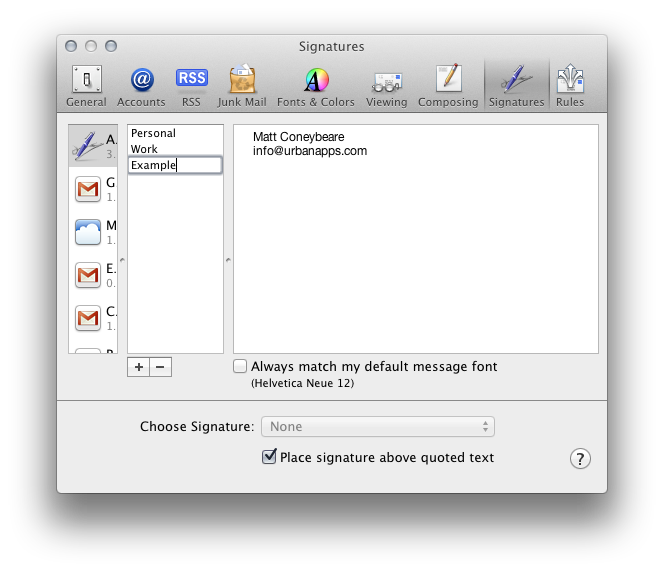
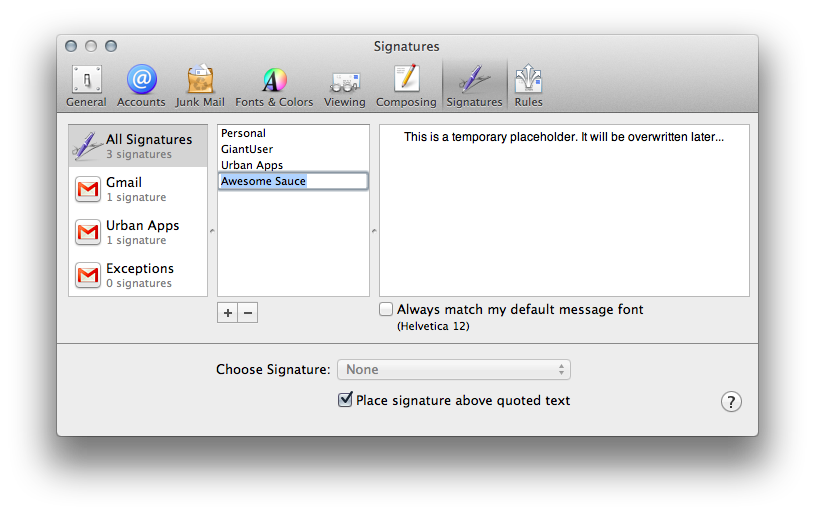
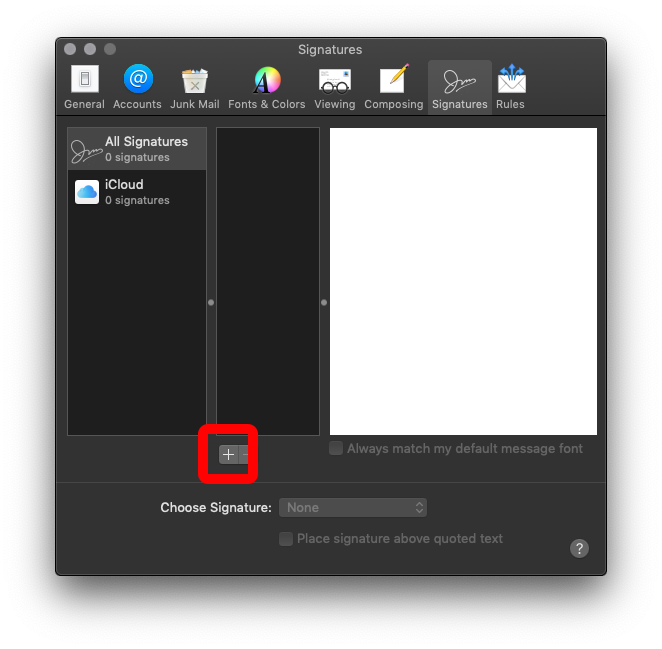
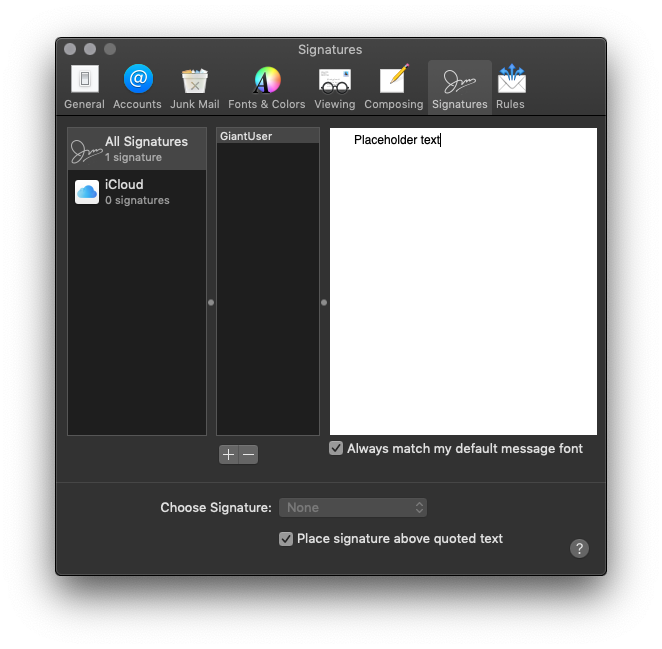
In Apple Mail, open Preferences > Signatures

Once open, create a new signature.

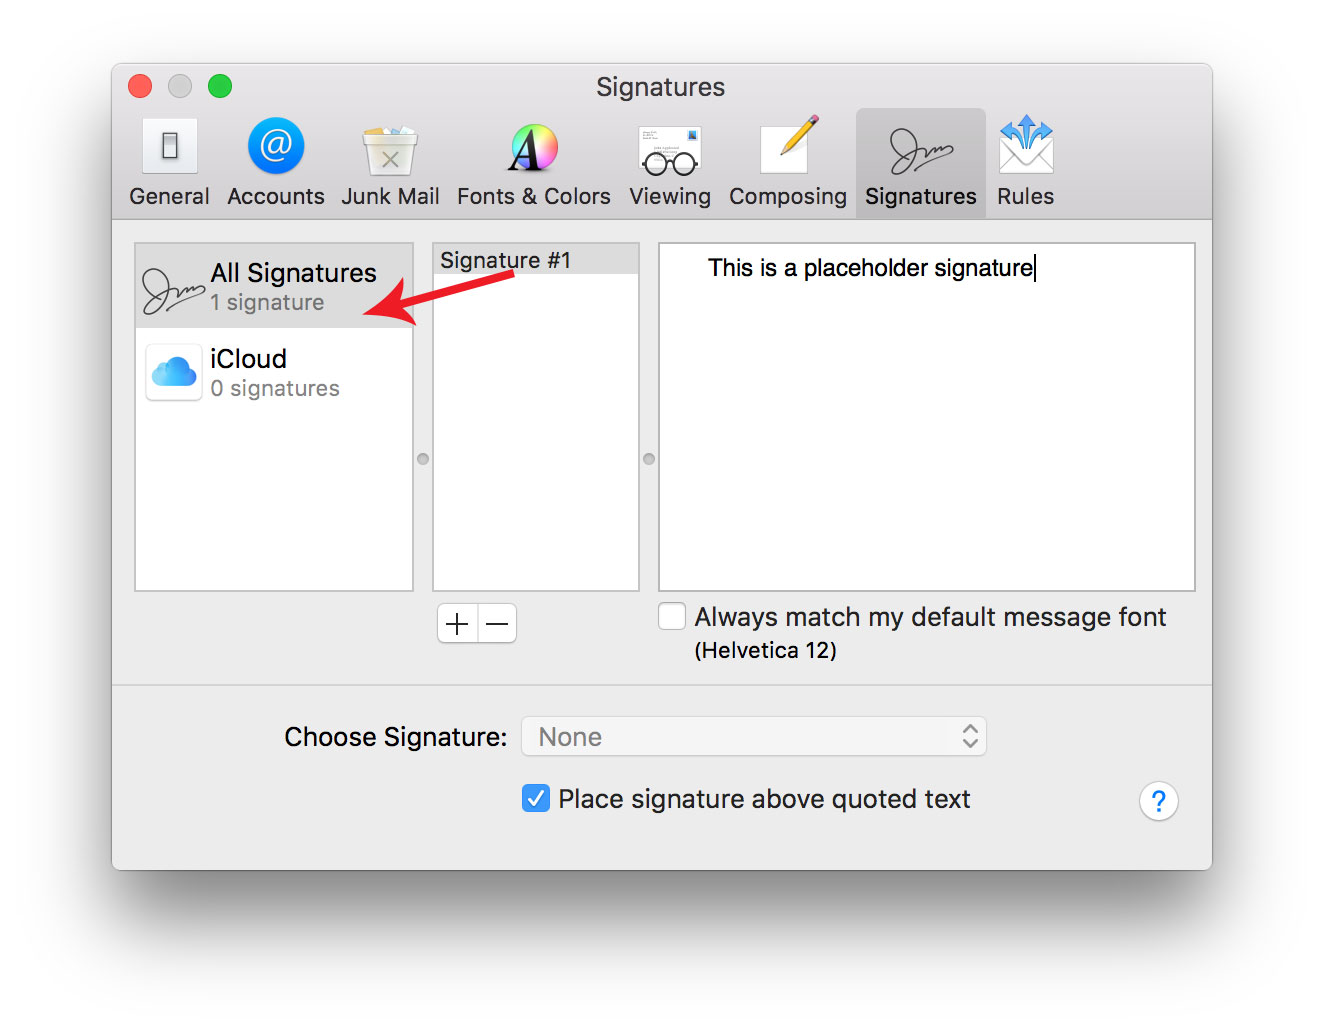
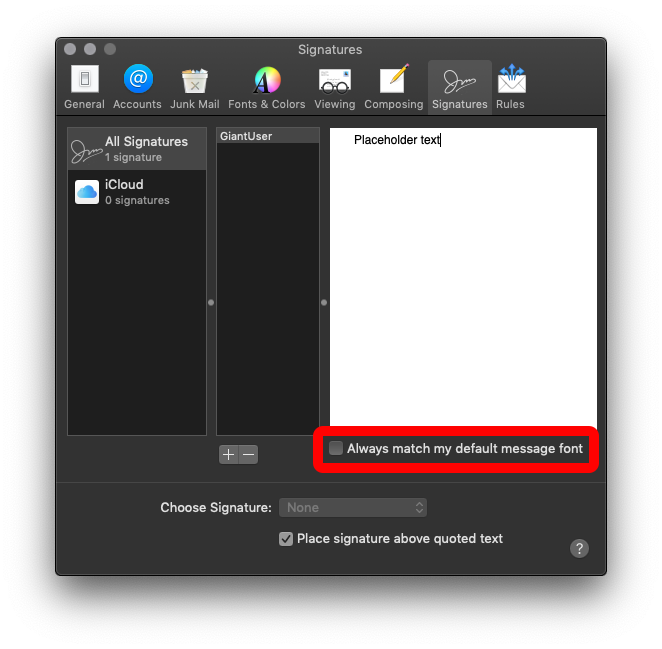
Name the signature something meaningful in the central column. Replace the signature contents on the right with some placeholder text. This text should be recognizable to you as we will use it to help identify the correct signature system file later.
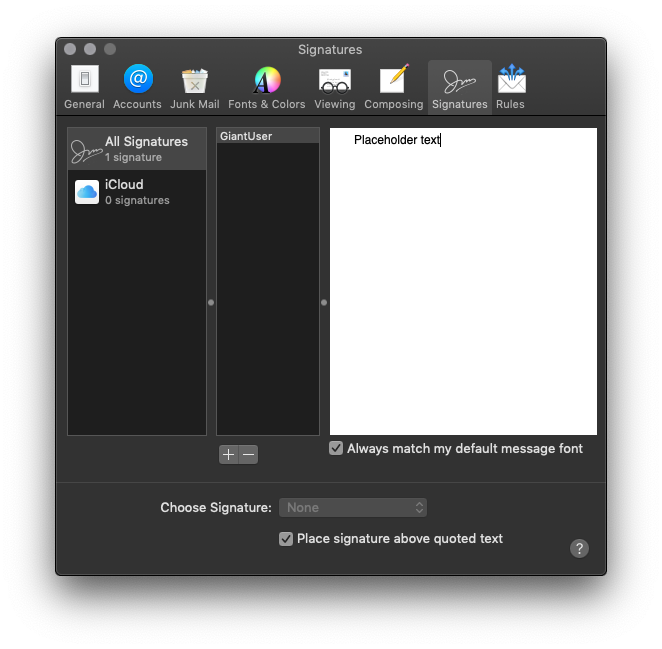
Ensure the Always match my default font checkbox is off

Connect the Placeholder to Your Account
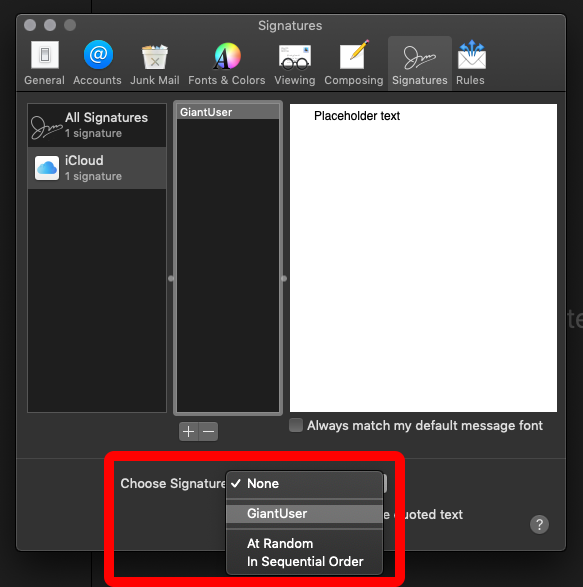
Associate the placeholder signature with one of your email accounts by dragging its name from the second column in the Preferences > Signatures window to an email account in the first column.

If you want to setup the signature to be the default for an email account with auto-load when starting a new message, select the email account in the first column, and choose the new signature.

Close and Quit
Close the Preferences window to save it, then Quit Apple Mail.
Locate the Placeholder File
We are going to need to locate the folder containing the placeholder signature. Unfortunately, most of you are not going to be able to use Finder to get to these folders.
Apple goes to great lengths to hide these files from people as they usually contain info that is not usually editable by hand.
Trying to navigate to them by clicking in Finder will usually lead you to your visible iCloud Drive folder with nowhere else to go.
Don't worry though, I will walk you through an alternative method of getting to the hidden signature files we need to work with.
The files can be in 2 different places depending on whether you are using iCloud Drive or not.
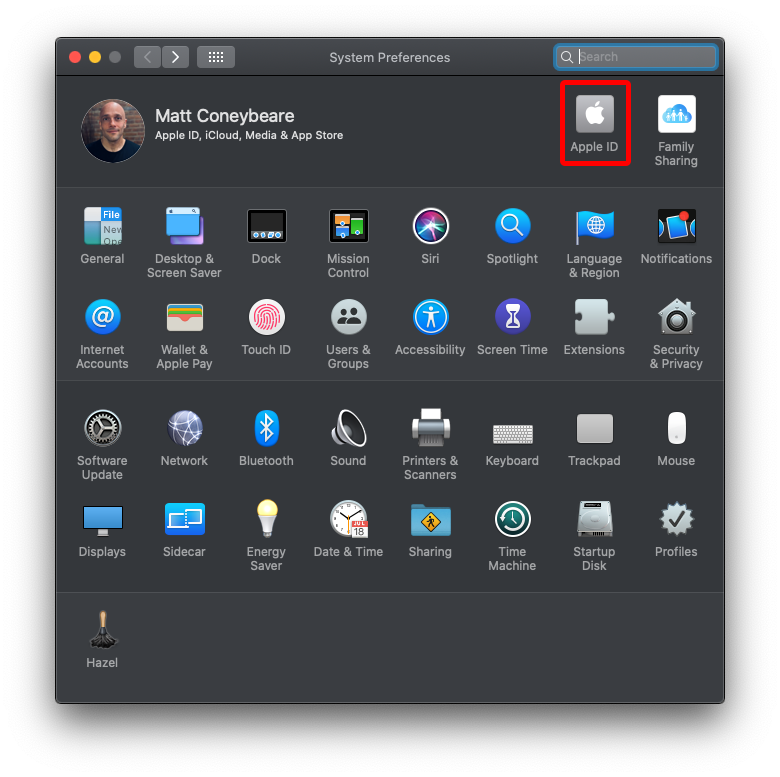
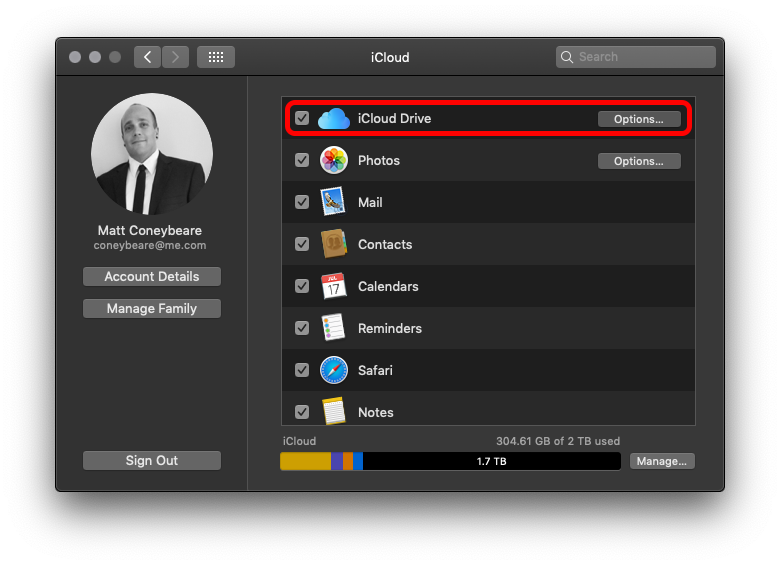
You are most likely using iCloud Drive, even if you are not using an iCloud email address. Check to see if you're using iCloud Drive
by going to System Preferences > Apple ID...

...then look to see if the iCloud Drive checkbox is ticked or not.

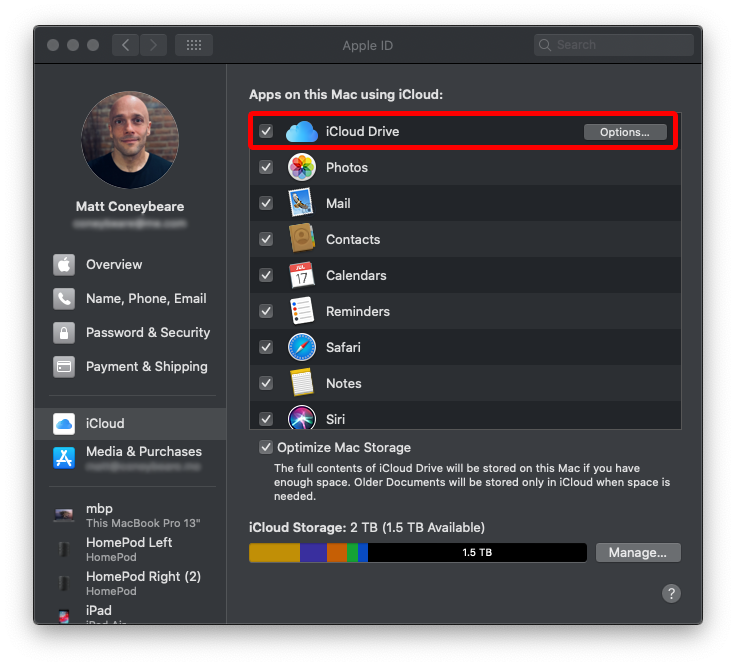
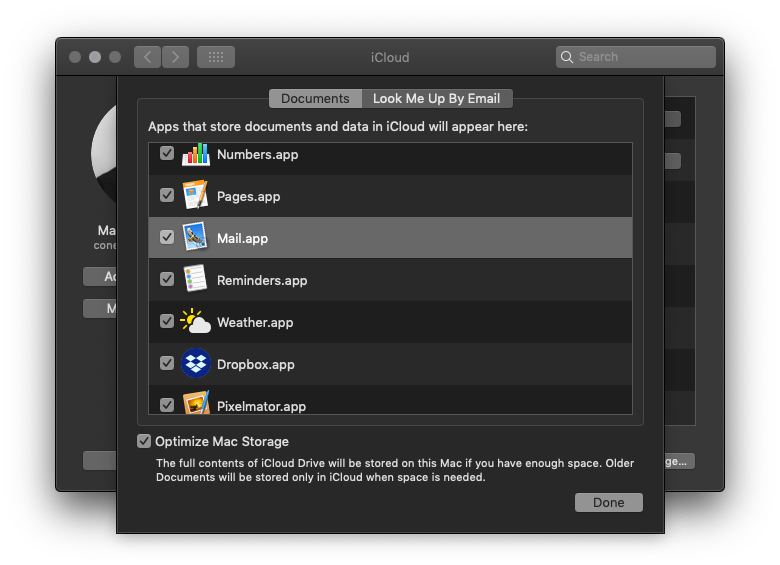
Double-check that iCloud Drive is enabled for Mail by clicking the Options button and ensuring the checkbox next to Mail is ticked.
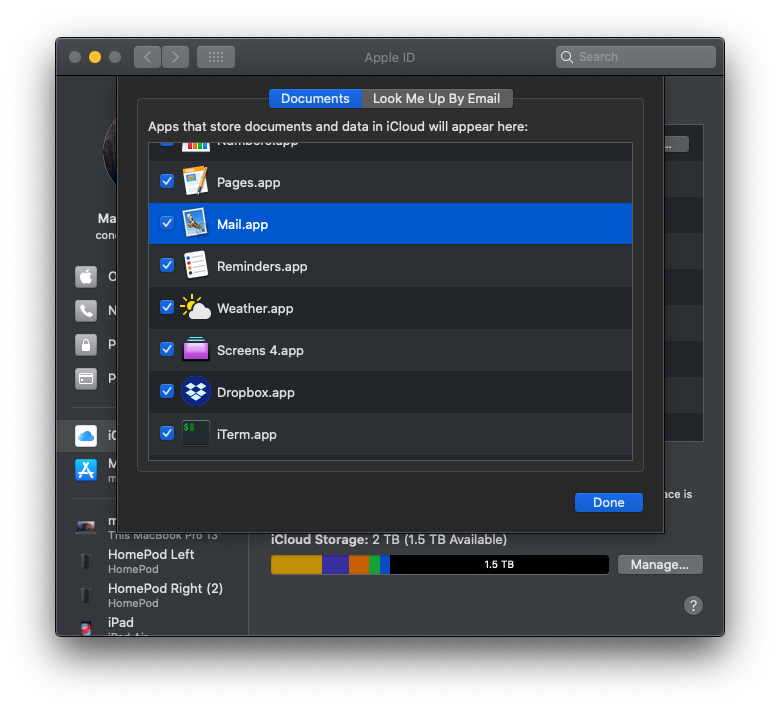
If both of these checkmarks are ticked, then you are using iCloud Drive and should proceed to the next step. If not, skip ahead to step 4b.
Locate the Placeholder File (iCloud Drive)
(You should only do this step if using iCloud Drive.)
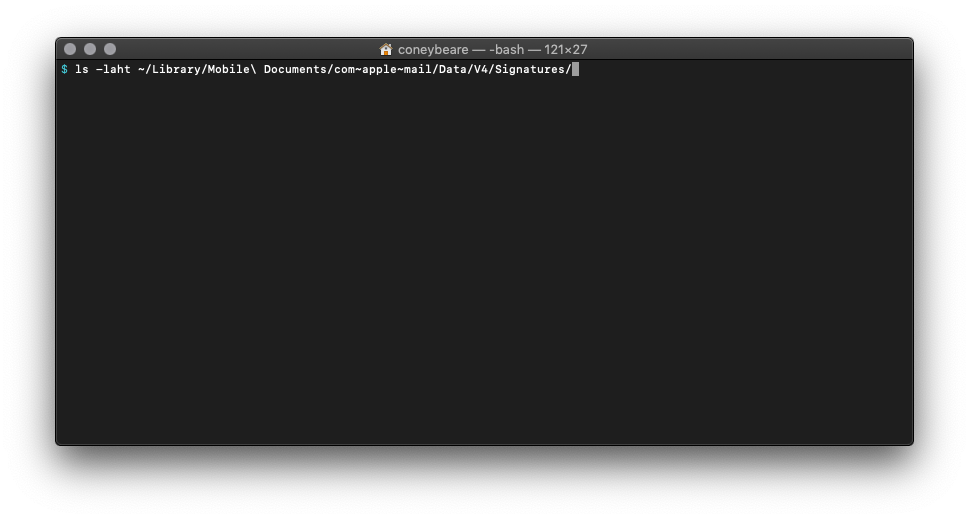
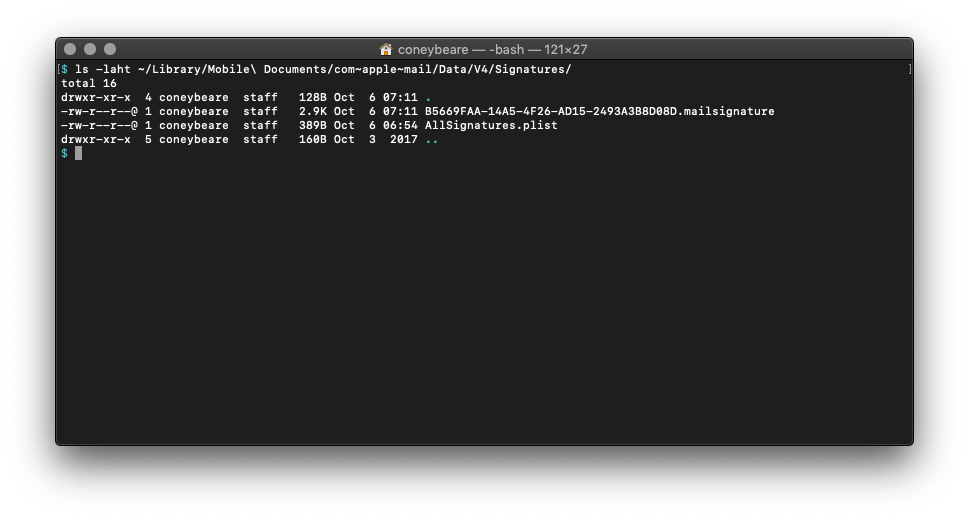
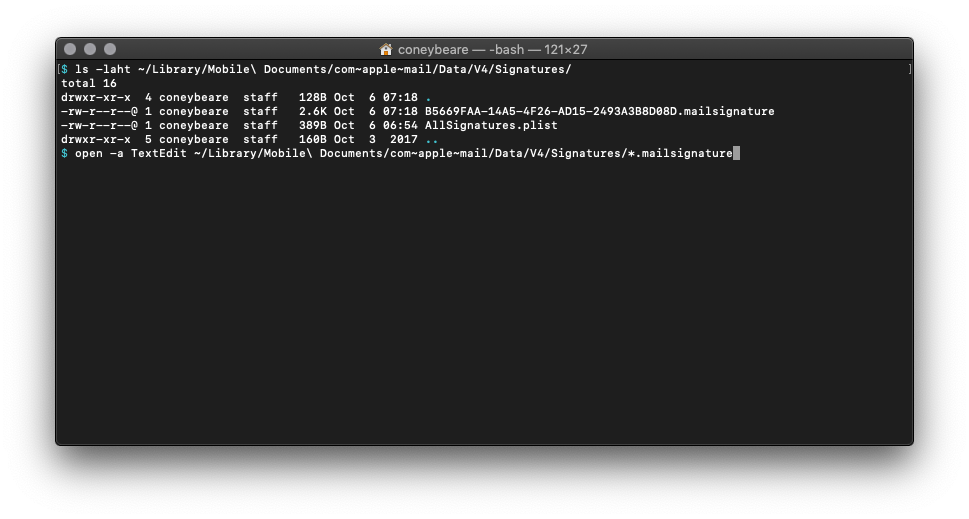
Open Terminal.app, found in Applications > Utilities, and copy/paste the following line into the box and press enter.
ls -laht ~/Library/Mobile\ Documents/com\~apple\~mail/Data/V4/Signatures/
Even if the text is wrapping above, ensure the command is pasted on one line.

This line tells Terminal to list all the files in this directory along with some other file info, then sort it by date.
When you press enter you should see a bunch of lines, each of which corresponds to a file and some of its metadata.
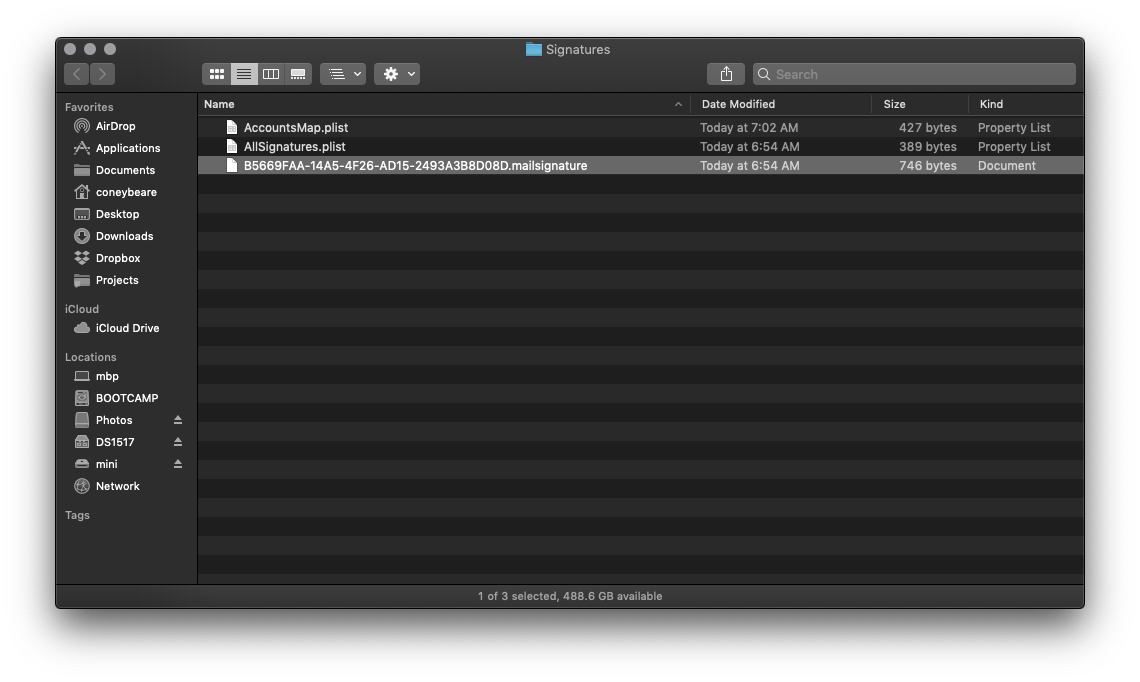
Look at the right side column — the file names — and notice the ones that end in .mailsignature.
These are the files we are interested in working with.
If you get an error, make sure you pasted the line in exactly like shown on one line. If you still get an error, you may not be using iCloud Drive and are following the wrong step.

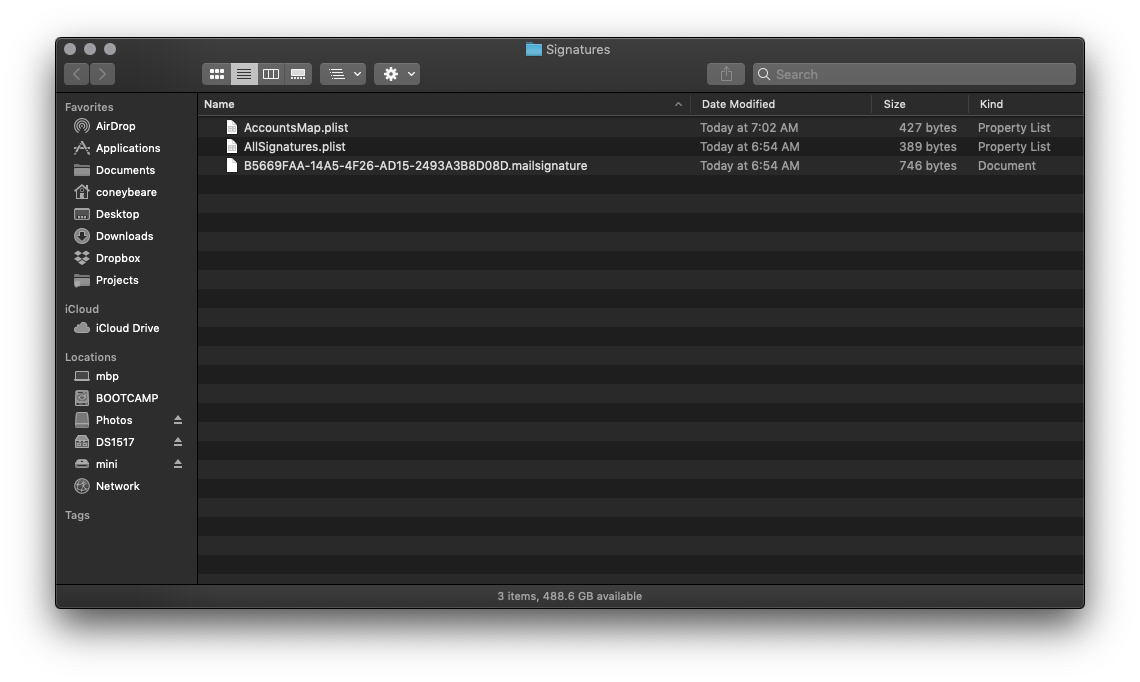
In the new lines that come up in Terminal after running the command, you should see a .mailsignature file that has the date and time of when you started this tutorial. This is the placeholder file. If you don't see a file, then you may have done something wrong in a previous step, and should try again.
As mentioned above, we could normally use Finder to view these folders, but Apple has hidden access to them to prevent direct editing, something we wish to do here. If you have only 1 .mailsignature file, then this is most likely the placeholder file you created in the earlier steps. If you have more than one .mailsignature file in there, then you need to find the one you created earlier. Because this list is sorted top-down by the most recently updated, it will most likely be the top one, but you can check by opening them all and seeing their contents.
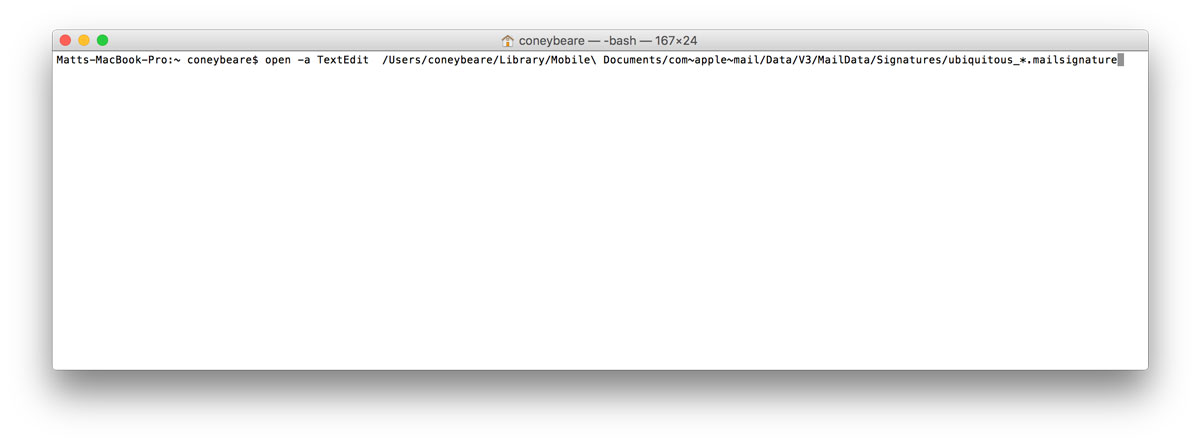
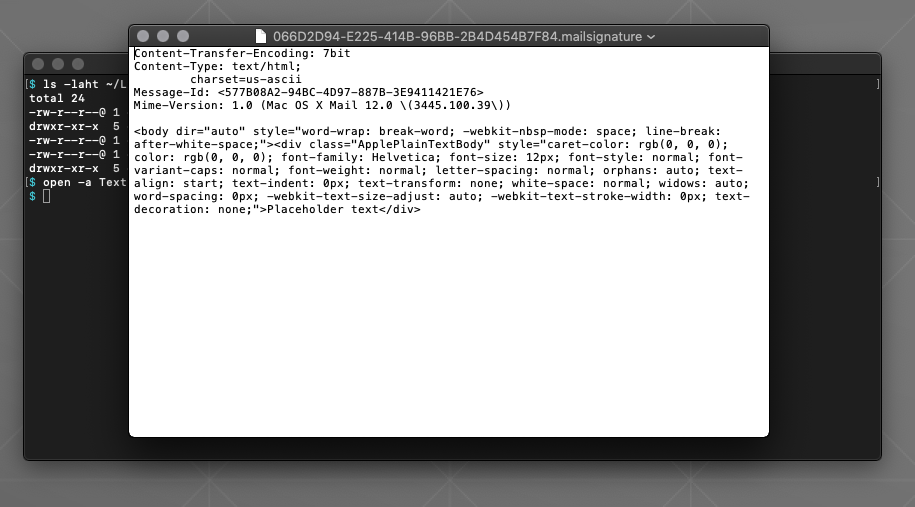
Terminal.app does not respond to double-clicking the file so how can you open the .mailsignature files? You can copy/paste the following command on the keyboard, all on one line.
open -a TextEdit ~/Library/Mobile\ Documents/com\~apple\~mail/Data/V4/Signatures/*.mailsignature
Even if the text is wrapping above, ensure the command is pasted on one line.

This line tells Terminal to open all files in that directory that have a filename that ends with .mailsignature, and to open them using the TextEdit application.

Once you have the file(s) open in TextEdit, move on to step 5.
Locate the Placeholder File (Not Using iCloud Drive)
(You should only do this step if NOT using iCloud Drive.)
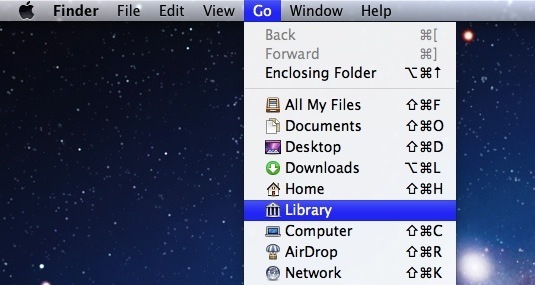
Luckily for you, we can use Finder to open the signature file we need. In Finder, select the menu bar item Go > Go to Folder...
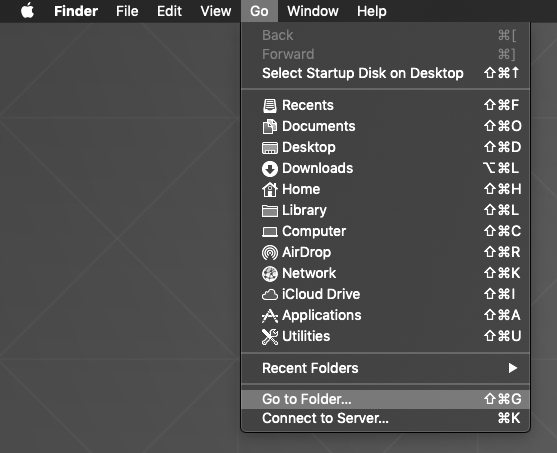
A panel will popup that allows you to input the direct path to the signature folder. Copy/paste the following line into the box:
~/Library/Mail/V8/MailData/Signatures/

After clicking Go, a finder window should appear with several files.

Look at the file names and notice the ones that end in .mailsignature. These are the files we are interested in working with.
More specifically, we are looking for the placeholder signature file you created earlier. Locate the most recently modified .mailsignature file.

If you have more than one signature file in there, or cannot determine which is the placeholder, you can open each of them to help you find the right file. Simply repeat the following process for all the files.
Right-click on the .mailsignature file in Finder, select Open With, and choose TextEdit.

If TextEdit is not an option, choose Other..., and then choose Applications > TextEdit.
Once you have the file(s) open in TextEdit, move on to step 5.
Find the Right Placeholder File
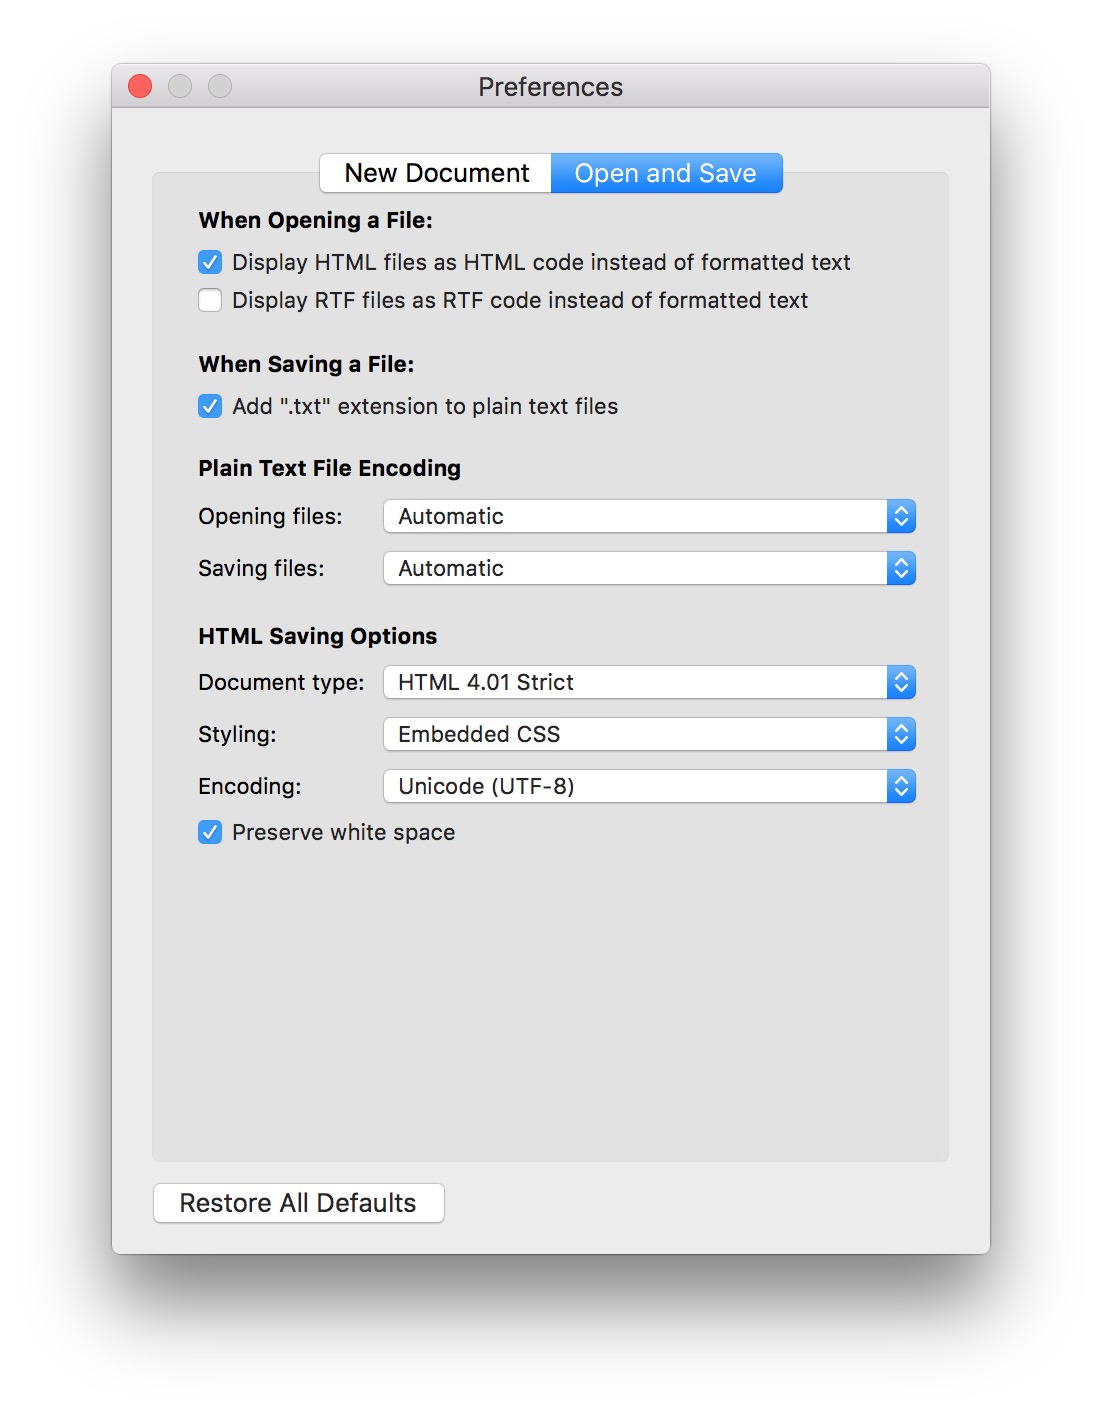
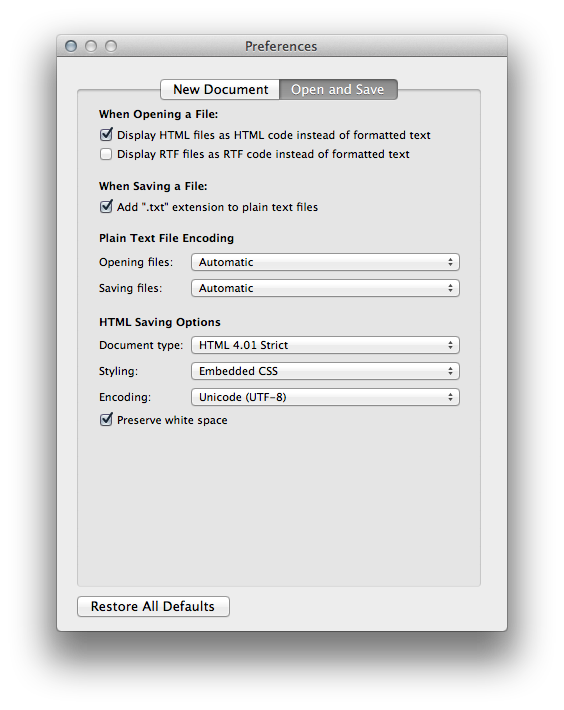
Once open in TextEdit, if the pages looks like your finished signature instead of code, you have to make sure the Display HTML files as HTML code instead of formatted text option is checked in the Preferences for TextEdit.
In TextEdit, go to the menu bar on the top of the screen and choose TextEdit > Preferences, then click the Open and Save tab and select the Display HTML files as HTML code... option on the top line.

Repeat step 4a or 4b again, and you will see the code instead of the finished signature.
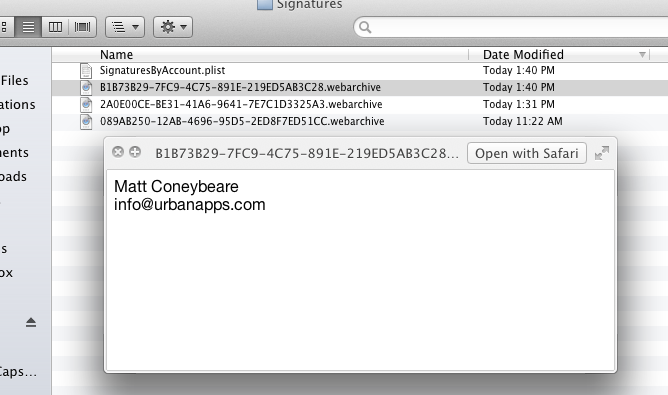
Now that you have the .mailsignature file(s) open in TextEdit, we need to ensure it is the right one.
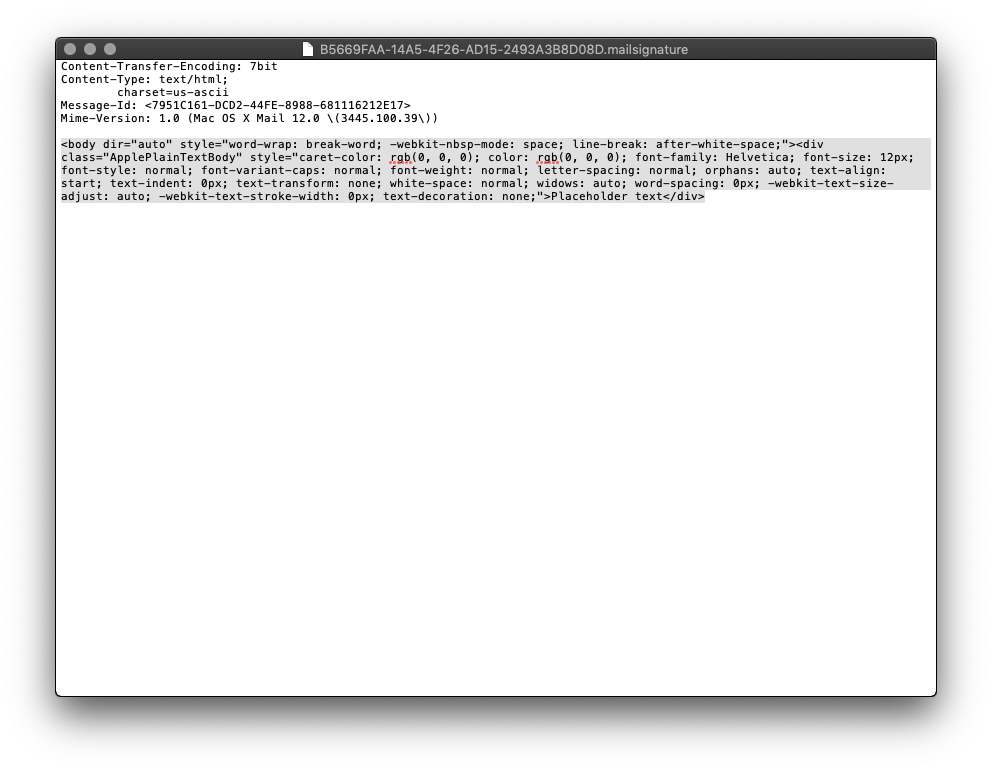
Make sure that the placeholder file we created earlier is open by scanning each of the open TextEdit documents for the
placeholder text you entered earlier in the Mail.app Preferences panel.
Because the text I entered earlier was Placeholder text, this is what I am looking for now.

Look for your placeholder text within the file's HTML code. Here, we know we have the correct file because we can clearly see our placeholder text: Placeholder text
If you cannot find the placeholder, you may still be in "edit" mode on the signature. Try closing the Mail > Preferences Window,
quitting Apple Mail and repeating the previous steps.
If you still cannot find the placeholder, you may need to double check that you are/aren't using iCloud Drive, as detailed in an earlier step.
Select and Delete the Placeholder Code
When you have located the right placeholder .mailsignature file, keep it open and close all other TextEdit windows.
Feel free to resize the window to make text editing a bit easier.
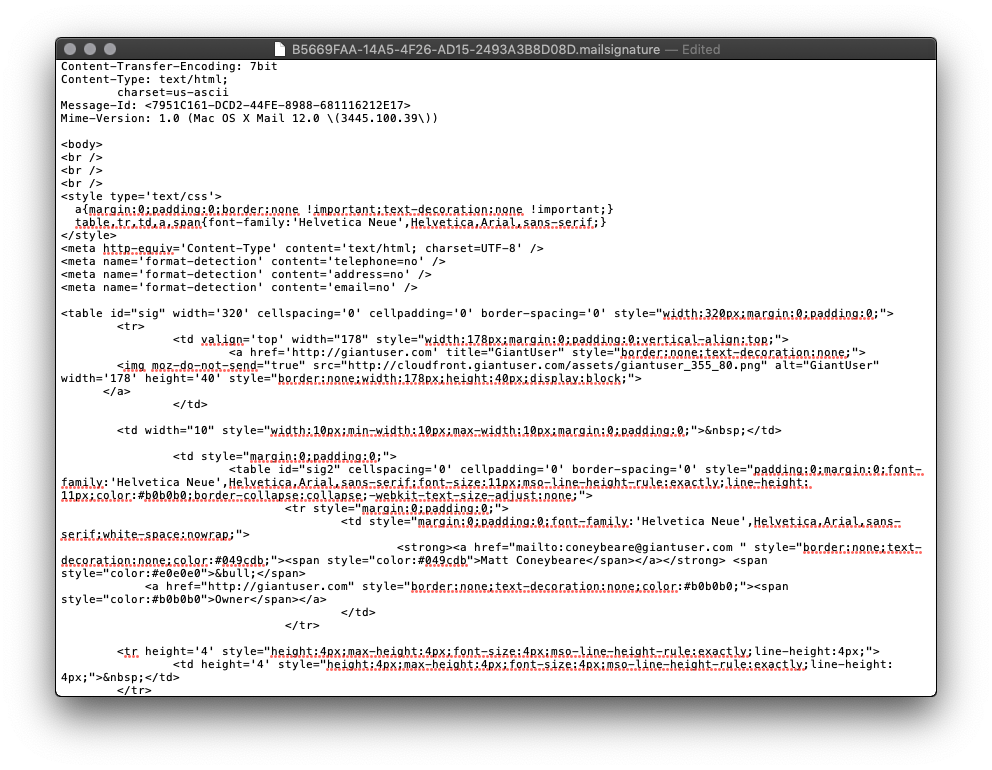
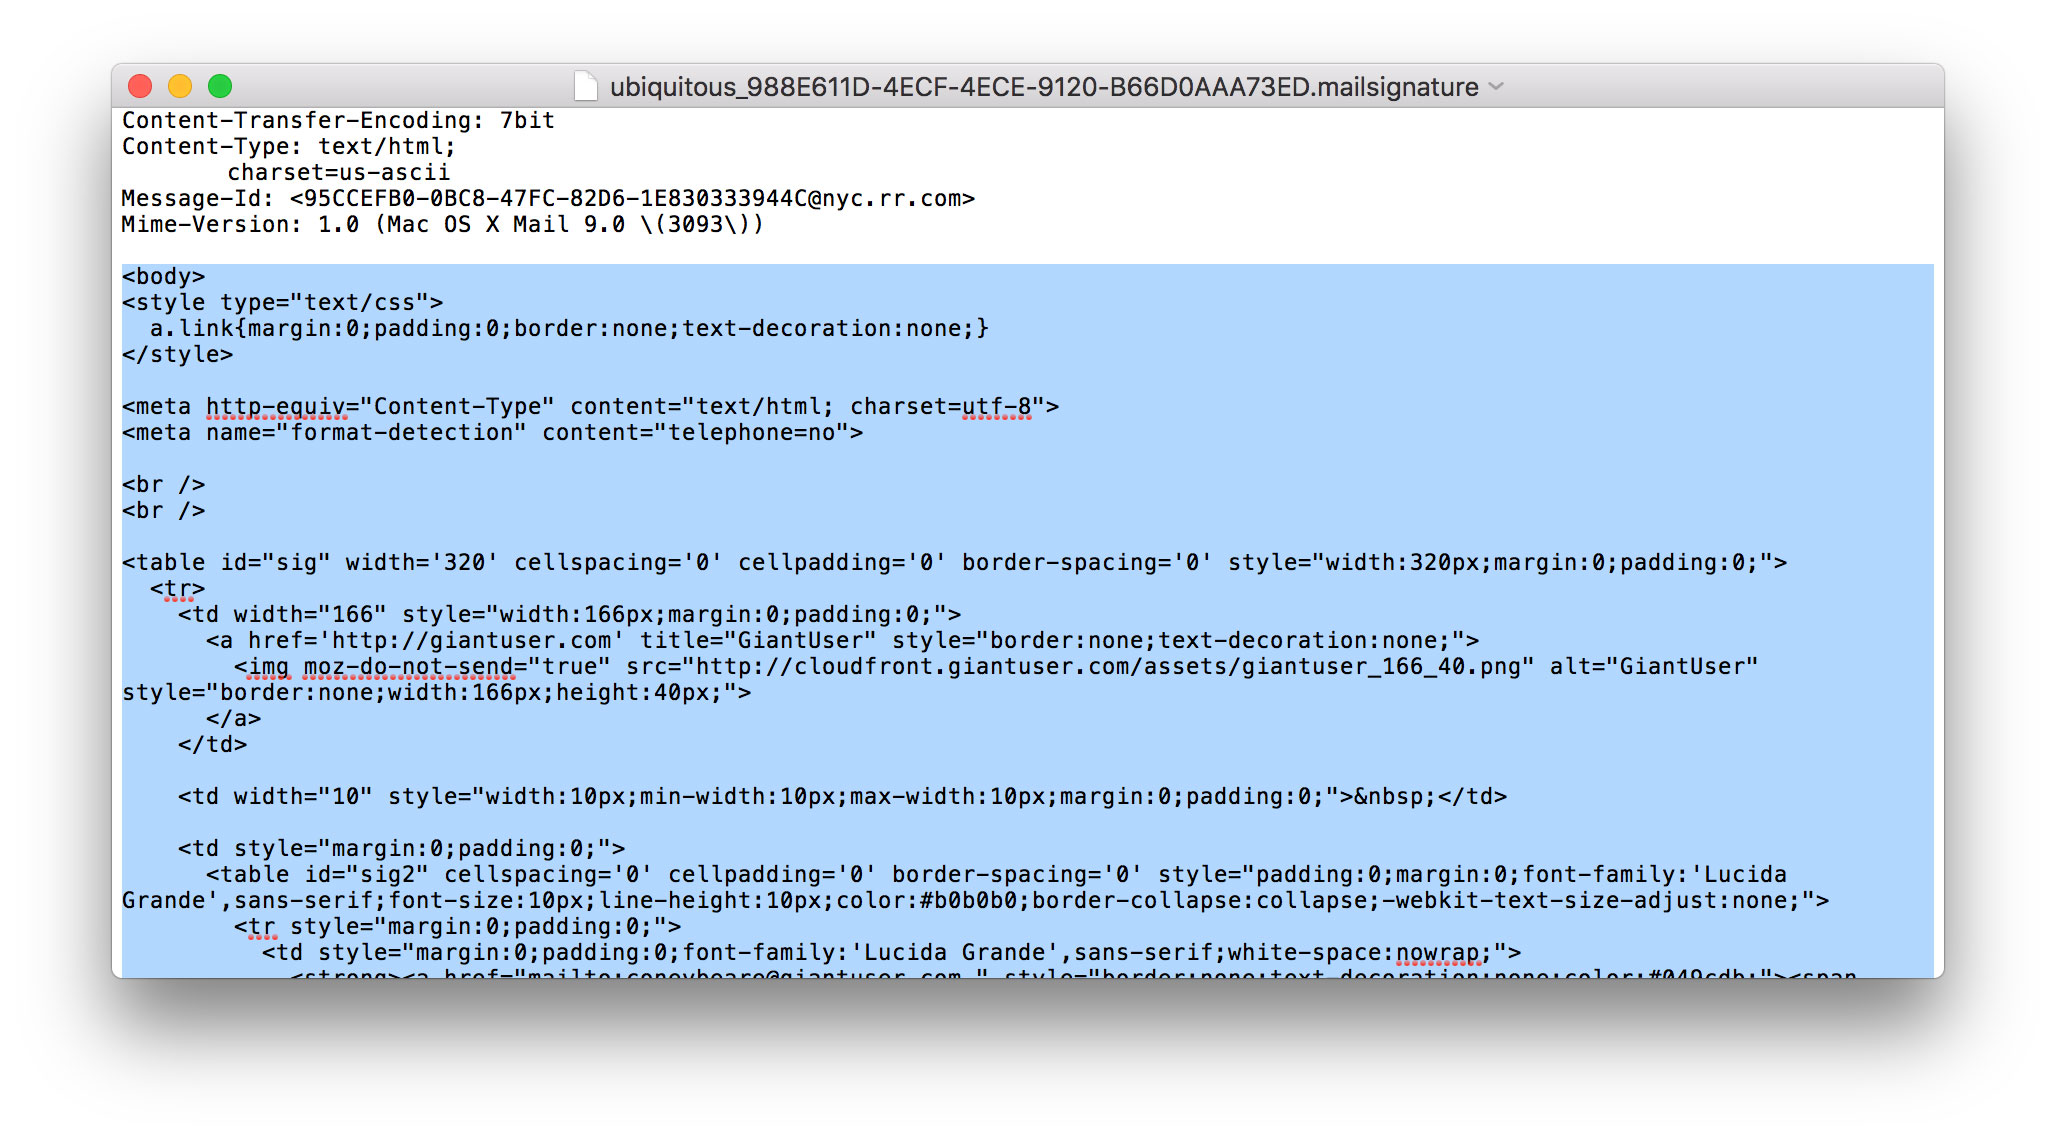
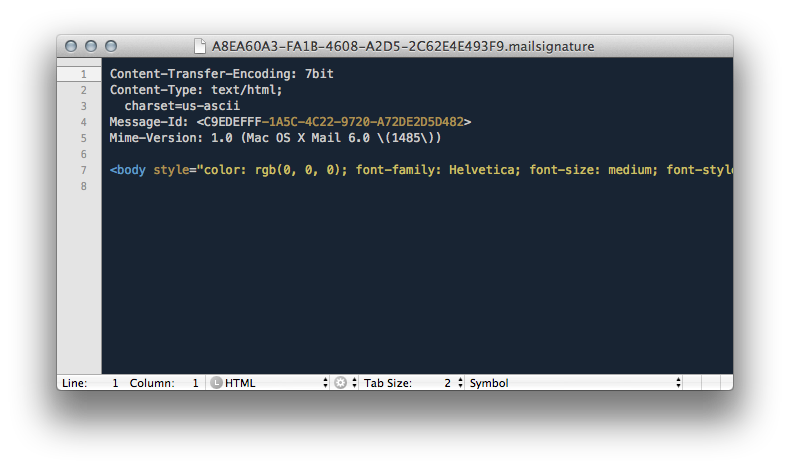
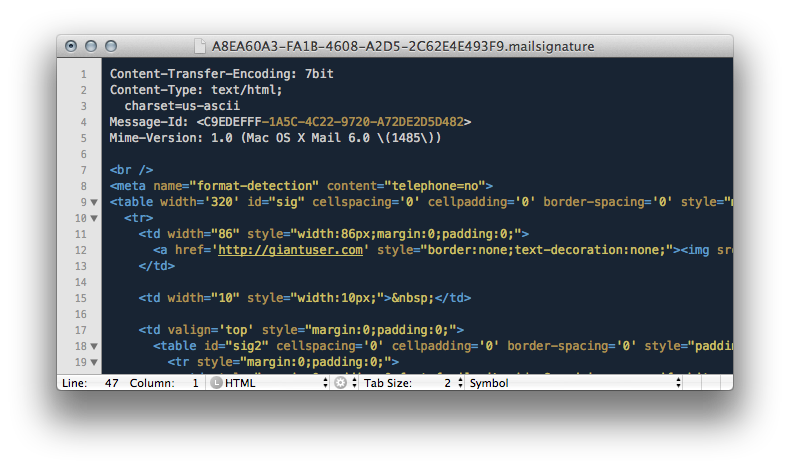
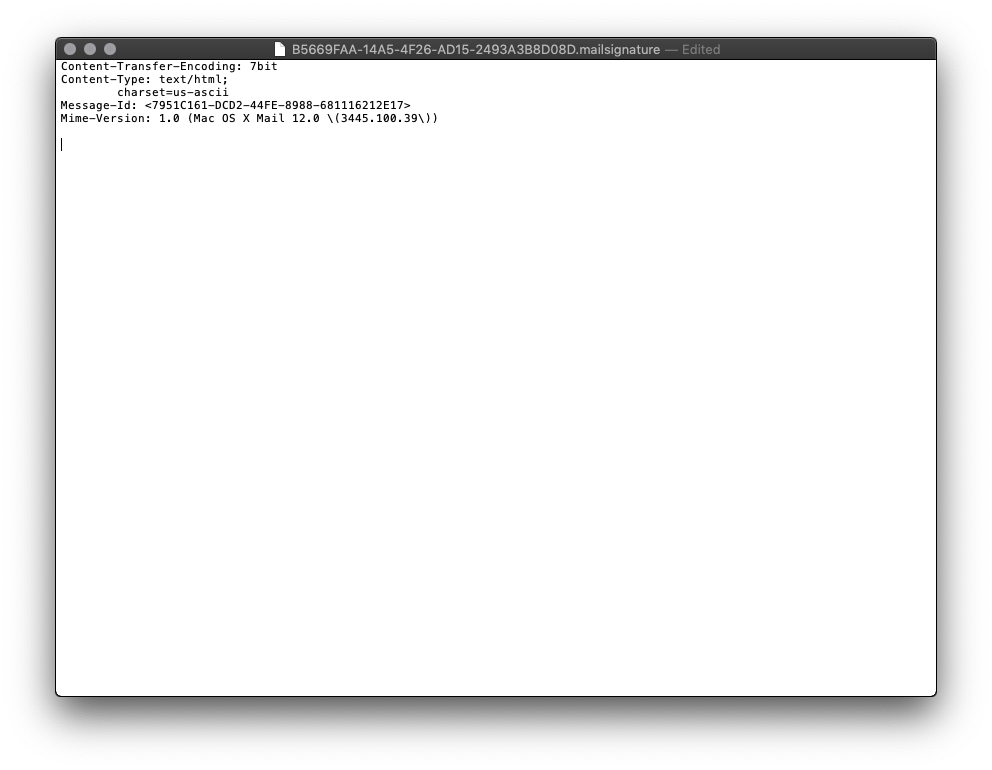
You will see a few metadata lines on the top of the file and some HTML code below it. Select all that code from the line starting with body,
all the way to the end of the file.
Keep the top metadata lines, delete the entire block of placeholder HTML code.

Open Your New HTML File
Locate the HTML file we provided you as part of your completed order.
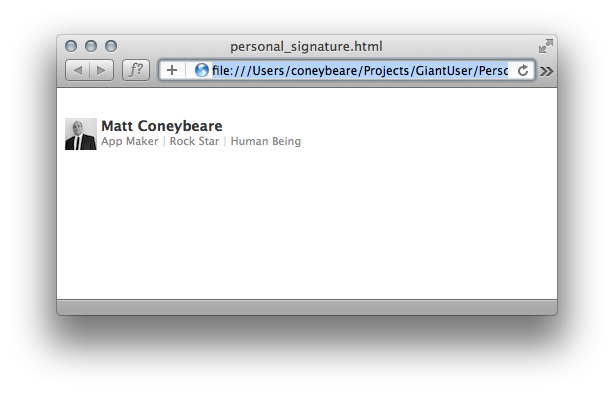
If you were to try and open it, it will open in Safari because it is a webpage, so we need to open it in TextEdit to see the the code so we can copy and paste it into the placeholder file, just like before
Right click on the HTML file in Finder and select Open With > TextEdit.app to open it in TextEdit.
Copy the New HTML Code
Now that the code for the new signature is visible, select all of it, then copy to your clipboard.
Once copied, you can close the new signature HTML file.
Replace the HTML Contents
Still keeping the top metadata lines, paste in your own custom HTML code from earlier.

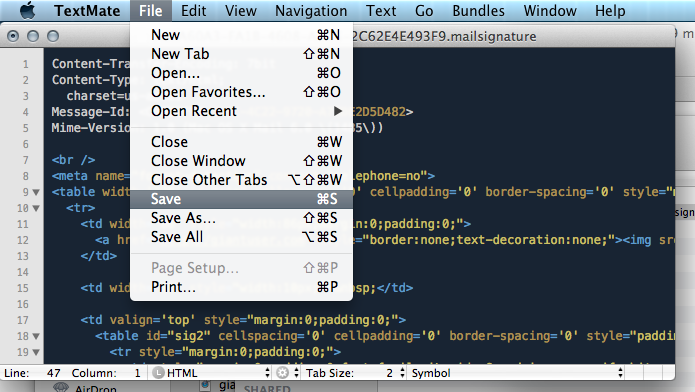
Save and Quit
Save and close the file, then Quit TextEdit.
Lock the Mail Signature File
If you are using iCloud Drive, skip this step and proceed to the next step.
You can determine if you are using iCloud for Apple Mail by checking System Preferences > iCloud.
You need to check that both the iCloud Drive check box is checked and, after clicking options, that the Mail.app checkbox is also checked.
If both are checked, then you are using iCloud Drive to sync your settings and signatures across your Mac computers.
Still unsure? Skip this step — you can redo the steps and include this one if your signature is not working correctly at the end.
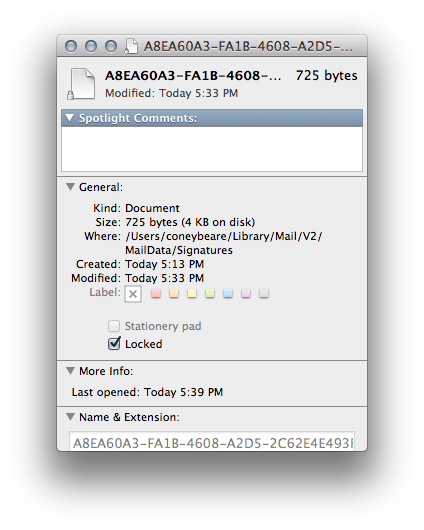
Even though you save this file, Apple Mail may use the original version and overwrite your new signature unless you lock the file.
With your text editor now closed and the file saved, go back to terminal, enter the following line, and lock all the mailsignature files in the folder.
Lock Files:chflags uchg ~/Library/Mail/V8/MailData/Signatures/*.mailsignature
If you get an Operation not permitted error, you need to open System Preferences > Security & Privacy > Privacy, then select Full Disk Access on the left column, and ensure Terminal is on the list in the right. You may need to tick the checkbox next to it, or use the + button to add it. Then restart Terminal and try again.
If you mess up, you can unlock the files with this command.
Unlock Files:chflags nouchg ~/Library/Mail/V8/MailData/Signatures/*.mailsignature
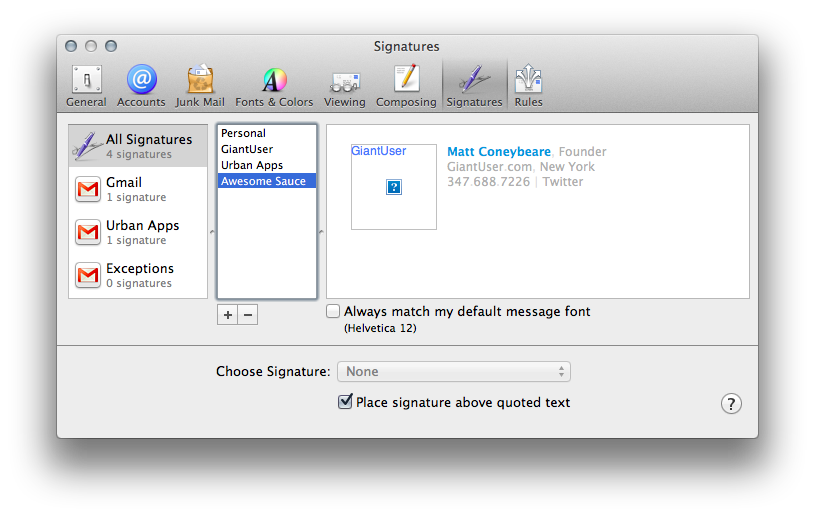
Restart Mail App
Open Apple Mail and go back to Preferences > Signatures. If you have images in your signature,
they will not show here in the preview, but they will show in the real signature
as long as your coded image source location is valid.
Send a Test Email
To test that it is working correctly, simply compose a new email using the account you associated this new signature with, and set the signature (right side of screen) to be the one with the name you created earlier. If the images show, and everything looks as it should, you have succeeded!

Apple Mail on 10.15.X (Catalina)
Apple Mail has a pretty complicated process of installing your signature. Don't worry though! We will walk you through it step-by-step. You will be using the HTML file we provided to you for this process.
Add a Placeholder Signature
In Apple Mail, open Preferences > Signatures
Once open, create a new signature.

Name the signature something meaningful in the central column. Replace the signature contents on the right with some placeholder text. This text should be recognizable to you as we will use it to help identify the correct signature system file later.

Ensure the Always match my default font checkbox is off

Connect the Placeholder to Your Account
Associate the placeholder signature with one of your email accounts by dragging its name from the second column in the Preferences > Signatures window to an email account in the first column.
If you want to setup the signature to be the default for an email account with auto-load when starting a new message, select the email account in the first column, and choose the new signature.

Close and Quit
Close the Preferences window to save it, then Quit Apple Mail.
Locate the Placeholder File
We are going to need to locate the folder containing the placeholder signature. Unfortunately, most of you are not going to be able to use Finder to get to these folders.
Apple goes to great lengths to hide these files from people as they usually contain info that is not usually editable by hand.
Trying to navigate to them by clicking in Finder will usually lead you to your visible iCloud Drive folder with nowhere else to go.
Don't worry though, I will walk you through an alternative method of getting to the hidden signature files we need to work with.
The files can be in 2 different places depending on whether you are using iCloud Drive or not.
You are most likely using iCloud Drive, even if you are not using an iCloud email address. Check to see if you're using iCloud Drive
by going to System Preferences > Apple ID...
...then look to see if the iCloud Drive checkbox is ticked or not.
Double-check that iCloud Drive is enabled for Mail by clicking the Options button and ensuring the checkbox next to Mail is ticked.

If both of these checkmarks are ticked, then you are using iCloud Drive and should proceed to the next step. If not, skip ahead to step 4b.
Locate the Placeholder File (iCloud Drive)
(You should only do this step if using iCloud Drive.)
Open Terminal.app, found in Applications > Utilities, and copy/paste the following line into the box and press enter.
ls -laht ~/Library/Mobile\ Documents/com\~apple\~mail/Data/V4/Signatures/
Even if the text is wrapping above, ensure the command is pasted on one line.
This line tells Terminal to list all the files in this directory along with some other file info, then sort it by date.
When you press enter you should see a bunch of lines, each of which corresponds to a file and some of its metadata.
Look at the right side column — the file names — and notice the ones that end in .mailsignature.
These are the files we are interested in working with.
If you get an error, make sure you pasted the line in exactly like shown on one line. If you still get an error, you may not be using iCloud Drive and are following the wrong step.

In the new lines that come up in Terminal after running the command, you should see a .mailsignature file that has the date and time of when you started this tutorial. This is the placeholder file. If you don't see a file, then you may have done something wrong in a previous step, and should try again.
As mentioned above, we could normally use Finder to view these folders, but Apple has hidden access to them to prevent direct editing, something we wish to do here. If you have only 1 .mailsignature file, then this is most likely the placeholder file you created in the earlier steps. If you have more than one .mailsignature file in there, then you need to find the one you created earlier. Because this list is sorted top-down by the most recently updated, it will most likely be the top one, but you can check by opening them all and seeing their contents.
Terminal.app does not respond to double-clicking the file so how can you open the .mailsignature files? You can copy/paste the following command on the keyboard, all on one line.
open -a TextEdit ~/Library/Mobile\ Documents/com\~apple\~mail/Data/V4/Signatures/*.mailsignature
Even if the text is wrapping above, ensure the command is pasted on one line.

This line tells Terminal to open all files in that directory that have a filename that ends with .mailsignature, and to open them using the TextEdit application.

Once you have the file(s) open in TextEdit, move on to step 5.
Locate the Placeholder File (Not Using iCloud Drive)
(You should only do this step if NOT using iCloud Drive.)
Luckily for you, we can use Finder to open the signature file we need. In Finder, select the menu bar item Go > Go to Folder...

A panel will popup that allows you to input the direct path to the signature folder. Copy/paste the following line into the box:
~/Library/Mail/V7/MailData/Signatures/

After clicking Go, a finder window should appear with several files.
Look at the file names and notice the ones that end in .mailsignature. These are the files we are interested in working with.
More specifically, we are looking for the placeholder signature file you created earlier. Locate the most recently modified .mailsignature file.
If you have more than one signature file in there, or cannot determine which is the placeholder, you can open each of them to help you find the right file. Simply repeat the following process for all the files.
Right-click on the .mailsignature file in Finder, select Open With, and choose TextEdit.

If TextEdit is not an option, choose Other..., and then choose Applications > TextEdit.
Once you have the file(s) open in TextEdit, move on to step 5.
Find the Right Placeholder File
Once open in TextEdit, if the pages looks like your finished signature instead of code, you have to make sure the Display HTML files as HTML code instead of formatted text option is checked in the Preferences for TextEdit.
In TextEdit, go to the menu bar on the top of the screen and choose TextEdit > Preferences, then click the Open and Save tab and select the Display HTML files as HTML code... option on the top line.
Repeat step 4a or 4b again, and you will see the code instead of the finished signature.
Now that you have the .mailsignature file(s) open in TextEdit, we need to ensure it is the right one.
Make sure that the placeholder file we created earlier is open by scanning each of the open TextEdit documents for the
placeholder text you entered earlier in the Mail.app Preferences panel.
Because the text I entered earlier was Placeholder text, this is what I am looking for now.

Look for your placeholder text within the file's HTML code. Here, we know we have the correct file because we can clearly see our placeholder text: Placeholder text
If you cannot find the placeholder, you may still be in "edit" mode on the signature. Try closing the Mail > Preferences Window,
quitting Apple Mail and repeating the previous steps.
If you still cannot find the placeholder, you may need to double check that you are/aren't using iCloud Drive, as detailed in an earlier step.
Select and Delete the Placeholder Code
When you have located the right placeholder .mailsignature file, keep it open and close all other TextEdit windows.
Feel free to resize the window to make text editing a bit easier.
You will see a few metadata lines on the top of the file and some HTML code below it. Select all that code from the line starting with body,
all the way to the end of the file.

Keep the top metadata lines, delete the entire block of placeholder HTML code.

Open Your New HTML File
Locate the HTML file we provided you as part of your completed order.
If you were to try and open it, it will open in Safari because it is a webpage, so we need to open it in TextEdit to see the the code so we can copy and paste it into the placeholder file, just like before
Right click on the HTML file in Finder and select Open With > TextEdit.app to open it in TextEdit.
Copy the New HTML Code
Now that the code for the new signature is visible, select all of it, then copy to your clipboard.
Once copied, you can close the new signature HTML file.
Replace the HTML Contents
Still keeping the top metadata lines, paste in your own custom HTML code from earlier.
Save and Quit
Save and close the file, then Quit TextEdit.
Lock the Mail Signature File
If you are using iCloud Drive, skip this step and proceed to the next step.
You can determine if you are using iCloud for Apple Mail by checking System Preferences > iCloud.
You need to check that both the iCloud Drive check box is checked and, after clicking options, that the Mail.app checkbox is also checked.
If both are checked, then you are using iCloud Drive to sync your settings and signatures across your Mac computers.
Still unsure? Skip this step — you can redo the steps and include this one if your signature is not working correctly at the end.
Even though you save this file, Apple Mail may use the original version and overwrite your new signature unless you lock the file.
With your text editor now closed and the file saved, go back to terminal, enter the following line, and lock all the mailsignature files in the folder.
Lock Files:chflags uchg ~/Library/Mail/V7/MailData/Signatures/*.mailsignature
If you get an Operation not permitted error, you need to open System Preferences > Security & Privacy > Privacy, then select Full Disk Access on the left column, and ensure Terminal is on the list in the right. You may need to tick the checkbox next to it, or use the + button to add it. Then restart Terminal and try again.
If you mess up, you can unlock the files with this command.
Unlock Files:chflags nouchg ~/Library/Mail/V7/MailData/Signatures/*.mailsignature
Restart Mail App
Open Apple Mail and go back to Preferences > Signatures. If you have images in your signature,
they will not show here in the preview, but they will show in the real signature
as long as your coded image source location is valid.

Send a Test Email
To test that it is working correctly, simply compose a new email using the account you associated this new signature with, and set the signature (right side of screen) to be the one with the name you created earlier. If the images show, and everything looks as it should, you have succeeded!

Apple Mail on 10.11.X (El Capitan)
Apple Mail has a pretty complicated process of installing your signature. Don't worry though! We will walk you through it step-by-step. You will be using the HTML file we provided to you for this process.
Add a Placeholder Signature
In Apple Mail, go to Preferences > Signatures and create a signature with any random content. Name it something meaningful in the central column. You will be swapping this out later.

Connect the Placeholder to Your Account
Associate the placeholder signature with one of your email accounts by dragging its name from the second column in the Preferences > Signatures window to an email account in the first column.
Close and Quit
Close the Preferences window to save it, then quit Apple Mail.
Locate the Placeholder's File
We are going to need to locate the folder containing the placeholder signature. Unfortunately, you are not going to be able to use Finder to get to these folders.
Apple goes to great lengths to hide these files from people as they usually contain info that is not editable by hand.
Trying to navigate through by clicking in Finder will usually lead you to your visible iCloud Drive folder with nowhere to go.
Don't worry though, I will walk you through an alternative method of getting at those files.
The files can be in 2 different places depending on whether you are using iCloud Drive or not.
You are most likely using iCloud Drive, even if you are not using an iCloud email address.
Check by going to System Preferences > iCloud, then seeing if the iCloud Drive checkbox is ticked or not.
Using iCloud Drive:~/Library/Mobile\ Documents/com~apple~mail/Data/V3/MailData/Signatures/
Not using iCloud Drive:~/Library/Mail/V3/MailData/Signatures/
Even if the text is wrapping above, ensure the command is pasted on one line.
Open Terminal.app, found in Applications > Utilities, paste the following line into the box and press enter:
Using iCloud Drive:ls -laht ~/Library/Mobile\ Documents/com~apple~mail/Data/V3/MailData/Signatures/
Not using iCloud Drive:ls -laht ~/Library/Mail/V3/MailData/Signatures/
Even if the text is wrapping above, ensure the command is pasted on one line.

This line tells Terminal to list all the files in this directory along with some other file info, then sort it by date.
When you press enter you should see a bunch of lines, each of which corresponds to a file and some of its metadata.
Look at the right side column — the file names — and notice some that start with ubiquitous_ and end in .mailsignature.
These are the files we are interested in working with.
If you get an error, make sure you pasted the line in exactly like shown on one line. If you still get an error, try the next path on the list above.
As mentioned above, we could normally use Finder to view these folders, but Apple has hidden access to them to prevent direct editing, something we wish to do here. If you have only 1 ubiquitous mailsignature file, then this is most likely the placeholder file you created in step 1. If you have more than one mailsignature file in there, then you need to find the one you created in step 1. Because this list is sorted top-down by the most recently updated, it will most likely be the top one, but you can check by opening them all and seeing ther contents.
Terminal.app does not respond to double-clicking the file so how can you open the mailsignature files? You can copy/paste the following command on the keyboard, all on one line.
Using iCloud Drive:open -a TextEdit ~/Library/Mobile\ Documents/com~apple~mail/Data/V3/MailData/Signatures/ubiquitous_*.mailsignature
Not using iCloud Drive:open -a TextEdit ~/Library/Mail/V3/MailData/Signatures/*.mailsignature
Even if the text is wrapping above, ensure the command is pasted on one line.

This line tells Terminal to open all files in that directory that have a filename that starts with ubiquitous_ and ends with mailsignature, and to open them using the TextEdit application.
Once you have these files open in TextEdit, move on to next step.
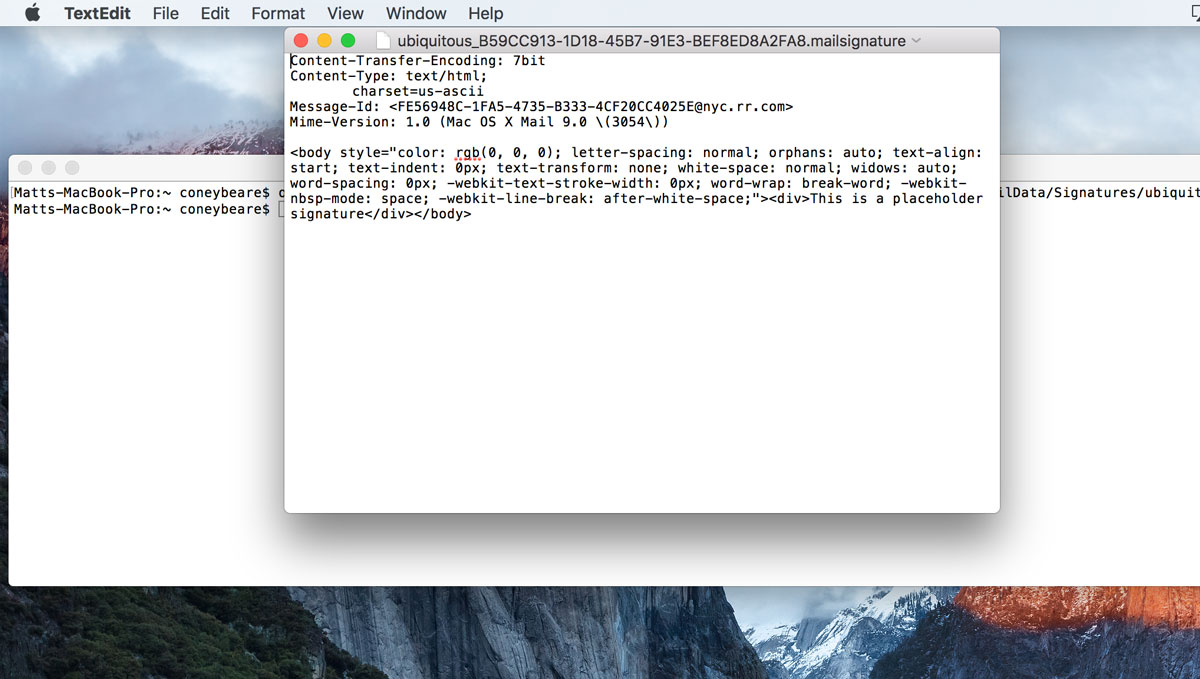
Find the Right Placeholder File
When you created a temporary placeholder signature in step 1, Mail automatically created a ubiquitout_XXXXXXX.mailsignature file that represents it.
This placeholder now should be open in TextEdit.
If you have more than one ubiquitout_XXXXXXX.mailsignature files open in TextEdit, we have to find the right one amongst them now.
To help ensure you have the right file, look the one you think is your placeholder in TextEdit.
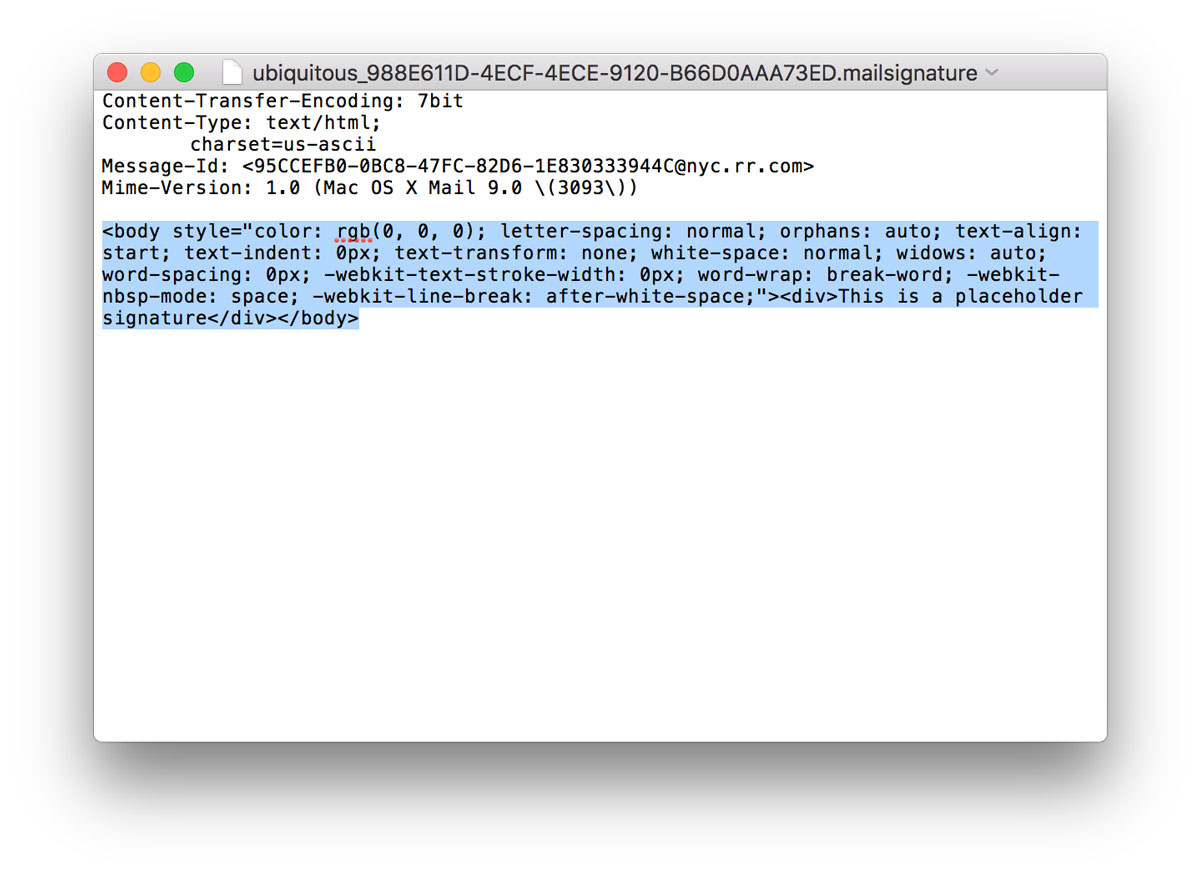
You should see the placeholder text you entered in step 1, along with other code and metadata.

Look for your placeholder text in the highlighted part shown in the image above. Here, we know we have the correct file because we can clearly see our placeholder text: "This is a placeholder."
If you cannot find the placeholder, you may still be in "edit" mode on the signature. Try closing the Mail > Preferences Window, quitting Apple Mail and opening the files using the process outlined in the previous step.
If you still cannot find the placeholder, you may need to try one of the other folders from the above step.
Select the Placeholder Code
When you have located the right placeholder .mailsignature file, keep it open and close all other TextEdit windows.
Feel free to resize the window to make text editing a bit easier.
You will see a few metadata lines on the top of the file and some html code below it.
Select only the placeholder code and delete, leaving the metadata on top in place in the file.
Open Your New HTML File
Locate the HTML file we provided you as part of your completed order.
If you were to try and open it, it will open in Safari because it is a webpage, so we need to open it in TextEdit to see the the code so we can copy and paste it into the placeholder file.
Right click on the HTML file in Finder and select Open With > TextEdit.app to open it in TextEdit.
Once open in TextEdit, if the page looks like your finished signature instead of the html code, you have to make sure the Display HTML files as HTML code instead of formatted text option is checked in the Preferences for TextEdit.
In TextEdit, go to the manu bar on the top of the screen and choose TextEdit > Preferences, then click the Open and Save tab and select the Display HTML files as HTML code... option on the top line.
Reopen the HTML file again, and you will see the code instead of the finished signature.
Copy the New HTML Code
Now that the code for the new signature is visible, select all of it, then copy to your clipboard.
Once copied, you can close the new signature HTML file.
Replace the HTML Contents
Back in the placeholder file, keep the top metadata lines on top, and paste the new signature HTML code we just copied into your clipboard below it.

Save and Quit
Save and close the signature code file, then quit the TextEdit app.
Lock the Mail Signature File
If you are using iCloud Drive, skip this step and proceed to the next step. You can determine if you are using iCloud for Apple Mail by checking System Preferences > iCloud. Still unsure? Skip this step — you can redo the steps and include this one if your signature is not working correctly at the end.
Even though you save this file, Apple Mail may use the original version and overwrite your new signature unless you lock the file.
With your text editor now closed and the file saved, go back to terminal, enter the following line, and lock all the mailsignature files in the folder.
Lock Files:chflags uchg ~/Library/Mail/V3/MailData/Signatures/*.mailsignature
If you mess up, you can unlock the files with this command.
Unlock Files:chflags nouchg ~/Library/Mail/V3/MailData/Signatures/*.mailsignature
Restart Mail App
Open Apple Mail and go back to Preferences > Signatures. If you have images in your signature,
they will will not show here in the preview, but they will show in the real signature
once you compose a new email.
Send a Test Email
To test that it is working correctly, simply compose a new email using the account you associated this signature with in step 2, and set the signature (right side of screen) to be the one with the name you created in step 1. If the images show, and everything looks as it should, you have succeeded!
Gmail
Gmail HTML signature installation is really easy. You just copy the HTML from your browser and paste it into Gmail setting. We will still walk you through it step-by-step though. You will only be using the HTML file we provided to you.
Open the HTML File
Open the html file in your default web browser. You can double click the file, or drag it onto the browser icon to open it.
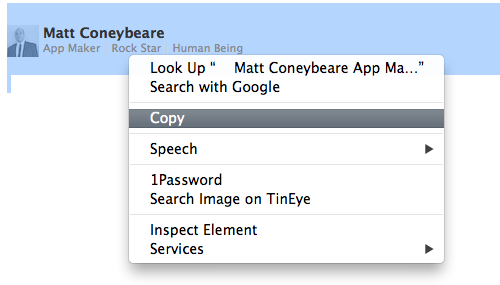
Copy the HTML Content
Select and copy the entire page onto the clipboard. Some browsers let you drag the mouse around everything to select it, others will need to go to Edit > Select All. Once you have the content selected, copy it to the clipboard by going to Edit > Copy.

Paste the HTML Content
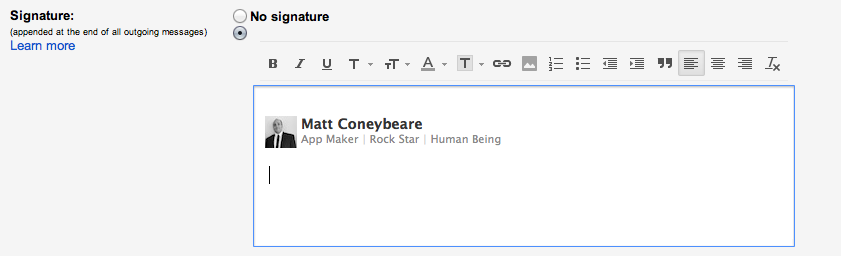
Click inside the Signature edit box and go to Edit > Paste to paste in the HTML you have stored in the clipboard. Scroll down and click "Save Changes".
Troubleshooting
Colored Links or Formatting Errors
Depending on which version of which browser you are using, copying and pasting could manipulate the HTML code before and/or after sitting on your clipboard. If you are having problems with the install into Gmail using Chrome or Safari, please try using the Firefox browser for both copying and pasting into Gmail. We have seen the least amount of problems when customers use this browser for installation.
Apple Mail on 10.13.X (High Sierra)
Apple Mail has a pretty complicated process of installing your signature. Don't worry though! We will walk you through it step-by-step. You will be using the HTML file we provided to you for this process.
Add a Placeholder Signature
In Apple Mail, go to Preferences > Signatures and create a signature with any random content. Name it something meaningful in the central column. You will be swapping this out later.

Connect the Placeholder to Your Account
Associate the placeholder signature with one of your email accounts by dragging its name from the second column in the Preferences > Signatures window to an email account in the first column.

Close and Quit
Close the Preferences window to save it, then quit Apple Mail.
Locate the Placeholder File
We are going to need to locate the folder containing the placeholder signature. Unfortunately, you are not going to be able to use Finder to get to these folders.
Apple goes to great lengths to hide these files from people as they usually contain info that is not editable by hand.
Trying to navigate through by clicking in Finder will usually lead you to your visible iCloud Drive folder with nowhere to go.
Don't worry though, I will walk you through an alternative method of getting at those files.
The files can be in 2 different places depending on whether you are using iCloud Drive or not.
You are most likely using iCloud Drive, even if you are not using an iCloud email address.
Check by navigating to System Preferences > iCloud on your computer.
You need to check that both the iCloud Drive check box is checked and, after clicking options, that the Mail.app checkbox is also checked.
If both are checked, then you are using iCloud Drive to sync your settings and signatures across your Mac computers.
Using iCloud Drive:~/Library/Mobile\ Documents/com~apple~mail/Data/V4/Signatures/
Not using iCloud Drive:~/Library/Mail/V5/MailData/Signatures/
Even if the text is wrapping above, ensure the command is pasted on one line.
Open Terminal.app, found in Applications > Utilities, paste the following line into the box and press enter:
Using iCloud Drive:ls -laht ~/Library/Mobile\ Documents/com~apple~mail/Data/V4/Signatures/
Not using iCloud Drive:ls -laht ~/Library/Mail/V5/MailData/Signatures/
Even if the text is wrapping above, ensure the command is pasted on one line.

This line tells Terminal to list all the files in this directory along with some other file info, then sort it by date.
When you press enter you should see a bunch of lines, each of which corresponds to a file and some of its metadata.
Look at the right side column — the file names — and notice some end in .mailsignature.
These are the files we are interested in working with.
If you get an error, make sure you pasted the line in exactly like shown on one line. If you still get an error, try the next path on the list above.
As mentioned above, we could normally use Finder to view these folders, but Apple has hidden access to them to prevent direct editing, something we wish to do here. If you have only 1 mailsignature file, then this is most likely the placeholder file you created in step 1. If you have more than one mailsignature file in there, then you need to find the one you created in step 1. Because this list is sorted top-down by the most recently updated, it will most likely be the top one, but you can check by opening them all and seeing ther contents.
Terminal.app does not respond to double-clicking the file so how can you open the mailsignature files? You can copy/paste the following command on the keyboard, all on one line.
Using iCloud Drive:open -a TextEdit ~/Library/Mobile\ Documents/com~apple~mail/Data/V4/Signatures/*.mailsignature
Not using iCloud Drive:open -a TextEdit ~/Library/Mail/V5/MailData/Signatures/*.mailsignature
Even if the text is wrapping above, ensure the command is pasted on one line.
This line tells Terminal to open all files in that directory that have a filename that ends with mailsignature, and to open them using the TextEdit application.

Once you have these files open in TextEdit, move on to next step.
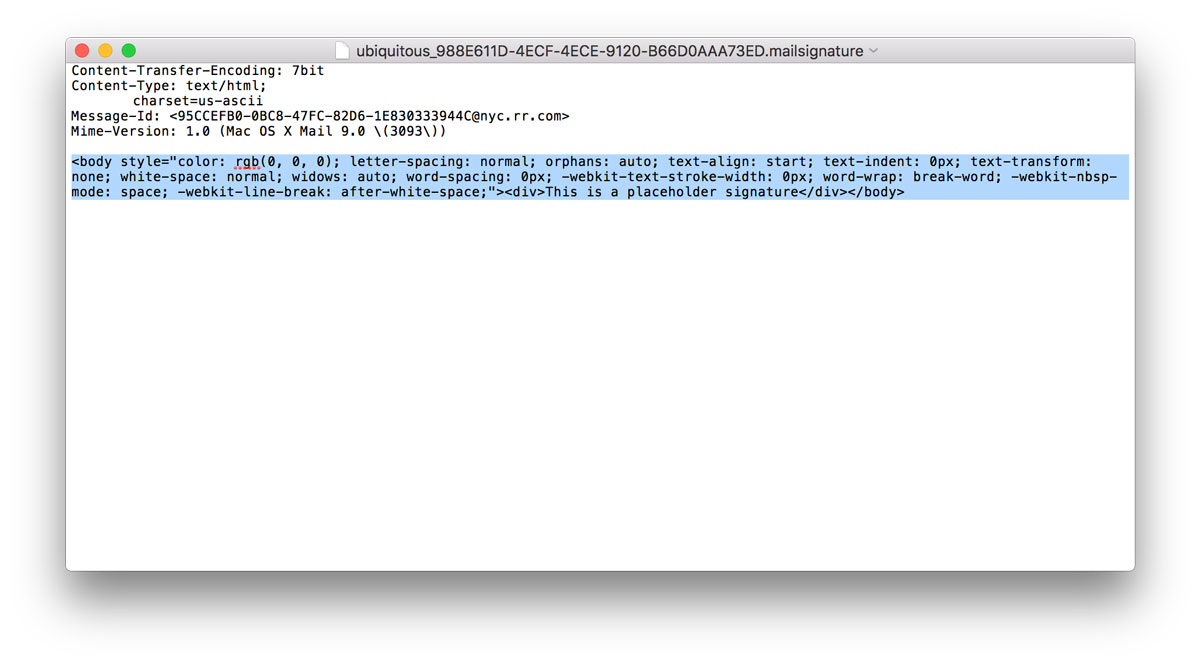
Find the Right Placeholder File
When you created a temporary placeholder signature in step 1, Mail automatically created a XXXXXXX.mailsignature file that represents it.
This placeholder now should be open in TextEdit.
If you have more than one XXXXXXX.mailsignature files open in TextEdit, we have to find the right one amongst them now.
To help ensure you have the right file, look the one you think is your placeholder in TextEdit.
You should see the placeholder text you entered in step 1, along with other code and metadata.
Look for your placeholder text in the highlighted part shown in the image above. Here, we know we have the correct file because we can clearly see our placeholder text: "This is a placeholder."
If you cannot find the placeholder, you may still be in "edit" mode on the signature. Try closing the Mail > Preferences Window, quitting Apple Mail and opening the files using the process outlined in the previous step.
If you still cannot find the placeholder, you may need to try one of the other folders from the above step.
Select the Placeholder Code
When you have located the right placeholder .mailsignature file, keep it open and close all other TextEdit windows.
Feel free to resize the window to make text editing a bit easier.
You will see a few metadata lines on the top of the file and some html code below it.
Select only the placeholder code and delete, leaving the metadata on top in place in the file.

Open Your New HTML File
Locate the HTML file we provided you as part of your completed order.
If you were to try and open it, it will open in Safari because it is a webpage, so we need to open it in TextEdit to see the the code so we can copy and paste it into the placeholder file.
Right click on the HTML file in Finder and select Open With > TextEdit.app to open it in TextEdit.
Once open in TextEdit, if the page looks like your finished signature instead of the html code, you have to make sure the Display HTML files as HTML code instead of formatted text option is checked in the Preferences for TextEdit.
In TextEdit, go to the manu bar on the top of the screen and choose TextEdit > Preferences, then click the Open and Save tab and select the Display HTML files as HTML code... option on the top line.
Reopen the HTML file again, and you will see the code instead of the finished signature.
Copy the New HTML Code
Now that the code for the new signature is visible, select all of it, then copy to your clipboard.
Once copied, you can close the new signature HTML file.
Replace the HTML Contents
Back in the placeholder file, keep the top metadata lines on top, and paste the new signature HTML code we just copied into your clipboard below it.
Save and Quit
Save and close the signature code file, then quit the TextEdit app.
Lock the Mail Signature File
If you are using iCloud Drive, skip this step and proceed to the next step.
You can determine if you are using iCloud for Apple Mail by checking System Preferences > iCloud.
You need to check that both the iCloud Drive check box is checked and, after clicking options, that the Mail.app checkbox is also checked.
If both are checked, then you are using iCloud Drive to sync your settings and signatures across your Mac computers.
Still unsure? Skip this step — you can redo the steps and include this one if your signature is not working correctly at the end.
Even though you save this file, Apple Mail may use the original version and overwrite your new signature unless you lock the file.
With your text editor now closed and the file saved, go back to terminal, enter the following line, and lock all the mailsignature files in the folder.
Lock Files:chflags uchg ~/Library/Mail/V5/MailData/Signatures/*.mailsignature
If you mess up, you can unlock the files with this command.
Unlock Files:chflags nouchg ~/Library/Mail/V5/MailData/Signatures/*.mailsignature
Restart Mail App
Open Apple Mail and go back to Preferences > Signatures. If you have images in your signature,
they will will not show here in the preview, but they will show in the real signature
once you compose a new email.

Send a Test Email
To test that it is working correctly, simply compose a new email using the account you associated this signature with in step 2, and set the signature (right side of screen) to be the one with the name you created in step 1. If the images show, and everything looks as it should, you have succeeded!

iPhone, iPad, and iPod Touch (iOS 7-10)
Apple Mail on iOS has a counter-intuitive, but easy process of installing signatures if you are using iOS 7-10. If you are still on iOS 6 or lower there are still some ways for you to use your signature though, but they are a little cumbersome.
Install Your Signature in Another Program
Part of the process is sending yourself the completed signature, so we will have to get it installed on another program first such as your computer. Refer to the instructions here on GiantUser for your program of choice, then come back when installed.
Send Yourself an Email with Your Signature
After setting up your signature in another app, send yourself an email that includes the signature. Be sure to send it to an email address of yours that you can open in your iOS Mail app.
Copy Your Signature to the Clipboard
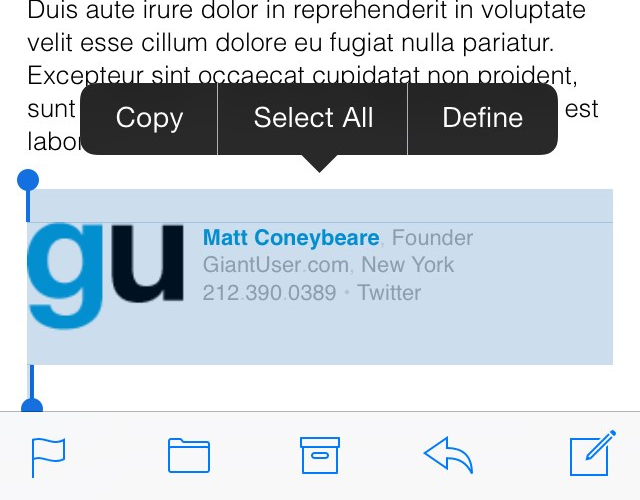
Tap and hold your finger on some part of the email body that is not a link. When the iOS select box appears, drag the little knobs at the end to surround your signature as best as possible. When surrounded, tap the "Copy" button to copy your signatures to your iOS Clipboard.
Paste Your Copied Signature
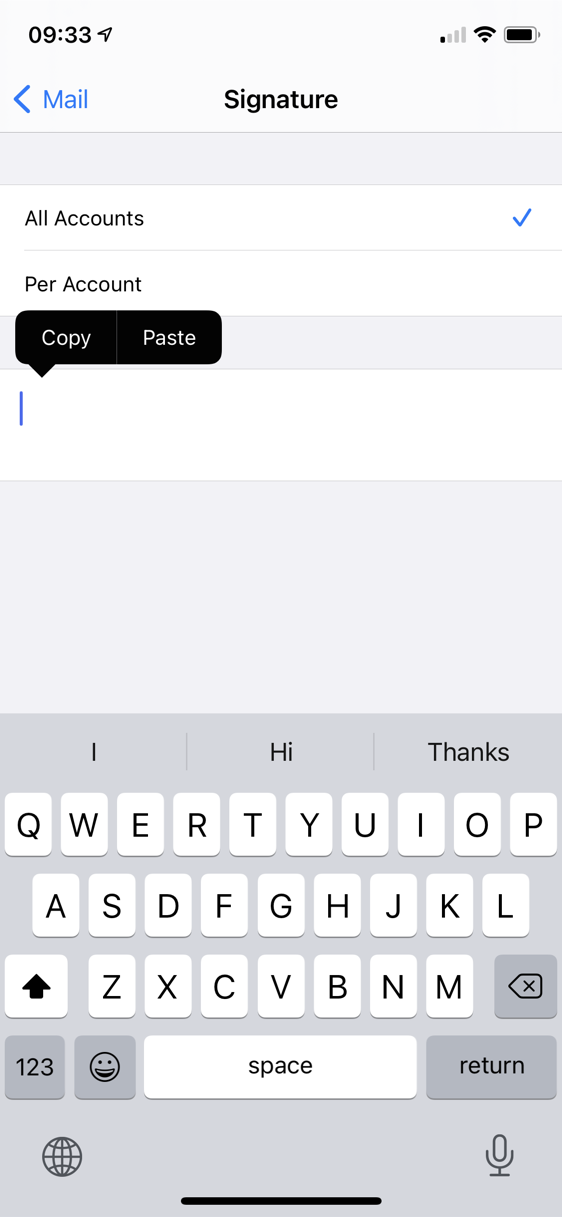
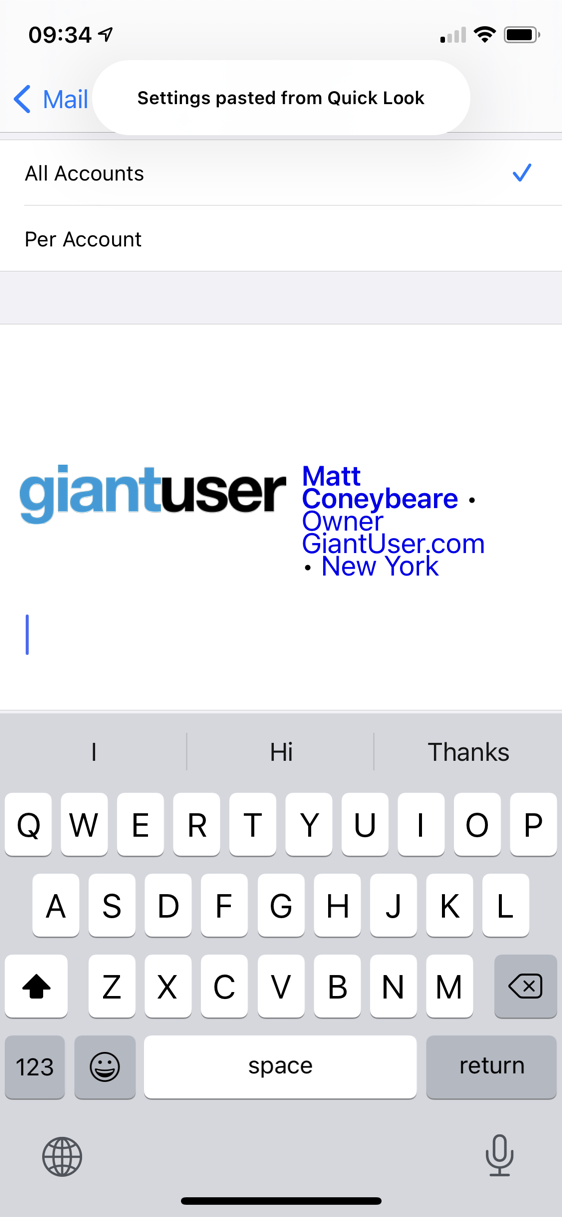
Navigate to the iOS Settings App, then to "Mail, Contacts, Calendars", then to "Signatures". Here you can paste your signature for all email accounts, or just one if you would rather. Tap twice in the empty box and select "Paste" from the popup menu.
NOTE: The signature will not look right, especially if you have special formatting applied to links. We will fix that in the next step.

Shake to Undo
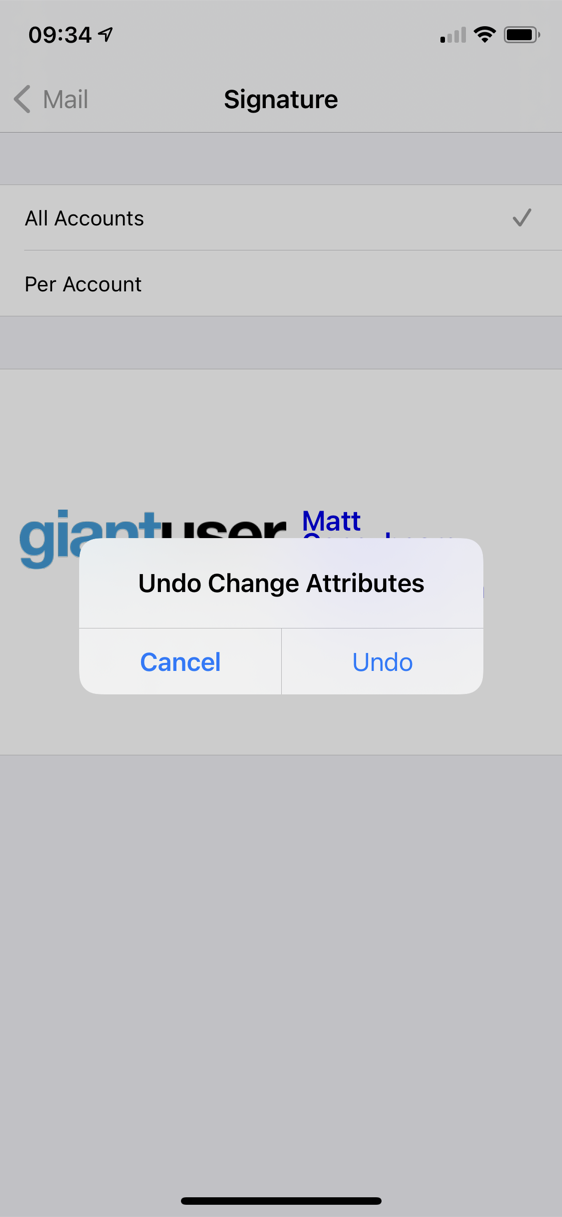
Apple automatically tries to "enhance" the signature when you paste it, causing it to become messed up and distorted. Luckily, they allow us to Undo these "enhancements". Shake your device until an "Undo Change Attributes" screen shows.
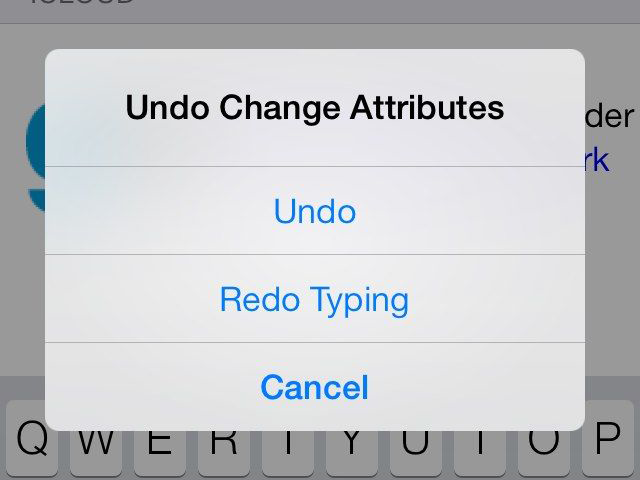
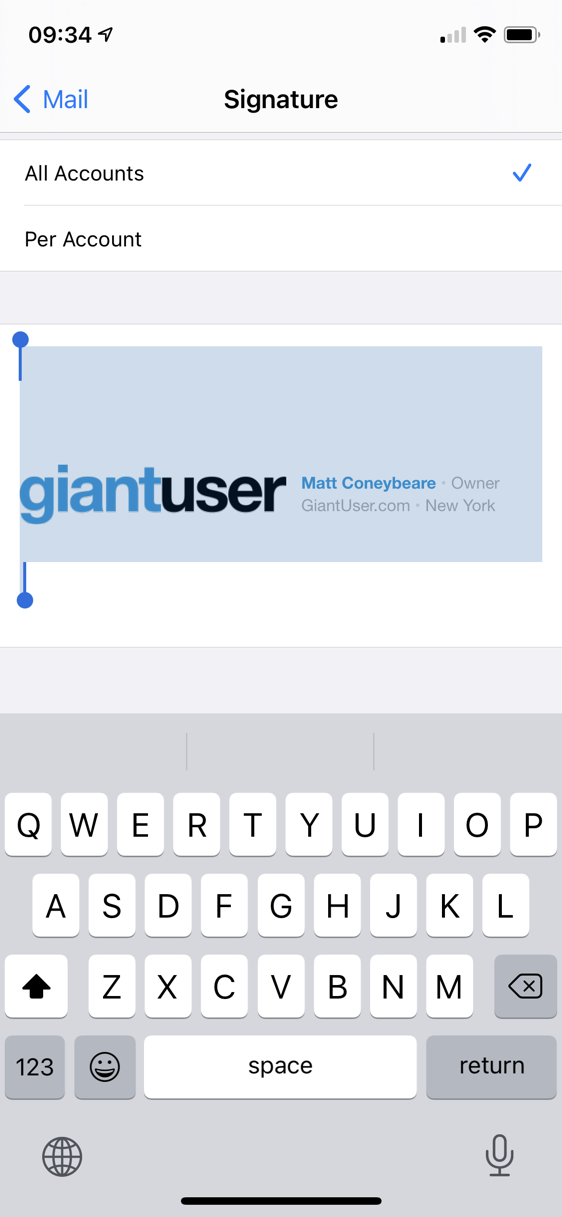
Select "Undo". After this, the signature will revert to your original, pasted design.

Send an Email
Go back to the Mail app and try sending an email from the account that you installed the signature on. It should now work as expected.
iOS 6 and Lower
Apple has not provided an official way to add HTML signatures to outgoing Mail messages. That being said, there are ways to do it that can be a little inconvenient or require Jailbreaking your device.
There are a few apps out there that allow html signatures to be used, but you have to send all of your email through these apps. This means replies, or emails sent from within Mobile Safari and other apps will not have the signature. If you would like to check one of these apps out, we recommend Quick Sig. You will have to copy/paste the HTML code we provide for you into the app. Please check the app for more information and detailed instructions.
The other way to do this is by Jailbreaking your device. GiantUser does not recommend Jailbreaking your device as it may void your warranty and is currently frowned upon by Apple. If you would like to try anyway, a Google search for "Jailbreak HTML Signatures" will give you some ways to do it. All you will need is the HTML code we have provided. Good Luck.
iPhone, iPad, and iPod Touch
Apple Mail on iOS has a counter-intuitive, but easy process of installing signatures if you are using iOS 10 and up.
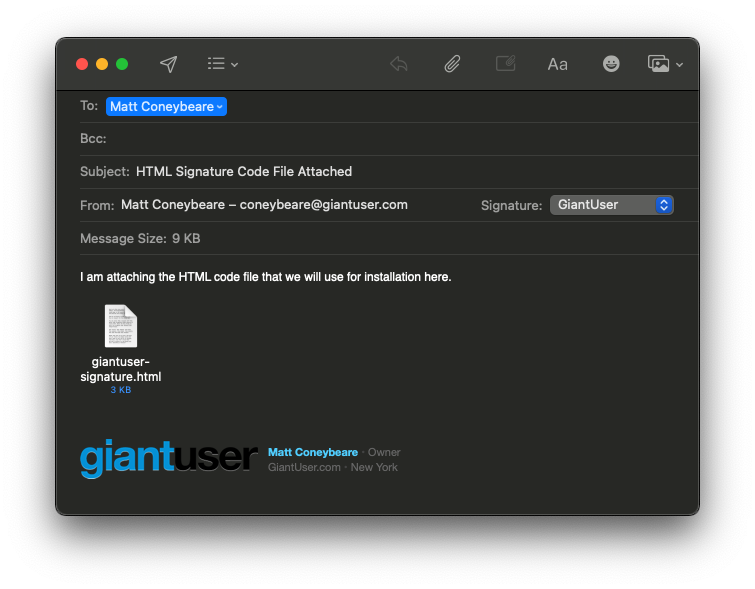
Send Yourself the Signature File
Grab your HTML signature code file and send it as an email attachment to an email account you can access within the Mail App on your iPhone/iPad.
Open the Email in Mail App
Open the iPhone/iPad Mail App and wait for the email you just sent yourself to arrive. When it arrives, open the email.
Open the Signature File
Tap the attached HTML signature code file to open it within the iOS/iPhone Mail app preview screen.
Copy the Signature
Tap and hold your finger on some part of the email body that is not a link. When the select box appears, drag the little blue knobs at the ends to surround your signature as best as possible. It is important that you select ALL whitespace above and blow the signature that you can. When surrounded, tap the
This part of the instructions is hard to complete due to the small size of the preview screen. Tip: try to rotate your phone landscape so you can zoom in more effectively and select the entire signature.
Navigate to Signature Settings
Return to your Home screen, and open the iOS Settings App. Scroll down to Mail and select it. Scroll down to Signatures and select it.
Paste Your Signature
On this screen you can install your signature for all accounts, or individual accounts if you prefer. Choose the account you wish to install the signature in to, and tap in the box. If there is something already there, delete ALL of it before proceeding. Tap twice in the empty box and select Paste from the popup menu.
NOTE: The signature will not look as designed, but this is expected. We will fix it in the next step.
Shake to Undo
Apple automatically tries to apply unnecessary enhancements to the signature when you paste it, causing it alter in unexpected ways. Luckily, we can undo these changes. Physically shake your device in the air until an Undo Change Attributes popup screen shows.
Select Undo. After applying the undo, your signature will revert to the intended design.
Send an Email
Go back to the Mail app and try sending an email from the account that you installed the signature on. It should now work as expected.

Apple Mail on 10.7.X (Lion)
Apple Mail has a slightly more complicated process of installing your signature. Don't worry though! We will walk you through it step-by-step. You will not be using the HTML file we provided to you, but the .webarchive file instead.
Add a Placeholder Signature
In Mail.app, go to Preferences > Signatures and create a signature with any random content. Name it something meaningful. You will be swapping this out later. Drag the temporary signature to the email account on the left where you will likely use it.
Open the Signatures Folder
Open the folder ~/Library/Mail/V2/MailData/Signatures/ to show your email signatures in Finder by holding down the Option key and clicking the "Go" menu in Finder. Check here for more tips if you are having trouble opening the ~/Library folder.
Find the Placeholder
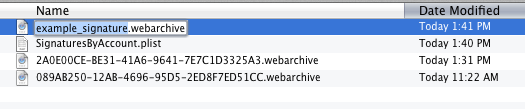
Locate the webarchive file you created in step 1 using quicklook (spacebar). It will have a random name, so you have to quicklook it to see which one is the placeholder.
Copy the Placeholder's Filename
Copy the exact filename of the webarchive located in the previous step. You can do this by selecting the file o it is highlighted, then pressing "return" to enter edit mode. You can then press Command-C to copy the text of the filename. Note that you are copying the filename, not the file itself. When the filename has been copied, you can delete the file.
Replace the Old Placeholder with the New Webarchive
Take the webarchive file we have provided for you and drag it into the Signatures folder. Change the name of the new webarchive to match the exact same filename that you copied in the previous step. You can do this by selecting the file in Finder so it is highlighted, then pressing "return" to enter edit mode. Once in edit mode, press Command-V to paste what was on the clipboard. When done, the file should be named exactly what the old placeholder file was named.
Restart Mail
Restart Mail.app and go to Preferences > Signatures. If you have images in your signature, they will not show here in the preview, but they will show in the real signature if the location is valid.

Apple Mail on 10.9.X (Mavericks)
Apple Mail has a pretty complicated process of installing your signature. Don't worry though! We will walk you through it step-by-step. You will be using the HTML file we provided to you for this process.
Add a Placeholder Signature
In Mail.app, go to Preferences > Signatures and create a signature with any random content. Name it something meaningful. You will be swapping this out later. Drag the temporary signature to the email account on the left where you will likely use it. Now quit Mail.app.
Open the Signatures Folder
This process differs if you are using iCloud. First open the following folder:
- Using iCloud:
~/Library/Mobile Documents/com~apple~mail/Data/MailData/Signatures/ - Not Using iCloud:
~/Library/Mail/V2/MailData/Signatures/
Open the folder to show your email signatures in Finder. If you are having trouble opening the ~/Library folder, try holding down the Option key and clicking the "Go" menu in Finder. Check here for more tips if you are still having trouble opening the ~/Library folder. Drill down through the appropriate folders as shown above.

Find the Placeholder
When you created a temporary placeholder signature in step 1, Mail automatically created a .mailsignature file that represents it in this folder. Locate the .mailsignature file in the ~/Library folder. It will have a random name. If you are using iCloud, it will start with ubiquitous. If you need help, you can open the file in Safari and view the contents to make sure it is the right one.


Open the Placeholder File
When you have located the placeholder .mailsignature file, open it with your html editor. I use TextMate, but you will probably find it easiest to use TextEdit. If you are using TextEdit, make sure you have the "Display HTML files as HTML code..." option set in TextEdit preferences menu.
Once open, you will see a few metadata lines on the top of the file and some html code below it.
Replace the HTML Contents
Keep the top metadata lines, but replace the HTML in the file with the contents of the HTML file we have provided for you. Save the file when you are done.
Lock the Mail Signature File
THIS STEP IS ONLY NECESSARY IF YOU ARE NOT USING ICLOUD. IF YOU ARE USING ICLOUD, PLEASE SKIP THIS STEP. Even though you save this file, Mail.app will use the original version and overwrite your new signature unless you lock the file. With your text editor now closed and the file saved, find it again in Finder and press command-i to bring up the info pane for the file. On this info pane, mark the "Locked" checkbox.
Restart Mail
Restart Mail.app and go to Preferences > Signatures. If you have images in your signature, they will not show here in the preview, but they will show in the real signature if the location is valid.
Apple Mail on 10.14.X (Mojave)
Apple Mail has a pretty complicated process of installing your signature. Don't worry though! We will walk you through it step-by-step. You will be using the HTML file we provided to you for this process.
Add a Placeholder Signature
In Apple Mail, open Preferences > Signatures

Once open, create a new signature.
Name the signature something meaningful in the central column. Replace the signature contents on the right with some placeholder text. This text should be recognizable to you as we will use it to help identify the correct signature system file later.

Ensure the Always match my default font checkbox is off
Connect the Placeholder to Your Account
Associate the placeholder signature with one of your email accounts by dragging its name from the second column in the Preferences > Signatures window to an email account in the first column.

If you want to setup the signature to be the default for an email account with auto-load when starting a new message, select the email account in the first column, and choose the new signature.

Close and Quit
Close the Preferences window to save it, then Quit Apple Mail.
Locate the Placeholder File
We are going to need to locate the folder containing the placeholder signature. Unfortunately, most of you are not going to be able to use Finder to get to these folders.
Apple goes to great lengths to hide these files from people as they usually contain info that is not usually editable by hand.
Trying to navigate to them by clicking in Finder will usually lead you to your visible iCloud Drive folder with nowhere else to go.
Don't worry though, I will walk you through an alternative method of getting to the hidden signature files we need to work with.
The files can be in 2 different places depending on whether you are using iCloud Drive or not.
You are most likely using iCloud Drive, even if you are not using an iCloud email address. Check to see if you're using iCloud Drive
by going to System Preferences > iCloud, then look to see if the iCloud Drive checkbox is ticked or not.
Double-check that iCloud Drive is enabled for Mail by clicking the Options button and ensuring the checkbox next to Mail is ticked.
If both of these checkmarks are ticked, then you are using iCloud Drive and should proceed to the next step. If not, skip ahead to step 4b.
Locate the Placeholder File (iCloud Drive)
(You should only do this step if using iCloud Drive.)
Open Terminal.app, found in Applications > Utilities, and copy/paste the following line into the box and press enter.
ls -laht ~/Library/Mobile\ Documents/com~apple~mail/Data/V4/Signatures/
Even if the text is wrapping above, ensure the command is pasted on one line.

This line tells Terminal to list all the files in this directory along with some other file info, then sort it by date.
When you press enter you should see a bunch of lines, each of which corresponds to a file and some of its metadata.
Look at the right side column — the file names — and notice the ones that end in .mailsignature.
These are the files we are interested in working with.
If you get an error, make sure you pasted the line in exactly like shown on one line. If you still get an error, you may not be using iCloud Drive and are following the wrong step.
In the new lines that come up in Terminal after running the command, you should see a .mailsignature file that has the date and time of when you started this tutorial. This is the placeholder file. If you don't see a file, then you may have done something wrong in a previous step, and should try again.
As mentioned above, we could normally use Finder to view these folders, but Apple has hidden access to them to prevent direct editing, something we wish to do here. If you have only 1 .mailsignature file, then this is most likely the placeholder file you created in the earlier steps. If you have more than one .mailsignature file in there, then you need to find the one you created earlier. Because this list is sorted top-down by the most recently updated, it will most likely be the top one, but you can check by opening them all and seeing their contents.
Terminal.app does not respond to double-clicking the file so how can you open the .mailsignature files? You can copy/paste the following command on the keyboard, all on one line.
open -a TextEdit ~/Library/Mobile\ Documents/com~apple~mail/Data/V4/Signatures/*.mailsignature
Even if the text is wrapping above, ensure the command is pasted on one line.

This line tells Terminal to open all files in that directory that have a filename that ends with .mailsignature, and to open them using the TextEdit application.
Once you have the file(s) open in TextEdit, move on to step 5.
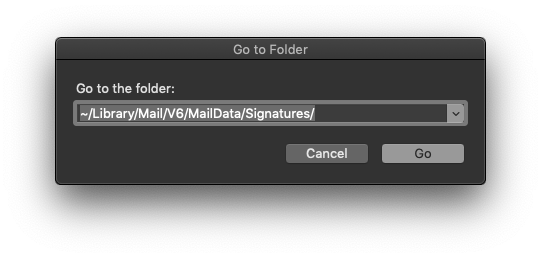
Locate the Placeholder File (Not Using iCloud Drive)
(You should only do this step if NOT using iCloud Drive.)
Luckily for you, we can use Finder to open the signature file we need. In Finder, select the menu bar item Go > Go to Folder...

A panel will popup that allows you to input the direct path to the signature folder. Copy/paste the following line into the box:
~/Library/Mail/V6/MailData/Signatures/

After clicking Go, a finder window should appear with several files.

Look at the file names and notice the ones that end in .mailsignature. These are the files we are interested in working with.
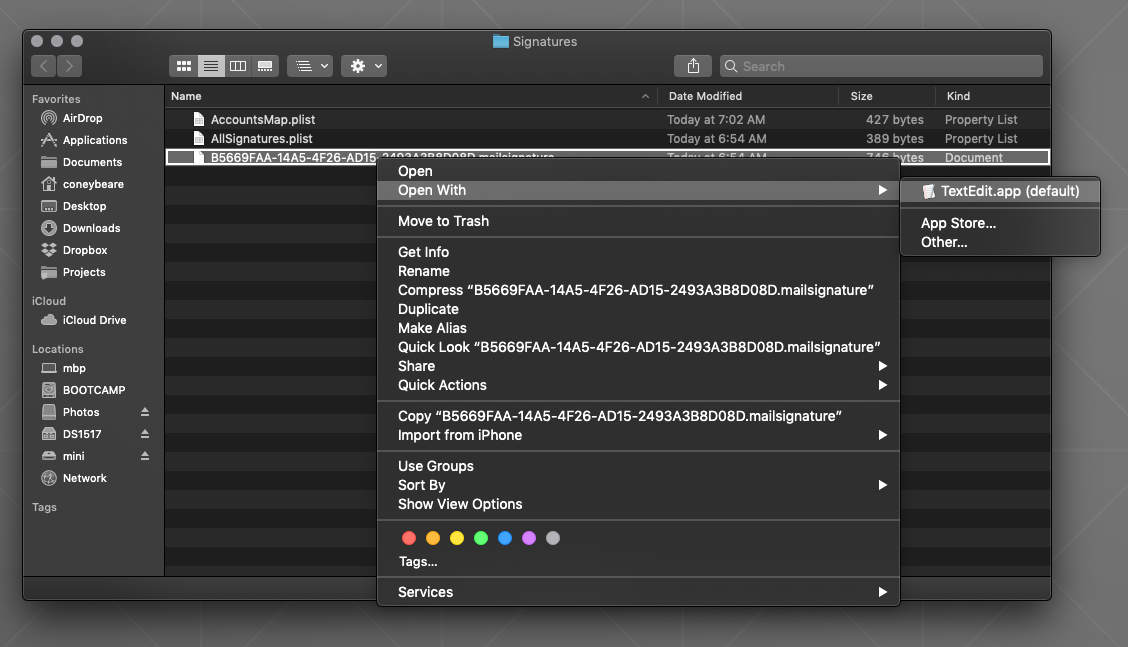
More specifically, we are looking for the placeholder signature file you created earlier. Locate the most recently modified .mailsignature file.

If you have more than one signature file in there, or cannot determine which is the placeholder, you can open each of them to help you find the right file. Simply repeat the following process for all the files.
Right-click on the .mailsignature file in Finder, select Open With, and choose TextEdit.

If TextEdit is not an option, choose Other..., and then choose Applications > TextEdit.
Once you have the file(s) open in TextEdit, move on to step 5.
Find the Right Placeholder File
Once open in TextEdit, if the pages looks like your finished signature instead of code, you have to make sure the Display HTML files as HTML code instead of formatted text option is checked in the Preferences for TextEdit.
In TextEdit, go to the menu bar on the top of the screen and choose TextEdit > Preferences, then click the Open and Save tab and select the Display HTML files as HTML code... option on the top line.
Repeat step 4a or 4b again, and you will see the code instead of the finished signature.
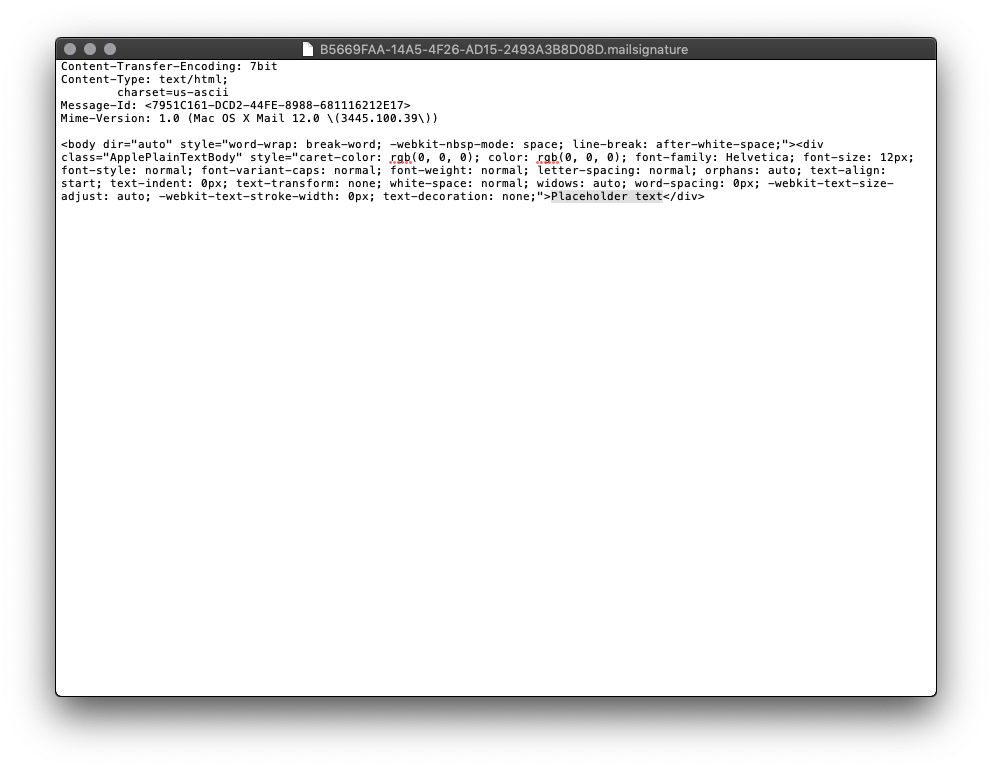
Now that you have the .mailsignature file(s) open in TextEdit, we need to ensure it is the right one.
Make sure that the placeholder file we created earlier is open by scanning each of the open TextEdit documents for the
placeholder text you entered earlier in the Mail.app Preferences panel.
Because the text I entered earlier was Placeholder text, this is what I am looking for now.

Look for your placeholder text within the file's HTML code. Here, we know we have the correct file because we can clearly see our placeholder text: Placeholder text
If you cannot find the placeholder, you may still be in "edit" mode on the signature. Try closing the Mail > Preferences Window,
quitting Apple Mail and repeating the previous steps.
If you still cannot find the placeholder, you may need to double check that you are/aren't using iCloud Drive, as detailed in an earlier step.
Select and Delete the Placeholder Code
When you have located the right placeholder .mailsignature file, keep it open and close all other TextEdit windows.
Feel free to resize the window to make text editing a bit easier.
You will see a few metadata lines on the top of the file and some HTML code below it. Select all that code from the line starting with body,
all the way to the end of the file.

Keep the top metadata lines, delete the entire block of placeholder HTML code.

Open Your New HTML File
Locate the HTML file we provided you as part of your completed order.
If you were to try and open it, it will open in Safari because it is a webpage, so we need to open it in TextEdit to see the the code so we can copy and paste it into the placeholder file, just like before
Right click on the HTML file in Finder and select Open With > TextEdit.app to open it in TextEdit.
Copy the New HTML Code
Now that the code for the new signature is visible, select all of it, then copy to your clipboard.
Once copied, you can close the new signature HTML file.
Replace the HTML Contents
Still keeping the top metadata lines, paste in your own custom HTML code from earlier.

Save and Quit
Save and close the file, then Quit TextEdit.
Lock the Mail Signature File
If you are using iCloud Drive, skip this step and proceed to the next step.
You can determine if you are using iCloud for Apple Mail by checking System Preferences > iCloud.
You need to check that both the iCloud Drive check box is checked and, after clicking options, that the Mail.app checkbox is also checked.
If both are checked, then you are using iCloud Drive to sync your settings and signatures across your Mac computers.
Still unsure? Skip this step — you can redo the steps and include this one if your signature is not working correctly at the end.
Even though you save this file, Apple Mail may use the original version and overwrite your new signature unless you lock the file.
With your text editor now closed and the file saved, go back to terminal, enter the following line, and lock all the mailsignature files in the folder.
Lock Files:chflags uchg ~/Library/Mail/V6/MailData/Signatures/*.mailsignature
If you mess up, you can unlock the files with this command.
Unlock Files:chflags nouchg ~/Library/Mail/V6/MailData/Signatures/*.mailsignature
Restart Mail App
Open Apple Mail and go back to Preferences > Signatures. If you have images in your signature,
they will not show here in the preview, but they will show in the real signature
as long as your coded image source location is valid.

Send a Test Email
To test that it is working correctly, simply compose a new email using the account you associated this new signature with, and set the signature (right side of screen) to be the one with the name you created earlier. If the images show, and everything looks as it should, you have succeeded!

Apple Mail on 12.X.X (Monterey)
Apple Mail has a pretty complicated process of installing your signature. Don't worry though! We will walk you through it step-by-step. You will be using the HTML file we provided to you for this process.
Add a Placeholder Signature
In Apple Mail, open Preferences > Signatures

Once open, create a new signature.

Name the signature something meaningful in the central column. Replace the signature contents on the right with some placeholder text. This text should be recognizable to you as we will use it to help identify the correct signature system file later.
Ensure the Always match my default font checkbox is off

Connect the Placeholder to Your Account
Associate the placeholder signature with one of your email accounts by dragging its name from the second column in the Preferences > Signatures window to an email account in the first column.

If you want to setup the signature to be the default for an email account with auto-load when starting a new message, select the email account in the first column, and choose the new signature.
Close and Quit
Close the Preferences window to save it, then Quit Apple Mail.
Locate the Placeholder File
We are going to need to locate the folder containing the placeholder signature. Unfortunately, most of you are not going to be able to use Finder to get to these folders.
Apple goes to great lengths to hide these files from people as they usually contain info that is not usually editable by hand.
Trying to navigate to them by clicking in Finder will usually lead you to your visible iCloud Drive folder with nowhere else to go.
Don't worry though, I will walk you through an alternative method of getting to the hidden signature files we need to work with.
The files can be in 2 different places depending on whether you are using iCloud Drive or not.
You are most likely using iCloud Drive, even if you are not using an iCloud email address. Check to see if you're using iCloud Drive
by going to System Preferences > Apple ID...

...then look to see if the iCloud Drive checkbox is ticked or not.

Double-check that iCloud Drive is enabled for Mail by clicking the Options button and ensuring the checkbox next to Mail is ticked.

If both of these checkmarks are ticked, then you are using iCloud Drive and should proceed to the next step. If not, skip ahead to step 4b.
Locate the Placeholder File (iCloud Drive)
(You should only do this step if using iCloud Drive.)
Open Terminal.app, found in Applications > Utilities, and copy/paste the following line into the box and press enter.
ls -laht ~/Library/Mobile\ Documents/com\~apple\~mail/Data/V4/Signatures/
Even if the text is wrapping above, ensure the command is pasted on one line.

This line tells Terminal to list all the files in this directory along with some other file info, then sort it by date.
When you press enter you should see a bunch of lines, each of which corresponds to a file and some of its metadata.
Look at the right side column — the file names — and notice the ones that end in .mailsignature.
These are the files we are interested in working with.
If you get an error, make sure you pasted the line in exactly like shown on one line. If you still get an error, you may not be using iCloud Drive and are following the wrong step.

In the new lines that come up in Terminal after running the command, you should see a .mailsignature file that has the date and time of when you started this tutorial. This is the placeholder file. If you don't see a file, then you may have done something wrong in a previous step, and should try again.
As mentioned above, we could normally use Finder to view these folders, but Apple has hidden access to them to prevent direct editing, something we wish to do here. If you have only 1 .mailsignature file, then this is most likely the placeholder file you created in the earlier steps. If you have more than one .mailsignature file in there, then you need to find the one you created earlier. Because this list is sorted top-down by the most recently updated, it will most likely be the top one, but you can check by opening them all and seeing their contents.
Terminal.app does not respond to double-clicking the file so how can you open the .mailsignature files? You can copy/paste the following command on the keyboard, all on one line.
open -a TextEdit ~/Library/Mobile\ Documents/com\~apple\~mail/Data/V4/Signatures/*.mailsignature
Even if the text is wrapping above, ensure the command is pasted on one line.
This line tells Terminal to open all files in that directory that have a filename that ends with .mailsignature, and to open them using the TextEdit application.

Once you have the file(s) open in TextEdit, move on to step 5.
Locate the Placeholder File (Not Using iCloud Drive)
(You should only do this step if NOT using iCloud Drive.)
Luckily for you, we can use Finder to open the signature file we need. In Finder, select the menu bar item Go > Go to Folder...

A panel will popup that allows you to input the direct path to the signature folder. Copy/paste the following line into the box:
~/Library/Mail/V9/MailData/Signatures/
After clicking Go, a finder window should appear with several files.

Look at the file names and notice the ones that end in .mailsignature. These are the files we are interested in working with.
More specifically, we are looking for the placeholder signature file you created earlier. Locate the most recently modified .mailsignature file.

If you have more than one signature file in there, or cannot determine which is the placeholder, you can open each of them to help you find the right file. Simply repeat the following process for all the files.
Right-click on the .mailsignature file in Finder, select Open With, and choose TextEdit.
If TextEdit is not an option, choose Other..., and then choose Applications > TextEdit.
Once you have the file(s) open in TextEdit, move on to step 5.
Find the Right Placeholder File
Once open in TextEdit, if the pages looks like your finished signature instead of code, you have to make sure the Display HTML files as HTML code instead of formatted text option is checked in the Preferences for TextEdit.
In TextEdit, go to the menu bar on the top of the screen and choose TextEdit > Preferences, then click the Open and Save tab and select the Display HTML files as HTML code... option on the top line.
Repeat step 4a or 4b again, and you will see the code instead of the finished signature.
Now that you have the .mailsignature file(s) open in TextEdit, we need to ensure it is the right one.
Make sure that the placeholder file we created earlier is open by scanning each of the open TextEdit documents for the
placeholder text you entered earlier in the Mail.app Preferences panel.
Because the text I entered earlier was Placeholder text, this is what I am looking for now.
Look for your placeholder text within the file's HTML code. Here, we know we have the correct file because we can clearly see our placeholder text: Placeholder text
If you cannot find the placeholder, you may still be in "edit" mode on the signature. Try closing the Mail > Preferences Window,
quitting Apple Mail and repeating the previous steps.
If you still cannot find the placeholder, you may need to double check that you are/aren't using iCloud Drive, as detailed in an earlier step.
Select and Delete the Placeholder Code
When you have located the right placeholder .mailsignature file, keep it open and close all other TextEdit windows.
Feel free to resize the window to make text editing a bit easier.
You will see a few metadata lines on the top of the file and some HTML code below it. Select all that code from the line starting with body,
all the way to the end of the file.

Keep the top metadata lines, delete the entire block of placeholder HTML code.
Open Your New HTML File
Locate the HTML file we provided you as part of your completed order.
If you were to try and open it, it will open in Safari because it is a webpage, so we need to open it in TextEdit to see the the code so we can copy and paste it into the placeholder file, just like before
Right click on the HTML file in Finder and select Open With > TextEdit.app to open it in TextEdit.
Copy the New HTML Code
Now that the code for the new signature is visible, select all of it, then copy to your clipboard.
Once copied, you can close the new signature HTML file.
Replace the HTML Contents
Still keeping the top metadata lines, paste in your own custom HTML code from earlier.

Save and Quit
Save and close the file, then Quit TextEdit.
Lock the Mail Signature File
If you are using iCloud Drive, skip this step and proceed to the next step.
You can determine if you are using iCloud for Apple Mail by checking System Preferences > iCloud.
You need to check that both the iCloud Drive check box is checked and, after clicking options, that the Mail.app checkbox is also checked.
If both are checked, then you are using iCloud Drive to sync your settings and signatures across your Mac computers.
Still unsure? Skip this step — you can redo the steps and include this one if your signature is not working correctly at the end.
Even though you save this file, Apple Mail may use the original version and overwrite your new signature unless you lock the file.
With your text editor now closed and the file saved, go back to terminal, enter the following line, and lock all the mailsignature files in the folder.
Lock Files:chflags uchg ~/Library/Mail/V9/MailData/Signatures/*.mailsignature
If you get an Operation not permitted error, you need to open System Preferences > Security & Privacy > Privacy, then select Full Disk Access on the left column, and ensure Terminal is on the list in the right. You may need to tick the checkbox next to it, or use the + button to add it. Then restart Terminal and try again.
If you mess up, you can unlock the files with this command.
Unlock Files:chflags nouchg ~/Library/Mail/V9/MailData/Signatures/*.mailsignature
Restart Mail App
Open Apple Mail and go back to Preferences > Signatures. If you have images in your signature,
they will not show here in the preview, but they will show in the real signature
as long as your coded image source location is valid.

Send a Test Email
To test that it is working correctly, simply compose a new email using the account you associated this new signature with, and set the signature (right side of screen) to be the one with the name you created earlier. If the images show, and everything looks as it should, you have succeeded!

Apple Mail on 10.8.X (Mountain Lion)
Apple Mail has a pretty complicated process of installing your signature. Don't worry though! We will walk you through it step-by-step. You will be using the HTML file we provided to you for this process.
Add a Placeholder Signature
In Mail.app, go to Preferences > Signatures and create a signature with any random content. Name it something meaningful. You will be swapping this out later. Drag the temporary signature to the email account on the left where you will likely use it. Now quit Mail.app.
Open the Signatures Folder
This process differs if you are using iCloud. First open the following folder:
- Using iCloud:
~/Library/Mobile Documents/com~apple~mail/Data/MailData/Signatures/ - Not Using iCloud:
~/Library/Mail/V2/MailData/Signatures/
Open the folder to show your email signatures in Finder. If you are having trouble opening the ~/Library folder, try holding down the Option key and clicking the "Go" menu in Finder. Check here for more tips if you are still having trouble opening the ~/Library folder. Drill down through the appropriate folders as shown above.
Find the Placeholder
When you created a temporary placeholder signature in step 1, Mail automatically created a .mailsignature file that represents it in this folder. Locate the .mailsignature file in the ~/Library folder. It will have a random name. If you are using iCloud, it will start with ubiquitous. If you need help, you can open the file in Safari and view the contents to make sure it is the right one.
Open the Placeholder File
When you have located the placeholder .mailsignature file, open it with your html editor. I use TextMate, but you will probably find it easiest to use TextEdit. If you are using TextEdit, make sure you have the "Display HTML files as HTML code..." option set in TextEdit preferences menu.
Once open, you will see a few metadata lines on the top of the file and some html code below it.
Replace the HTML Contents
Keep the top metadata lines, but replace the HTML in the file with the contents of the HTML file we have provided for you. Save the file when you are done.
Lock the Mail Signature File
THIS STEP IS ONLY NECESSARY IF YOU ARE NOT USING ICLOUD. IF YOU ARE USING ICLOUD, PLEASE SKIP THIS STEP. Even though you save this file, Mail.app will use the original version and overwrite your new signature unless you lock the file. With your text editor now closed and the file saved, find it again in Finder and press command-i to bring up the info pane for the file. On this info pane, mark the "Locked" checkbox.
Restart Mail
Restart Mail.app and go to Preferences > Signatures. If you have images in your signature, they will not show here in the preview, but they will show in the real signature if the location is valid.
Microsoft Outlook (Mac)
Luckily, Outlook HTML signature installation on a Mac is super easy. You will only be using the HTML file we provided to you.
Create a New Signature
In Outlook, go to File > Options > Mail and click on "Signatures". Click "New" to have Outlook create a new placeholder signature and give it a meaningful name.
Open Your Signature in the Firefox Web Browser
For this step, you must use the Firefox web browser. If you do not have it, please download it and install it. You can remove it afterwards. Recent updates of the Safari and Google Chrome web browsers changed the way this part of the installation works, so if you use those browsers to copy the signature, it will not work properly within Outlook.
After you have Firefox installed, right click the HTML file we gave you, choose Open With, and select Firefox.app
Copy the Signature
Use your mouse to select the entire signature and all the whitespace surrounding it, then copy it to your clipboard.
Paste the Signature
Back in Outlook, go to File > Options > Mail > Signatures and paste the copied signature from your clipboard, into the newly created placeholder signature you made in Step 1.
After pasting, if there is a small yellow clipboard icon showing on the bottom right of your signature, click it, and select Use Source Formatting.
Caveats
Blue Links
Despite its popularity, Microsoft Outlook is one of the worst email programs to use HTML signatures with. Each email you send through Outlook is routed through an internal Microsoft Word rendering engine that highly manipulates your message, and the signature code. Their manipulations will usually look fine for anybody using a Microsoft product to view it, but reading email elsewhere can introduce several bugs. Because of this, people wrongfully blame broken signatures on the receiving program instead of Microsoft, so they are unlikely to fix any of these issues.
The good news is that most of the issues Microsoft's code manipulation creates have been prevented and/or worked around through properly written HTML code, but there is currently no way to prevent the blue link effect which underlines any link in the signature with a solid blue line.
Microsoft Outlook (Windows)
Outlook HTML signature installation on a Windows computer is a little tricky. Don't worry though! We will walk you through it step-by-step. You will only be using the HTML file we provided to you.
Add a Placeholder Signature
In Outlook, go to File > Options > Mail and click on "Signatures". Click "New" to have Outlook create a new placeholder signature and give it a meaningful name.
Open the Signatures Folder
- Windows 10 and Higher
%APPDATA%\Microsoft\Signatures(Enter location on the start menu)- Windows 7 through 10
C:\Users\username\AppData\Roaming\Microsoft\Signatures- Windows XP
C:\Documents and Settings\username\Application Data\Microsoft\Signatures
The AppData folder may be hidden on your system, so you may have to tell Windows to display hidden folders. Here's how:
- Open Folder Options by clicking the Start button Picture of the Start button, clicking Control Panel, clicking Appearance and Personalization, and then clicking Folder Options.
- Click the View tab.
- Under Advanced settings, click Show hidden files, folders, and drives, and then click OK.
Open the folder on your hard drive where your Signatures are found (per above).
Find and Open the HTML Placeholder
Right-click on the .HTM file with the same name you gave your signature in step 1 and open it with Notepad.
Replace the HTML Placeholder Contents
Erase any existing HTML code from this file. Then, paste in the HTML code from the signature HTML file we provided for you.
Apply Signature to your Messages
Back in Outlook, go to File > Options > Mail > Signatures and set it to use your new Signature for both New Messages and Replies/Forwards.
Caveats
Blue Links
Despite its popularity, Microsoft Outlook is one of the worst email programs to use HTML signatures with. Each email you send through Outlook is routed through an internal Microsoft Word rendering engine that highly manipulates your message, and the signature code. Their manipulations will usually look fine for anybody using a Microsoft product to view it, but reading email elsewhere can introduce several bugs. Because of this, people wrongfully blame broken signatures on the receiving program instead of Microsoft, so they are unlikely to fix any of these issues.
The good news is that most of the issues Microsoft's code manipulation creates have been prevented and/or worked around through properly written HTML code, but there is currently no way to prevent the blue link effect which underlines any link in the signature with a solid blue line.
Apple Mail on 10.12.X (Sierra)
Apple Mail has a pretty complicated process of installing your signature. Don't worry though! We will walk you through it step-by-step. You will be using the HTML file we provided to you for this process.
Add a Placeholder Signature
In Apple Mail, go to Preferences > Signatures and create a signature with any random content. Name it something meaningful in the central column. You will be swapping this out later.
Connect the Placeholder to Your Account
Associate the placeholder signature with one of your email accounts by dragging its name from the second column in the Preferences > Signatures window to an email account in the first column.
Close and Quit
Close the Preferences window to save it, then quit Apple Mail.
Locate the Placeholder File
We are going to need to locate the folder containing the placeholder signature. Unfortunately, you are not going to be able to use Finder to get to these folders.
Apple goes to great lengths to hide these files from people as they usually contain info that is not editable by hand.
Trying to navigate through by clicking in Finder will usually lead you to your visible iCloud Drive folder with nowhere to go.
Don't worry though, I will walk you through an alternative method of getting at those files.
The files can be in 2 different places depending on whether you are using iCloud Drive or not.
You are most likely using iCloud Drive, even if you are not using an iCloud email address.
Check by going to System Preferences > iCloud, then seeing if the iCloud Drive checkbox is ticked or not.
Using iCloud Drive:~/Library/Mobile\ Documents/com~apple~mail/Data/V4/Signatures/
Not using iCloud Drive:~/Library/Mail/V4/MailData/Signatures/
Even if the text is wrapping above, ensure the command is pasted on one line.
Open Terminal.app, found in Applications > Utilities, paste the following line into the box and press enter:
Using iCloud Drive:ls -laht ~/Library/Mobile\ Documents/com~apple~mail/Data/V4/Signatures/
Not using iCloud Drive:ls -laht ~/Library/Mail/V4/MailData/Signatures/
Even if the text is wrapping above, ensure the command is pasted on one line.
This line tells Terminal to list all the files in this directory along with some other file info, then sort it by date.
When you press enter you should see a bunch of lines, each of which corresponds to a file and some of its metadata.
Look at the right side column — the file names — and notice some that start with ubiquitous_ and end in .mailsignature.
These are the files we are interested in working with.
If you get an error, make sure you pasted the line in exactly like shown on one line. If you still get an error, try the next path on the list above.
As mentioned above, we could normally use Finder to view these folders, but Apple has hidden access to them to prevent direct editing, something we wish to do here. If you have only 1 ubiquitous mailsignature file, then this is most likely the placeholder file you created in step 1. If you have more than one mailsignature file in there, then you need to find the one you created in step 1. Because this list is sorted top-down by the most recently updated, it will most likely be the top one, but you can check by opening them all and seeing ther contents.
Terminal.app does not respond to double-clicking the file so how can you open the mailsignature files? You can copy/paste the following command on the keyboard, all on one line.
Using iCloud Drive:open -a TextEdit ~/Library/Mobile\ Documents/com~apple~mail/Data/V4/Signatures/*.mailsignature
Not using iCloud Drive:open -a TextEdit ~/Library/Mail/V4/MailData/Signatures/*.mailsignature
Even if the text is wrapping above, ensure the command is pasted on one line.
This line tells Terminal to open all files in that directory that have a filename that starts with ubiquitous_ and ends with mailsignature, and to open them using the TextEdit application.
Once you have these files open in TextEdit, move on to next step.
Find the Right Placeholder File
When you created a temporary placeholder signature in step 1, Mail automatically created a ubiquitout_XXXXXXX.mailsignature file that represents it.
This placeholder now should be open in TextEdit.
If you have more than one ubiquitout_XXXXXXX.mailsignature files open in TextEdit, we have to find the right one amongst them now.
To help ensure you have the right file, look the one you think is your placeholder in TextEdit.
You should see the placeholder text you entered in step 1, along with other code and metadata.
Look for your placeholder text in the highlighted part shown in the image above. Here, we know we have the correct file because we can clearly see our placeholder text: "This is a placeholder."
If you cannot find the placeholder, you may still be in "edit" mode on the signature. Try closing the Mail > Preferences Window, quitting Apple Mail and opening the files using the process outlined in the previous step.
If you still cannot find the placeholder, you may need to try one of the other folders from the above step.
Select the Placeholder Code
When you have located the right placeholder .mailsignature file, keep it open and close all other TextEdit windows.
Feel free to resize the window to make text editing a bit easier.
You will see a few metadata lines on the top of the file and some html code below it.
Select only the placeholder code and delete, leaving the metadata on top in place in the file.
Open Your New HTML File
Locate the HTML file we provided you as part of your completed order.
If you were to try and open it, it will open in Safari because it is a webpage, so we need to open it in TextEdit to see the the code so we can copy and paste it into the placeholder file.
Right click on the HTML file in Finder and select Open With > TextEdit.app to open it in TextEdit.
Once open in TextEdit, if the page looks like your finished signature instead of the html code, you have to make sure the Display HTML files as HTML code instead of formatted text option is checked in the Preferences for TextEdit.
In TextEdit, go to the manu bar on the top of the screen and choose TextEdit > Preferences, then click the Open and Save tab and select the Display HTML files as HTML code... option on the top line.
Reopen the HTML file again, and you will see the code instead of the finished signature.
Copy the New HTML Code
Now that the code for the new signature is visible, select all of it, then copy to your clipboard.
Once copied, you can close the new signature HTML file.
Replace the HTML Contents
Back in the placeholder file, keep the top metadata lines on top, and paste the new signature HTML code we just copied into your clipboard below it.
Save and Quit
Save and close the signature code file, then quit the TextEdit app.
Lock the Mail Signature File
If you are using iCloud Drive, skip this step and proceed to the next step. You can determine if you are using iCloud for Apple Mail by checking System Preferences > iCloud. Still unsure? Skip this step — you can redo the steps and include this one if your signature is not working correctly at the end.
Even though you save this file, Apple Mail may use the original version and overwrite your new signature unless you lock the file.
With your text editor now closed and the file saved, go back to terminal, enter the following line, and lock all the mailsignature files in the folder.
Lock Files:chflags uchg ~/Library/Mail/V4/MailData/Signatures/*.mailsignature
If you mess up, you can unlock the files with this command.
Unlock Files:chflags nouchg ~/Library/Mail/V4/MailData/Signatures/*.mailsignature
Restart Mail App
Open Apple Mail and go back to Preferences > Signatures. If you have images in your signature,
they will will not show here in the preview, but they will show in the real signature
once you compose a new email.
Send a Test Email
To test that it is working correctly, simply compose a new email using the account you associated this signature with in step 2, and set the signature (right side of screen) to be the one with the name you created in step 1. If the images show, and everything looks as it should, you have succeeded!
Apple Mail on 10.6.X (Snow Leopard)
Apple Mail has a slightly more complicated process of installing your signature. Don't worry though! We will walk you through it step-by-step. You will not be using the HTML file we provided to you, but the .webarchive file instead.
Add a Placeholder Signature
In Mail.app, go to Preferences > Signatures and create a signature with any random content. Name it something meaningful. You will be swapping this out later. Drag the temporary signature to the email account on the left where you will likely use it.

Open the Signatures Folder
From your home folder, open ~/Library/Mail/Signatures to show your email signatures in Finder.

Find the Placeholder
Locate the webarchive file you created in step 1 using quicklook (spacebar). It will have a random name, so you have to quicklook it to see which one is the placeholder.
Copy the Placeholder's Filename
Copy the exact filename of the webarchive located in the previous step. You can do this by selecting the file o it is highlighted, then pressing "return" to enter edit mode. You can then press Command-C to copy the text of the filename. Note that you are copying the filename, not the file itself. When the filename has been copied, you can delete the file.
Replace the Old Placeholder with the New Webarchive
Take the webarchive file we have provided for you and drag it into the Signatures folder. Change the name of the new webarchive to match the exact same filename that you copied in the previous step. You can do this by selecting the file in Finder so it is highlighted, then pressing "return" to enter edit mode. Once in edit mode, press Command-V to paste what was on the clipboard. When done, the file should be named exactly what the old placeholder file was named.
Restart Mail
Restart Mail.app and go to Preferences > Signatures. If you have images in your signature, they will not show here in the preview, but they will show in the real signature if the location is valid.
Apple Mail on 14.X.X (Sonoma)
Apple Mail has a pretty complicated process of installing your signature. Don't worry though! We will walk you through it step-by-step. You will be using the HTML file we provided to you for this process.
Add a Placeholder Signature
In Apple Mail, open Preferences > Signatures
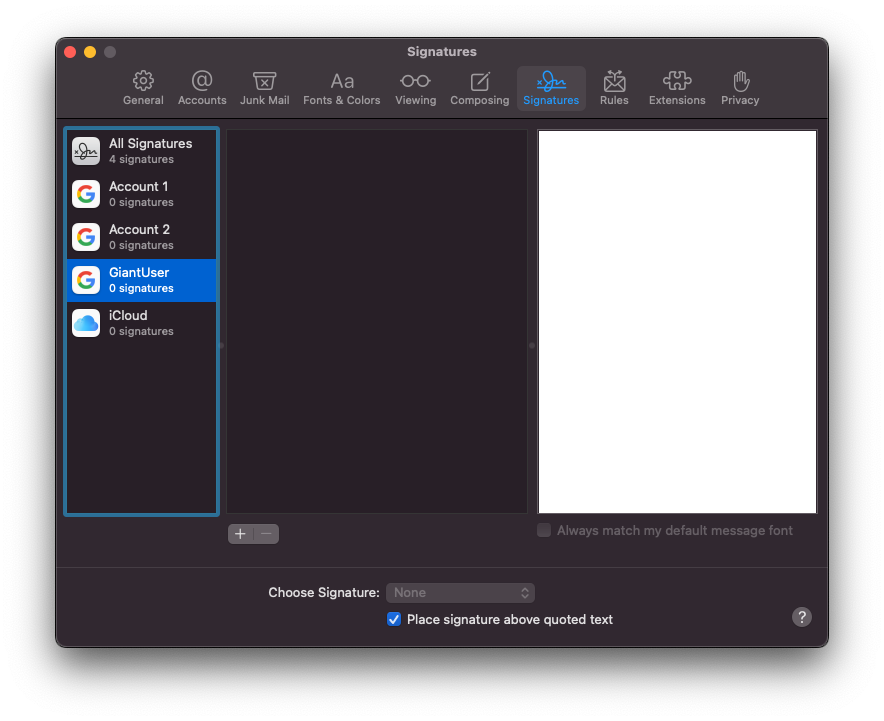
Once open, create a new signature.
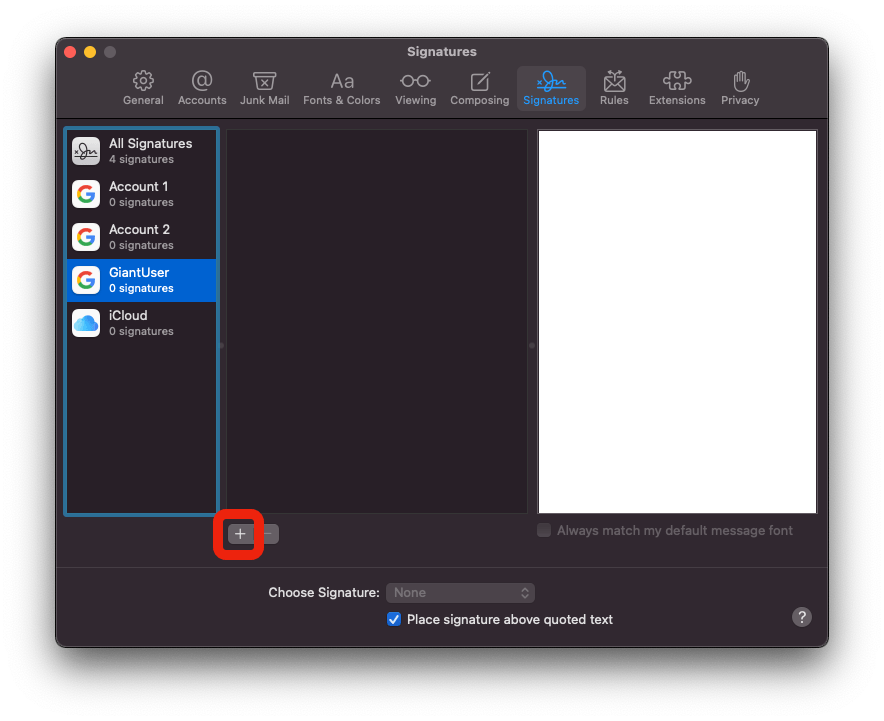
Name the signature something meaningful in the central column. Replace the signature contents on the right with some placeholder text. This text should be recognizable to you as we will use it to help identify the correct signature system file later.

Ensure the Always match my default font checkbox is off
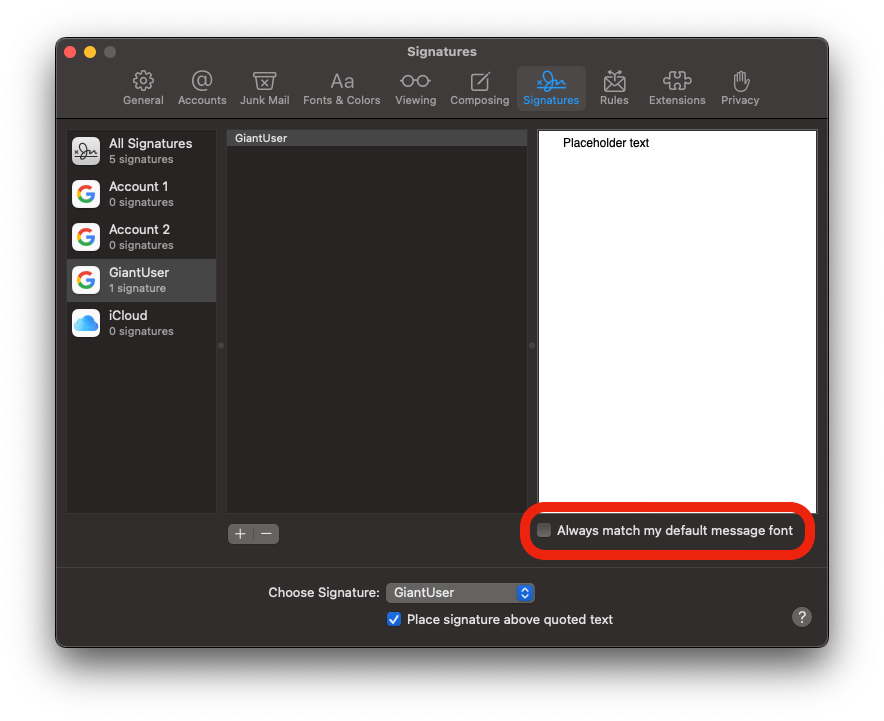
Connect the Placeholder to Your Account
Associate the placeholder signature with one of your email accounts by dragging its name from the second column in the Preferences > Signatures window to an email account in the first column.

If you want to setup the signature to be the default for an email account with auto-load when starting a new message, select the email account in the first column, and choose the new signature.
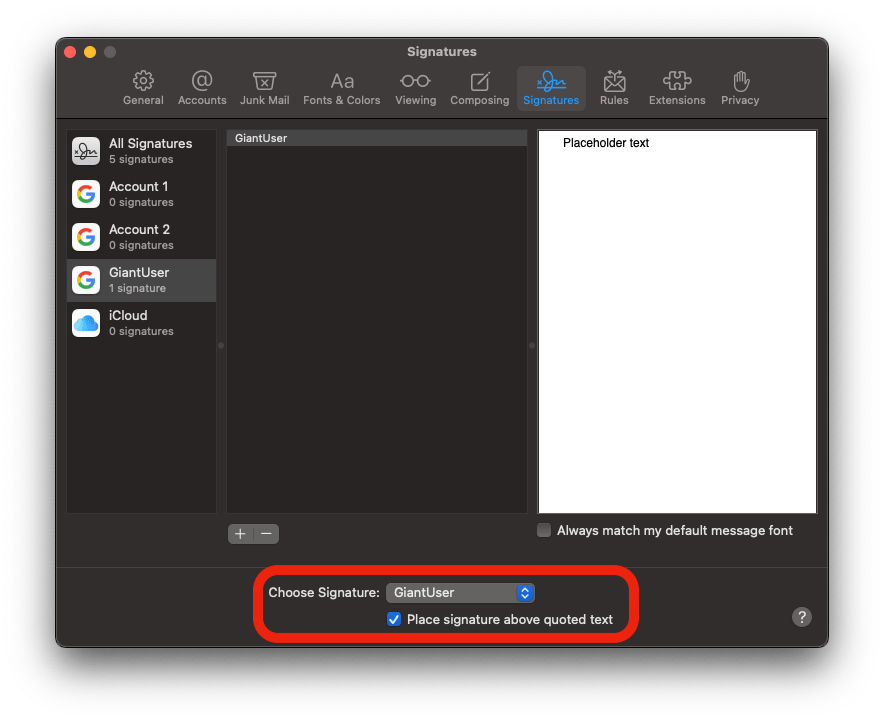
Close and Quit
Close the Preferences window to save it, then Quit Apple Mail.
Prepare TextEdit for HTML Editing
We are going to be using TextEdit to open code files in the following steps, so we need to ensure that it is setup properly to display the raw HTML code.
Open a TextEdit.app, found in Applications, and open Preferences > Open and Save.
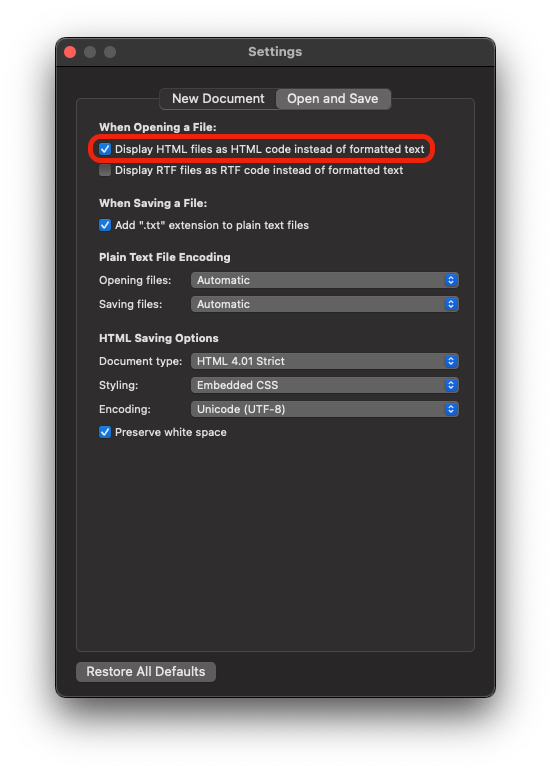
Ensure that the checkmark next to Display HTML files as HTML code instead of formatted text is ticked.
Locate the Placeholder File
We are going to need to locate the folder containing the placeholder signature. Unfortunately, you are likely not going to be able to use Finder to get to these folders.
Apple goes to great lengths to hide these files from people as they usually contain info that is not usually editable by hand.
Trying to navigate to them by clicking in Finder will usually lead you to your visible iCloud Drive folder with nowhere else to go.
Don't worry though, I will walk you through an alternative method of getting to the hidden signature files we need to work with.
The files can be in 2 different places depending on whether you are using iCloud Drive or not.
You are most likely using iCloud Drive, even if you are not using an iCloud email address.
Check to see if you're using iCloud Drive by going to System Preferences and selecting your user id on the left column.
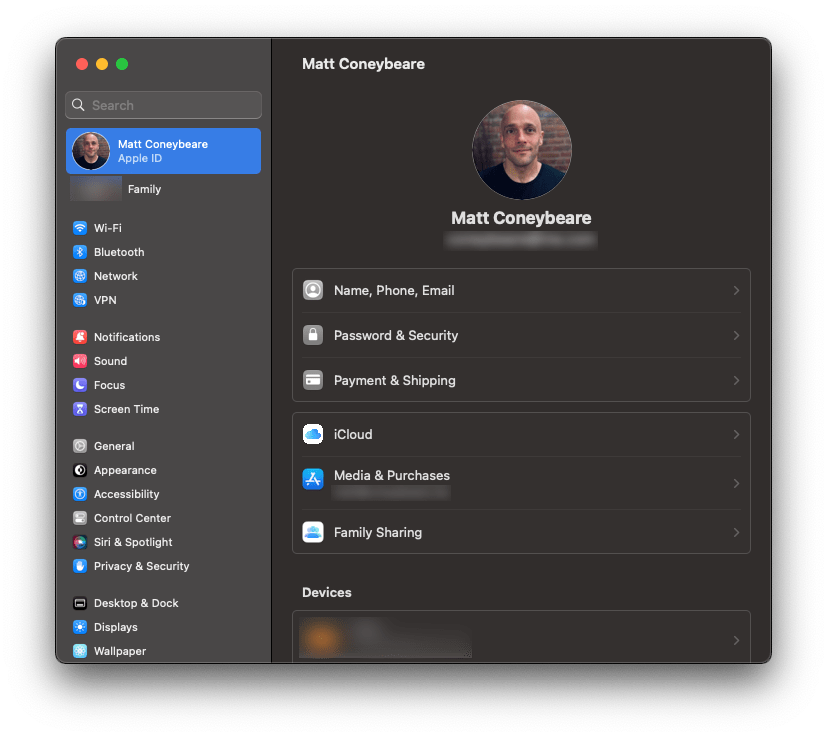
Next, select the iCloud button…
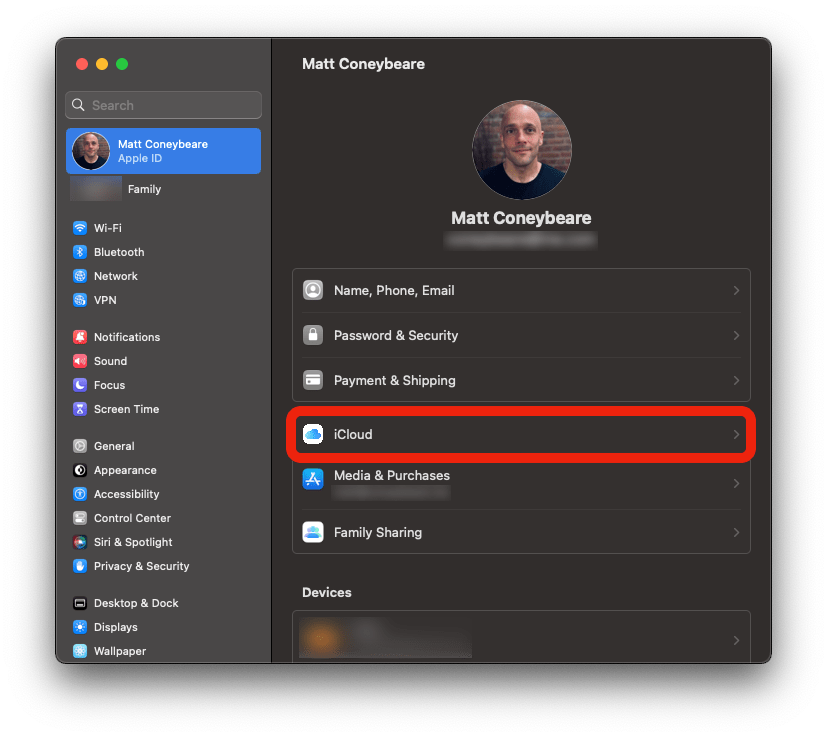
…and see if iCloud Drive is On.
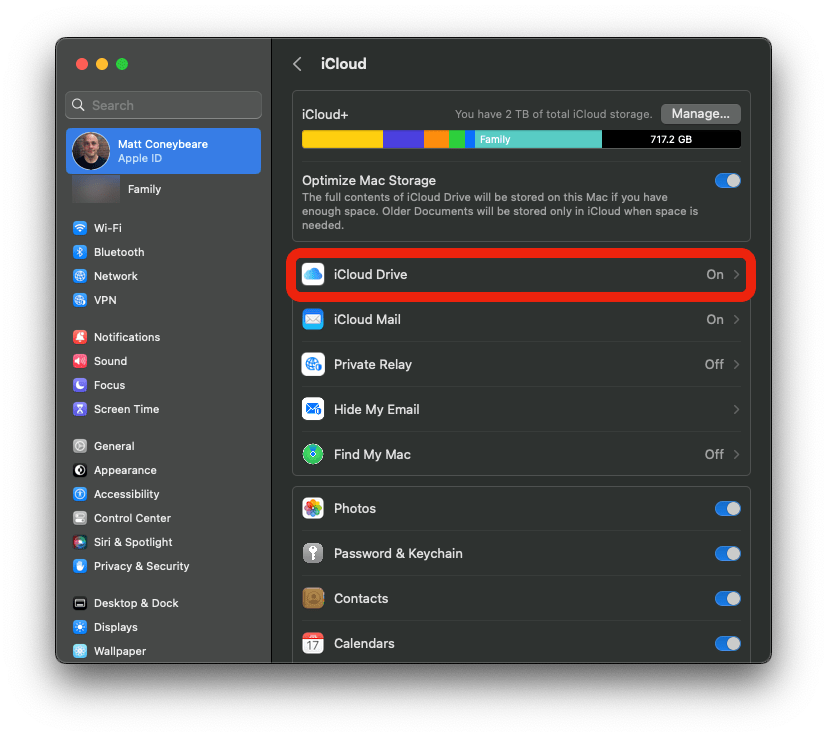
If so, double-check that iCloud Drive is enabled for Mail by selecting iCloud Drive, selecting Options in the popup…

…and see if the checkbox next to Mail is ticked.

If this checkbox is ticked, then you are using iCloud Drive and should proceed to the next step. If not, skip ahead to step 5b.
Locate the Placeholder File (iCloud Drive)
(You should skip this step if NOT using iCloud Drive.)
To open the placeholder signature file, we will need to use an application on your computer that lets us interact with your files in a different way than Finder.
Please find Terminal.app in Applications > Utilities, open it by double clicking.
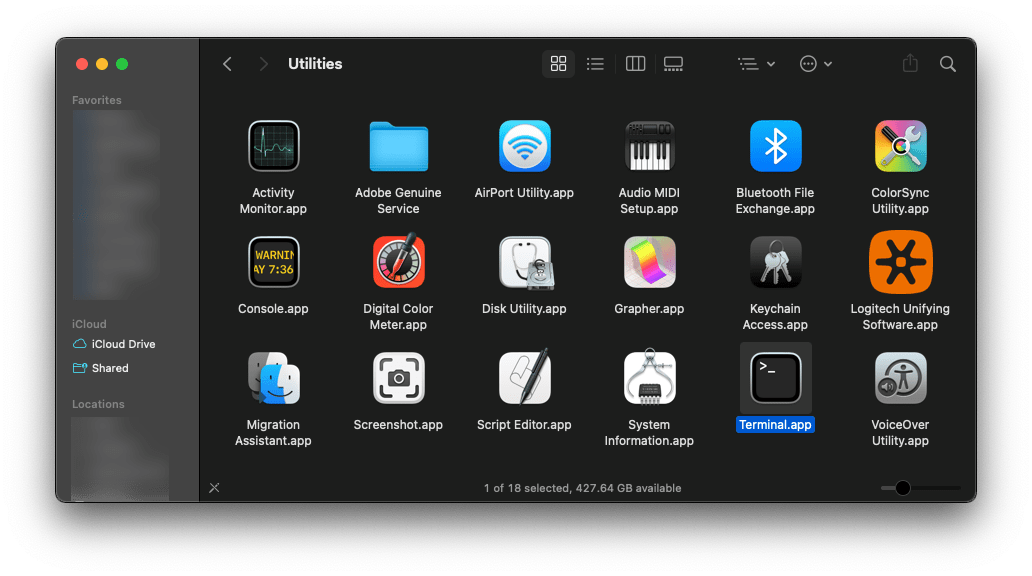
When terminal opens, copy/paste the following line into the box.
ls -laht ~/Library/Mobile\ Documents/com\~apple\~mail/Data/V4/Signatures/
Even if the text is wrapping above, ensure the command is pasted on one line.

This line tells Terminal to list all the files in this directory along with some other file info, then sort it by date. Now press enter to run the command.
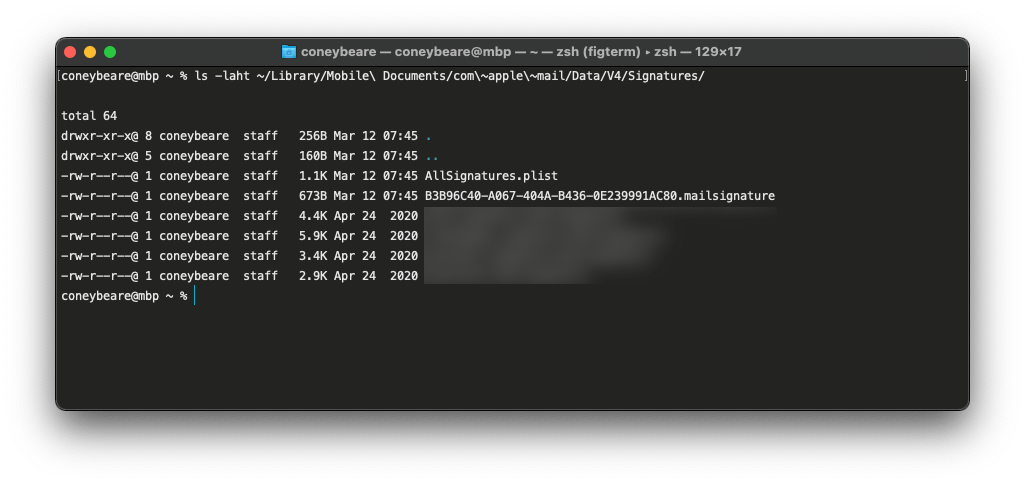
When you press enter you should see a bunch of lines, each of which corresponds to a file and some of its metadata.
Look at the right side column — the file names — and notice the ones that end in .mailsignature.
These are the files we are interested in working with.
Note: Your output might look a little different, and the rows that display will differ from the ones in this screenshot because the contents here are unique to your Mail setup. This is not a cause for concern.
If you get an error, make sure you pasted the line in exactly like shown on one line. If you still get an error, you may not be using iCloud Drive and are following the wrong step.
In the new lines that come up in Terminal after running the command,
you should see a .mailsignature file that has the date and time of when you started this tutorial.
This is the placeholder file. If you don't see a line listed, then you may have done something wrong in a previous step, and should try again.
As mentioned above, we could normally use Finder to view these folders, but Apple has hidden access to them to
prevent direct editing, something we wish to do here. If you have only 1 .mailsignature file,
then this is most likely the placeholder file you created in the earlier steps. If you have more than one
.mailsignature file in there, then we need to find the one you created earlier.
Because this list is sorted top-down by the most recently updated, it will most likely be the top one, but you
can check by opening them all and seeing their contents.
Terminal.app does not respond to double-clicking the file, but we can open the .mailsignature by running another command.
Copy/paste the following command into Terminal.app, all on one line:
open -a TextEdit ~/Library/Mobile\ Documents/com\~apple\~mail/Data/V4/Signatures/*.mailsignature
Even if the text is wrapping above, ensure the command is pasted on one line.
This line tells Terminal to open all files in that directory that have a filename that ends with .mailsignature,
and to open them using the TextEdit application.
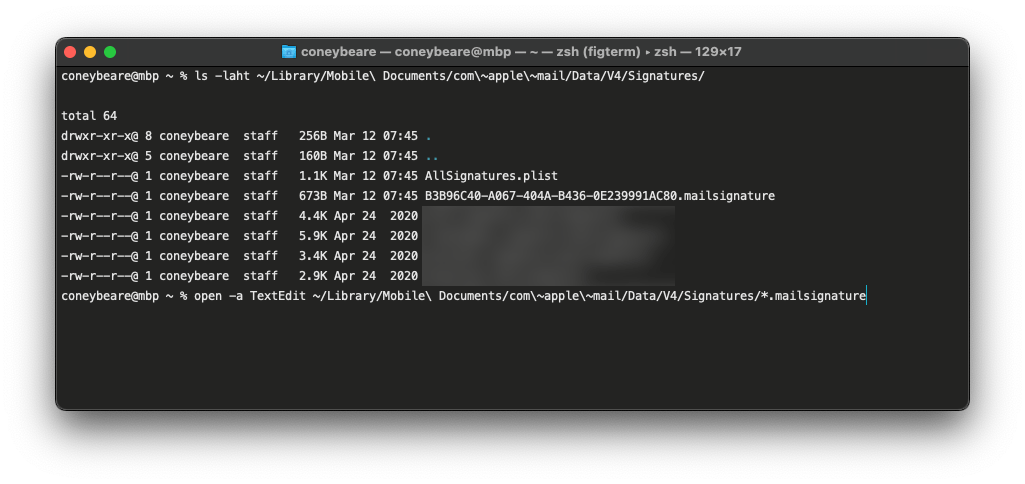
Now press enter to run the command, and TextEdit windows should pop open.

Once you have the file(s) open in TextEdit, move on to step 6.
Locate the Placeholder File (Not Using iCloud Drive)
(You should only do this step if NOT using iCloud Drive.)
Luckily for you, we can use Finder to open the signature file we need. In Finder, select the menu bar item
Go > Go to Folder…

A panel will popup that allows you to input the direct path to the signature folder. Copy/paste the following line into the box:
~/Library/Mail/V10/MailData/Signatures/

After clicking Go, a finder window should appear with several files.

Look at the file names and notice the ones that end in .mailsignature. These are the files we are interested in working with.
More specifically, we are looking for the placeholder signature file you created earlier. Locate the most recently modified .mailsignature file.

If you have more than one signature file in there, or cannot determine which is the placeholder, you can open each of them to help you find the right file. Simply repeat the following process for all the files.
Right-click on the .mailsignature file in Finder, select Open With, and choose TextEdit.
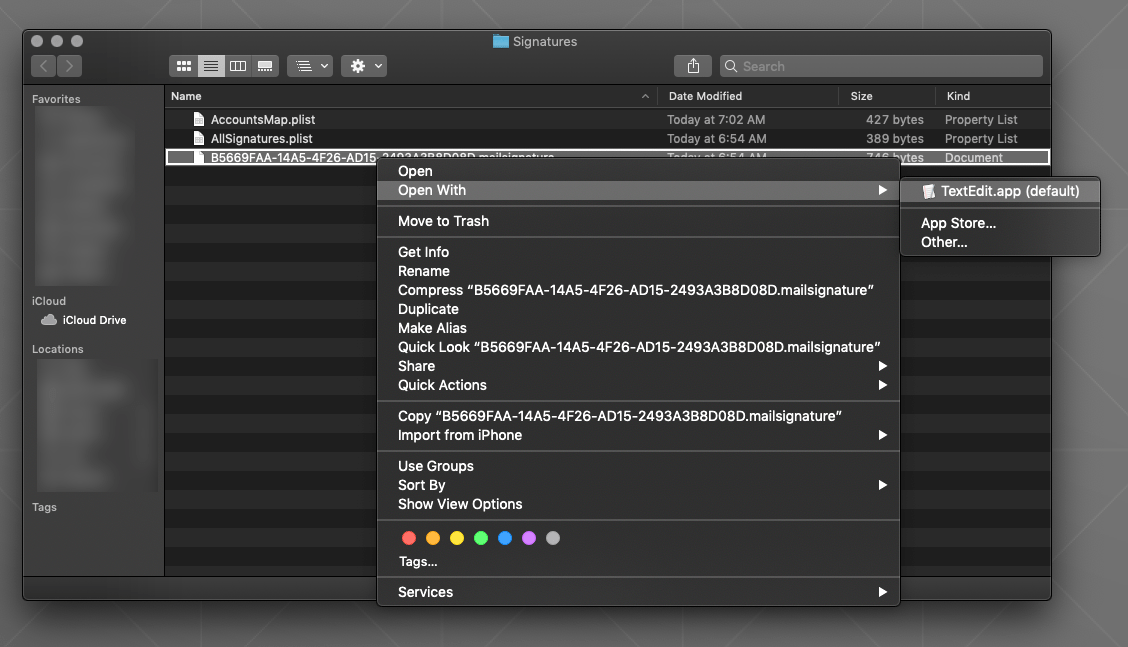
If TextEdit is not an option, choose Other…, and then choose Applications > TextEdit.
Once you have the file(s) open in TextEdit, move on to step 6.
Find the Right Placeholder File
Now that you have the .mailsignature file(s) open in TextEdit, we need to ensure it is the right one.
Make sure that the placeholder file we created earlier is open by scanning each of the open TextEdit documents for the
placeholder text you entered earlier in the Mail.app Preferences panel.
Because the text I entered earlier was Placeholder text, this is what I am looking for now.

Look for your placeholder text within the file's HTML code. Here, we know we have the correct file because we can clearly see our placeholder text: Placeholder text
If you cannot find the placeholder, you may still be in "edit" mode on the signature.
Try closing the Mail > Preferences Window,
completely quitting Apple Mail, and repeating the previous steps.
If you still cannot find the placeholder, you may need to double check that you are/aren't using iCloud Drive, as detailed in an earlier step.
Select and Delete the Placeholder Code
When you have located the right placeholder .mailsignature file, keep it open and close all
other TextEdit windows as we won't be using them here. Feel free to resize the window to make text editing a bit easier.
You will see a few metadata lines on the top of the file and some HTML code below it. Select all that code from
the line starting with body, all the way to the end of the file.

Keeping the top metadata lines, delete the entire block of placeholder HTML code.
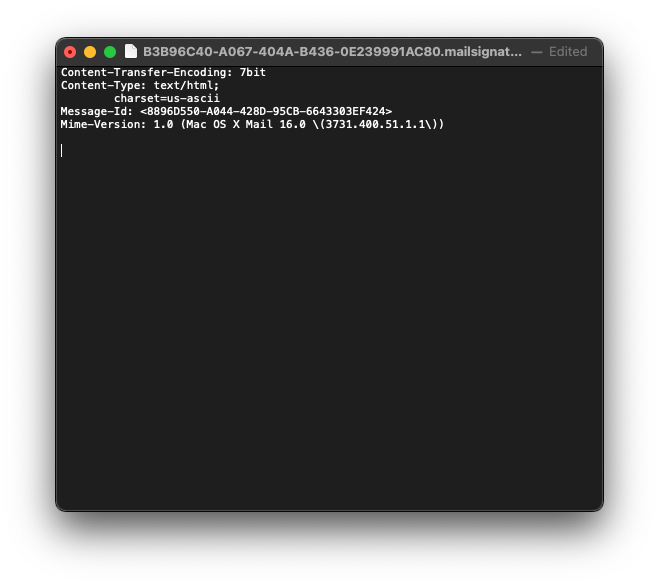
Open Your New HTML File
Locate the HTML file we provided you as part of your completed order.
If you were to try and open it, it will open in Safari because it is a webpage, so we need to open it in TextEdit to see the the code so we can copy and paste it into the placeholder file, just like before.
Right click on the HTML file in Finder and select Open With > TextEdit.app to open it in TextEdit.
Copy the New HTML Code
Now that the code for the new signature is visible, select all of it, then copy to your clipboard.
Once copied, you can close the new signature HTML file.
Replace the HTML Contents
Still keeping the top metadata lines unedited, paste in the new HTML code that is on your clipboard from the previous step.
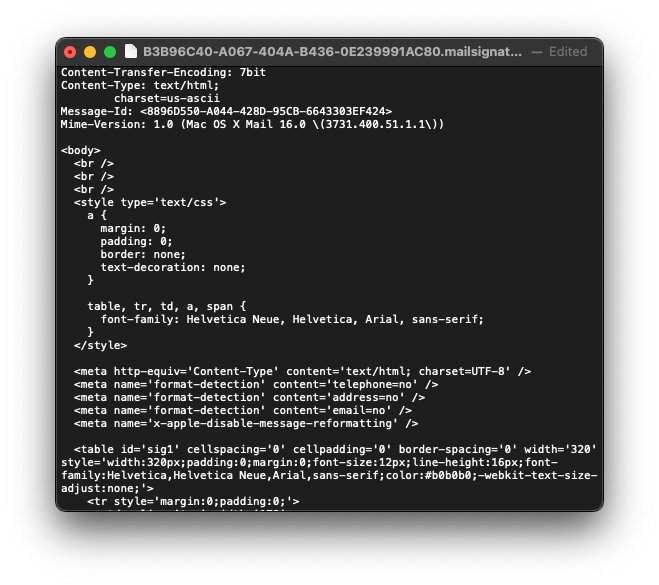
Save and Quit
Save and close the file, then Quit TextEdit.

Restart Mail App
Open Apple Mail and go back to Preferences > Signatures. If you have images in your signature,
they will not show here in the preview, but they will show in the real signature
as long as your coded image source location is valid.
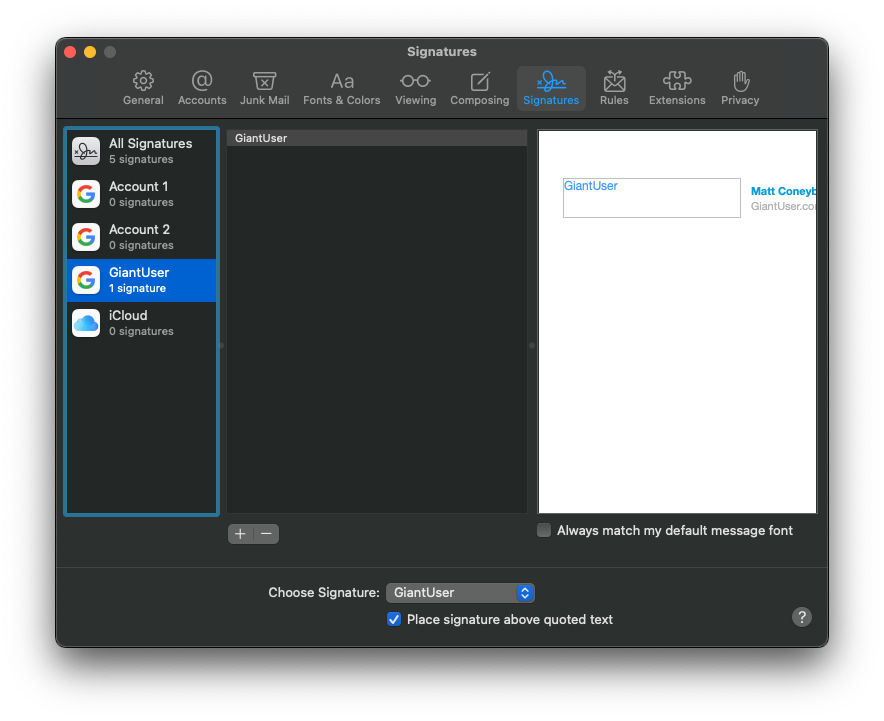
Send a Test Email
To test that it is working correctly, simply compose a new email using the account you associated this new signature with, and set the signature (right side of screen) to be the one with the name you created earlier. If the images show, and everything looks as it should, you have succeeded!

Mozilla Thunderbird (Mac & PC)
Thunderbird signature installation is really easy, but don't worry if you get stuck. We will walk you through it step-by-step. You will only be using the HTML file we provided to you. Thunderbird provides advanced signature options for those of you who are curious.
Put the HTML File Someplace Safe
Save the HTML file to someplace permanent on your hard drive. A good place is your Documents folder, or a subfolder inside of it.
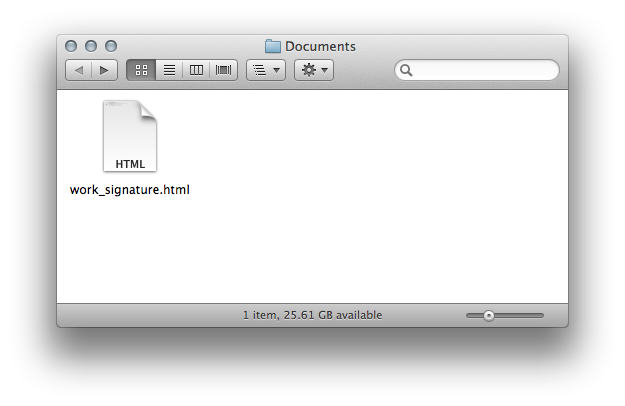
Open Thunderbird Account Settings
Open the Thunderbird application, then go to Tools > Account Settings.
Add the HTML Signature
On the first panel that opens up, mark the checkbox beside "Attach the signature from a file instead (text, HTML, or image):". Click the "Choose" button and find the location of the HTML file you saved in step 1. Click OK to save the new signature settings for this account.
Compose a New Email
Start a new email by clicking "Write". When the compose window opens, you will see your signature on the bottom, but it will be outlined in red boxes. These boxes will not appear in your emails when the recipient reads them.
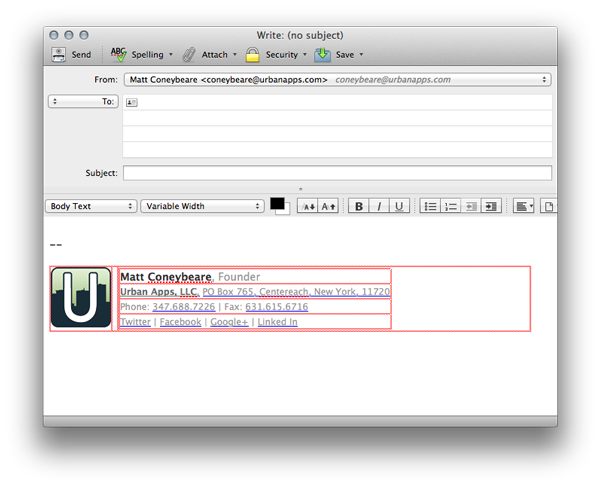
Apple Mail on 13.X.X (Ventura)
Apple Mail has a pretty complicated process of installing your signature. Don't worry though! We will walk you through it step-by-step. You will be using the HTML file we provided to you for this process.
Add a Placeholder Signature
In Apple Mail, open Preferences > Signatures

Once open, create a new signature.

Name the signature something meaningful in the central column. Replace the signature contents on the right with some placeholder text. This text should be recognizable to you as we will use it to help identify the correct signature system file later.
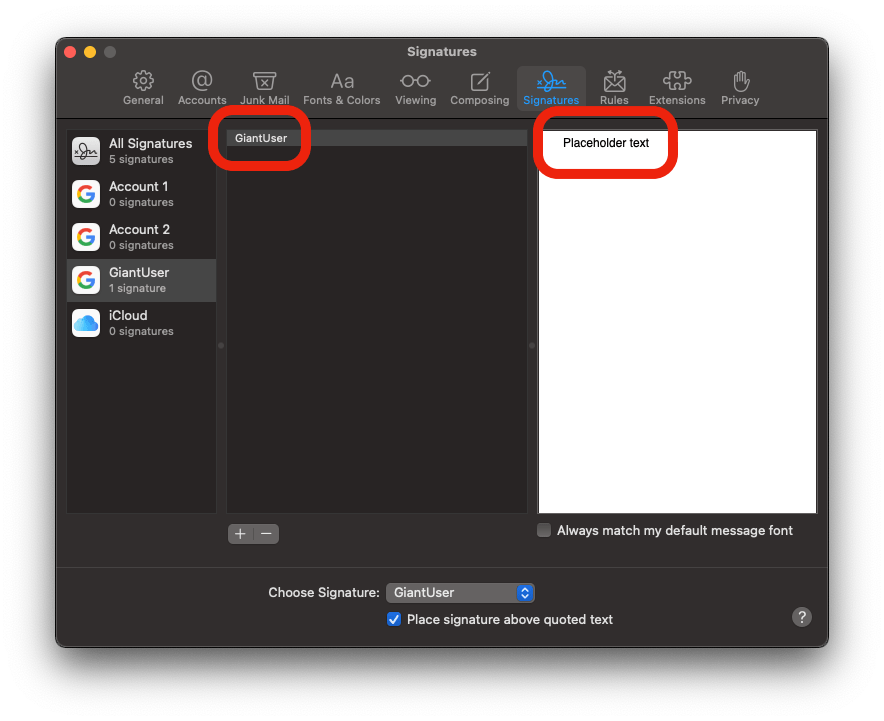
Ensure the Always match my default font checkbox is off

Connect the Placeholder to Your Account
Associate the placeholder signature with one of your email accounts by dragging its name from the second column in the Preferences > Signatures window to an email account in the first column.

If you want to setup the signature to be the default for an email account with auto-load when starting a new message, select the email account in the first column, and choose the new signature.

Close and Quit
Close the Preferences window to save it, then Quit Apple Mail.

Prepare TextEdit for HTML Editing
We are going to be using TextEdit to open code files in the following steps, so we need to ensure that it is setup properly to display the raw HTML code.
Open a TextEdit.app, found in Applications, and open Preferences > Open and Save.

Ensure that the checkmark next to Display HTML files as HTML code instead of formatted text is ticked.
Locate the Placeholder File
We are going to need to locate the folder containing the placeholder signature. Unfortunately, you are likely not going to be able to use Finder to get to these folders.
Apple goes to great lengths to hide these files from people as they usually contain info that is not usually editable by hand.
Trying to navigate to them by clicking in Finder will usually lead you to your visible iCloud Drive folder with nowhere else to go.
Don't worry though, I will walk you through an alternative method of getting to the hidden signature files we need to work with.
The files can be in 2 different places depending on whether you are using iCloud Drive or not.
You are most likely using iCloud Drive, even if you are not using an iCloud email address.
Check to see if you're using iCloud Drive by going to System Preferences and selecting your user id on the left column.

Next, select the iCloud button…

…and see if iCloud Drive is On.

If so, double-check that iCloud Drive is enabled for Mail by selecting iCloud Drive, selecting Options in the popup…

…and see if the checkbox next to Mail is ticked.
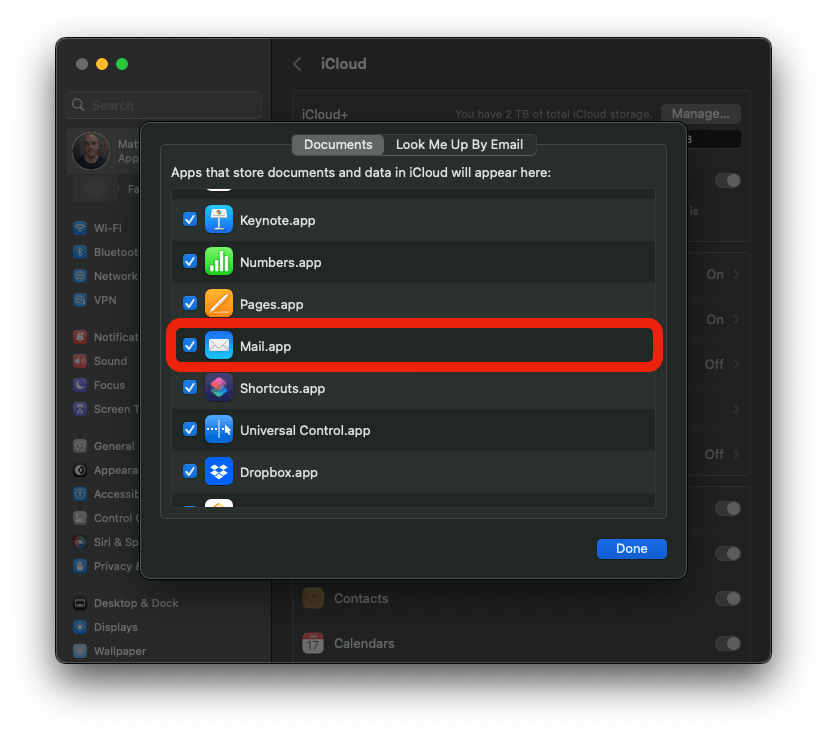
If this checkbox is ticked, then you are using iCloud Drive and should proceed to the next step. If not, skip ahead to step 5b.
Locate the Placeholder File (iCloud Drive)
(You should skip this step if NOT using iCloud Drive.)
To open the placeholder signature file, we will need to use an application on your computer that lets us interact with your files in a different way than Finder.
Please find Terminal.app in Applications > Utilities, open it by double clicking.

When terminal opens, copy/paste the following line into the box.
ls -laht ~/Library/Mobile\ Documents/com\~apple\~mail/Data/V4/Signatures/
Even if the text is wrapping above, ensure the command is pasted on one line.
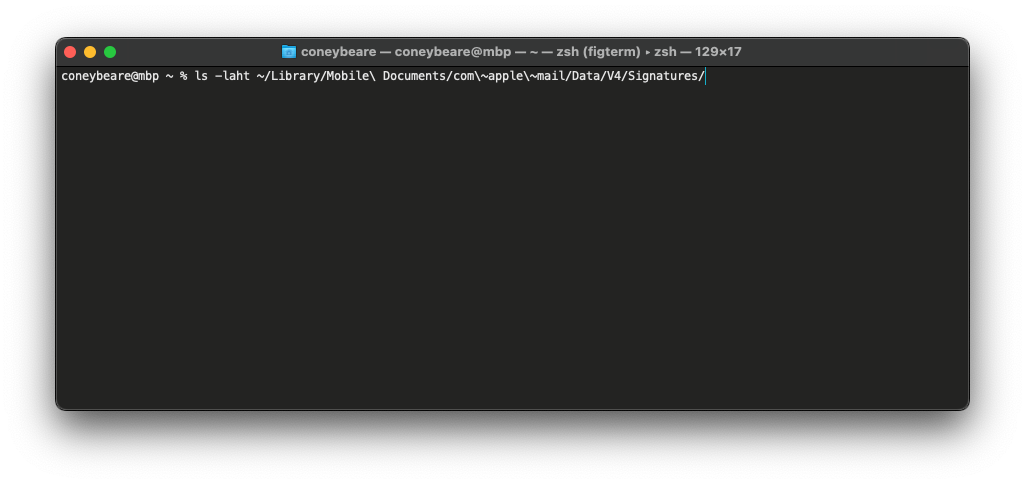
This line tells Terminal to list all the files in this directory along with some other file info, then sort it by date. Now press enter to run the command.

When you press enter you should see a bunch of lines, each of which corresponds to a file and some of its metadata.
Look at the right side column — the file names — and notice the ones that end in .mailsignature.
These are the files we are interested in working with.
Note: Your output might look a little different, and the rows that display will differ from the ones in this screenshot because the contents here are unique to your Mail setup. This is not a cause for concern.
If you get an error, make sure you pasted the line in exactly like shown on one line. If you still get an error, you may not be using iCloud Drive and are following the wrong step.
In the new lines that come up in Terminal after running the command,
you should see a .mailsignature file that has the date and time of when you started this tutorial.
This is the placeholder file. If you don't see a line listed, then you may have done something wrong in a previous step, and should try again.
As mentioned above, we could normally use Finder to view these folders, but Apple has hidden access to them to
prevent direct editing, something we wish to do here. If you have only 1 .mailsignature file,
then this is most likely the placeholder file you created in the earlier steps. If you have more than one
.mailsignature file in there, then we need to find the one you created earlier.
Because this list is sorted top-down by the most recently updated, it will most likely be the top one, but you
can check by opening them all and seeing their contents.
Terminal.app does not respond to double-clicking the file, but we can open the .mailsignature by running another command.
Copy/paste the following command into Terminal.app, all on one line:
open -a TextEdit ~/Library/Mobile\ Documents/com\~apple\~mail/Data/V4/Signatures/*.mailsignature
Even if the text is wrapping above, ensure the command is pasted on one line.
This line tells Terminal to open all files in that directory that have a filename that ends with .mailsignature,
and to open them using the TextEdit application.

Now press enter to run the command, and TextEdit windows should pop open.
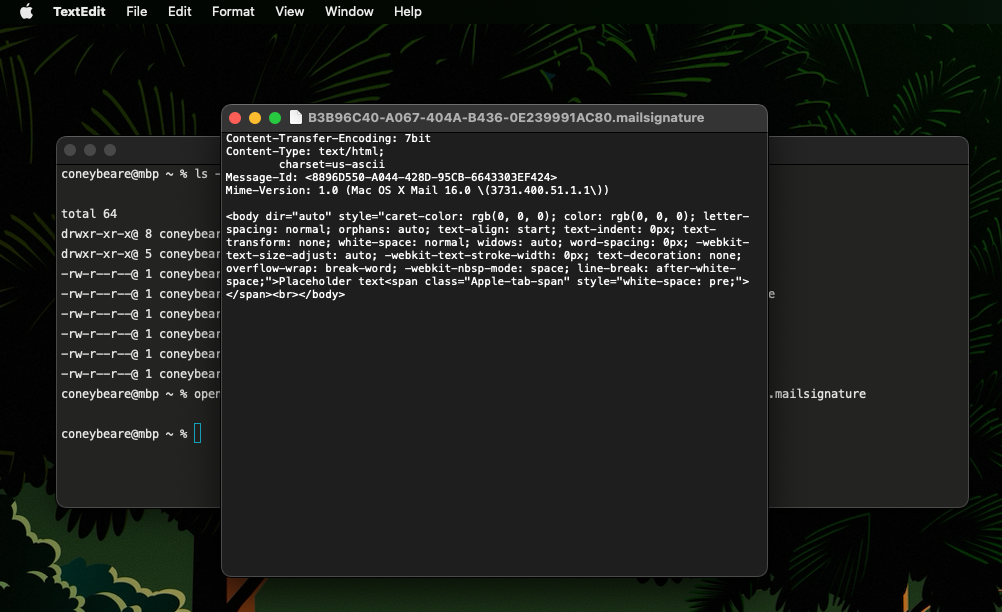
Once you have the file(s) open in TextEdit, move on to step 6.
Locate the Placeholder File (Not Using iCloud Drive)
(You should only do this step if NOT using iCloud Drive.)
Luckily for you, we can use Finder to open the signature file we need. In Finder, select the menu bar item
Go > Go to Folder…
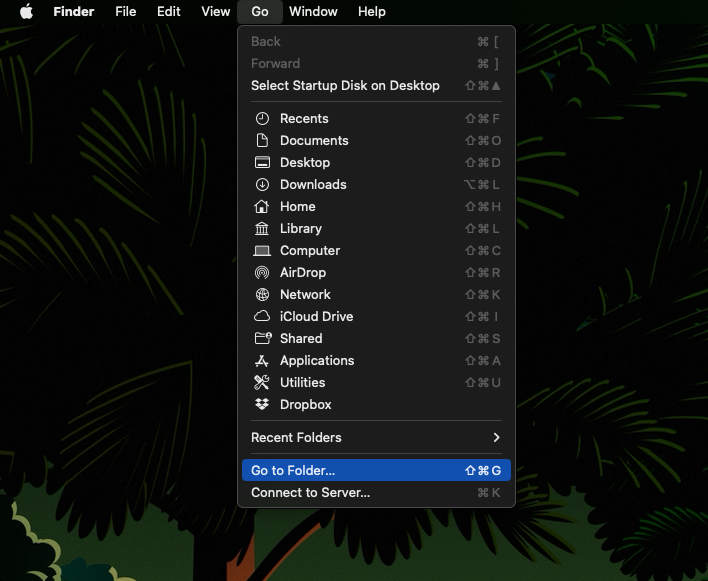
A panel will popup that allows you to input the direct path to the signature folder. Copy/paste the following line into the box:
~/Library/Mail/V10/MailData/Signatures/
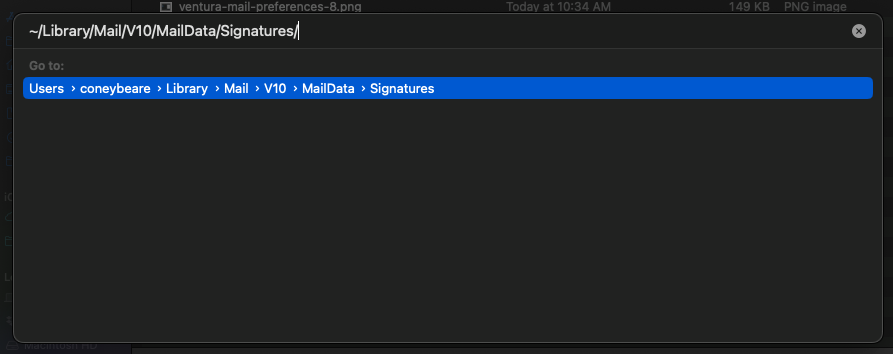
After clicking Go, a finder window should appear with several files.
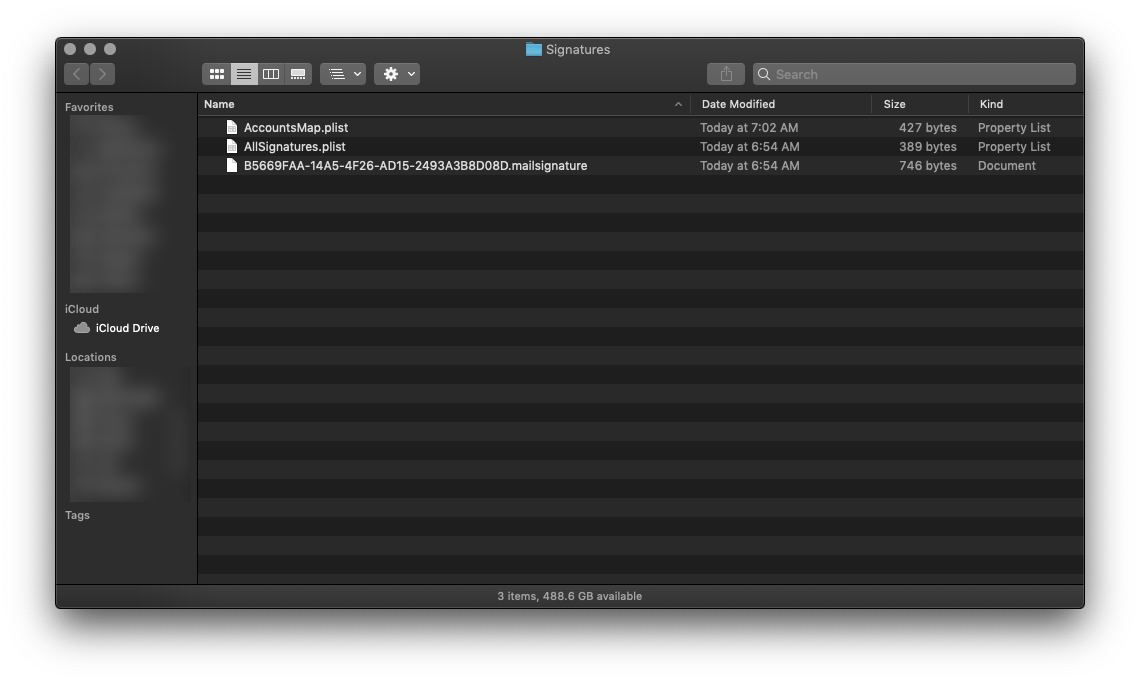
Look at the file names and notice the ones that end in .mailsignature. These are the files we are interested in working with.
More specifically, we are looking for the placeholder signature file you created earlier. Locate the most recently modified .mailsignature file.
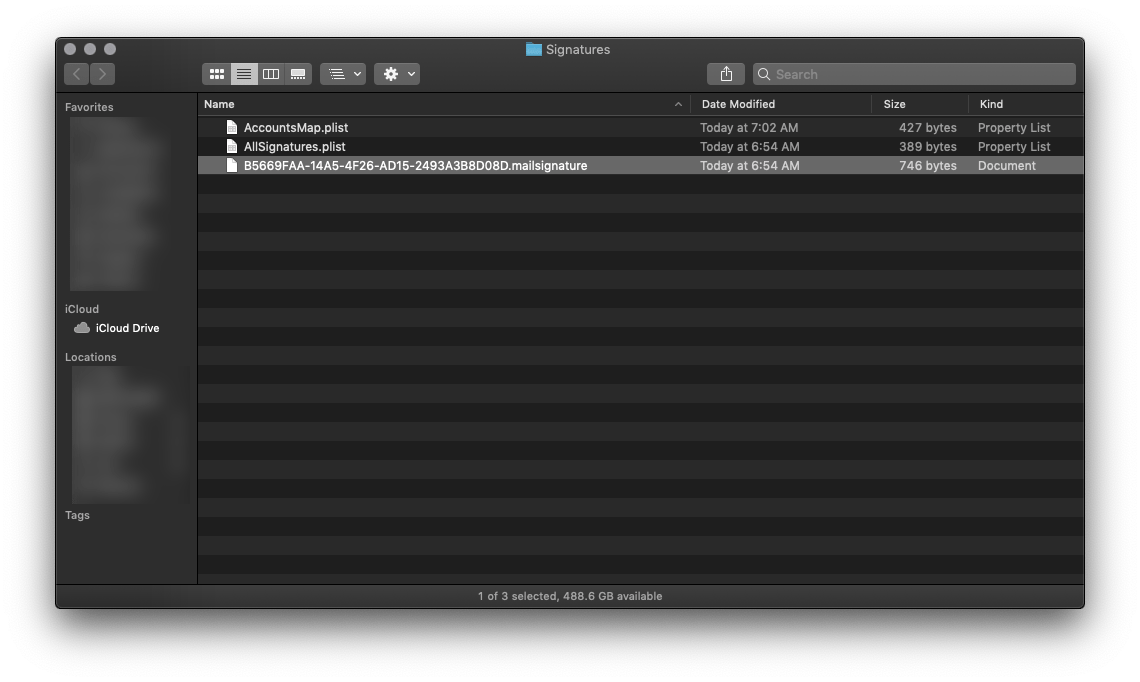
If you have more than one signature file in there, or cannot determine which is the placeholder, you can open each of them to help you find the right file. Simply repeat the following process for all the files.
Right-click on the .mailsignature file in Finder, select Open With, and choose TextEdit.

If TextEdit is not an option, choose Other…, and then choose Applications > TextEdit.
Once you have the file(s) open in TextEdit, move on to step 6.
Find the Right Placeholder File
Now that you have the .mailsignature file(s) open in TextEdit, we need to ensure it is the right one.
Make sure that the placeholder file we created earlier is open by scanning each of the open TextEdit documents for the
placeholder text you entered earlier in the Mail.app Preferences panel.
Because the text I entered earlier was Placeholder text, this is what I am looking for now.
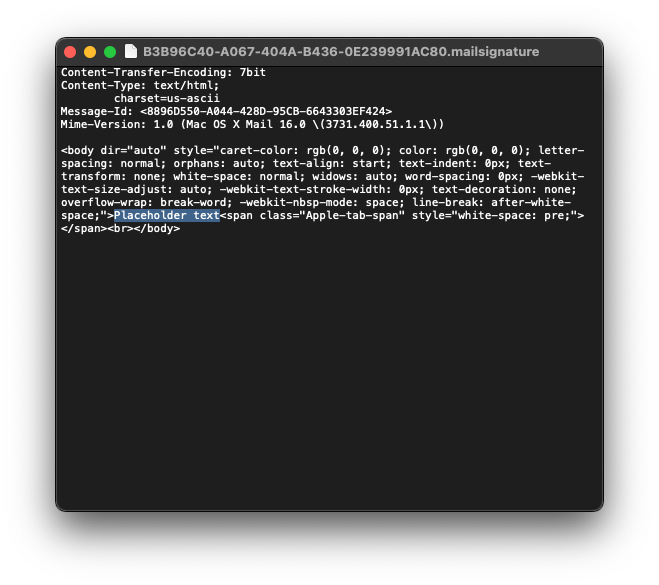
Look for your placeholder text within the file's HTML code. Here, we know we have the correct file because we can clearly see our placeholder text: Placeholder text
If you cannot find the placeholder, you may still be in "edit" mode on the signature.
Try closing the Mail > Preferences Window,
completely quitting Apple Mail, and repeating the previous steps.
If you still cannot find the placeholder, you may need to double check that you are/aren't using iCloud Drive, as detailed in an earlier step.
Select and Delete the Placeholder Code
When you have located the right placeholder .mailsignature file, keep it open and close all
other TextEdit windows as we won't be using them here. Feel free to resize the window to make text editing a bit easier.
You will see a few metadata lines on the top of the file and some HTML code below it. Select all that code from
the line starting with body, all the way to the end of the file.
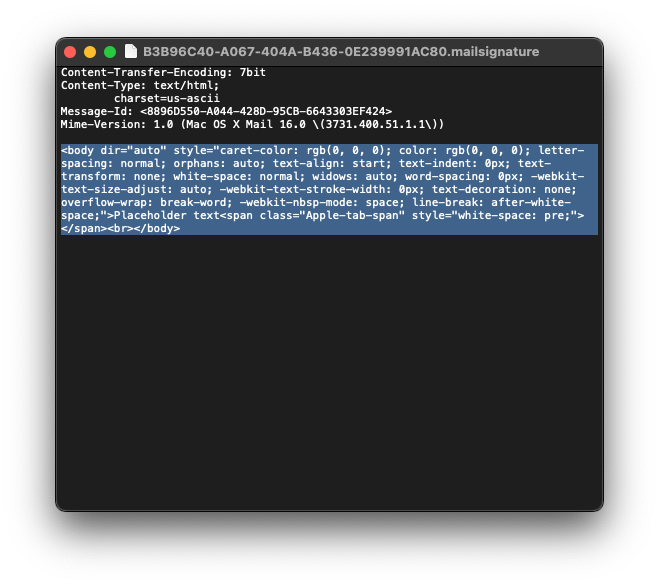
Keeping the top metadata lines, delete the entire block of placeholder HTML code.

Open Your New HTML File
Locate the HTML file we provided you as part of your completed order.
If you were to try and open it, it will open in Safari because it is a webpage, so we need to open it in TextEdit to see the the code so we can copy and paste it into the placeholder file, just like before.
Right click on the HTML file in Finder and select Open With > TextEdit.app to open it in TextEdit.
Copy the New HTML Code
Now that the code for the new signature is visible, select all of it, then copy to your clipboard.
Once copied, you can close the new signature HTML file.
Replace the HTML Contents
Still keeping the top metadata lines unedited, paste in the new HTML code that is on your clipboard from the previous step.

Save and Quit
Save and close the file, then Quit TextEdit.
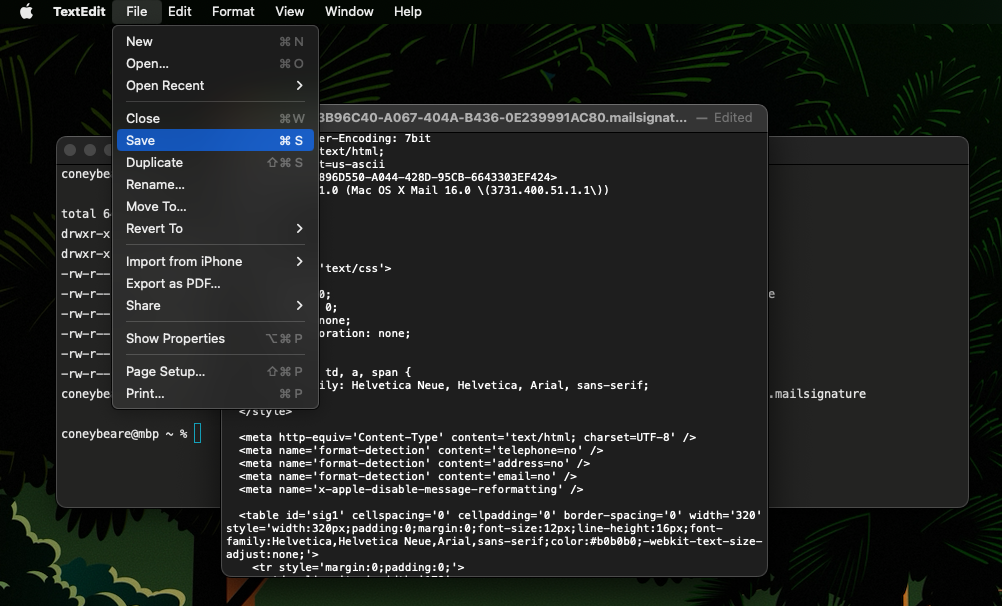
Restart Mail App
Open Apple Mail and go back to Preferences > Signatures. If you have images in your signature,
they will not show here in the preview, but they will show in the real signature
as long as your coded image source location is valid.

Send a Test Email
To test that it is working correctly, simply compose a new email using the account you associated this new signature with, and set the signature (right side of screen) to be the one with the name you created earlier. If the images show, and everything looks as it should, you have succeeded!
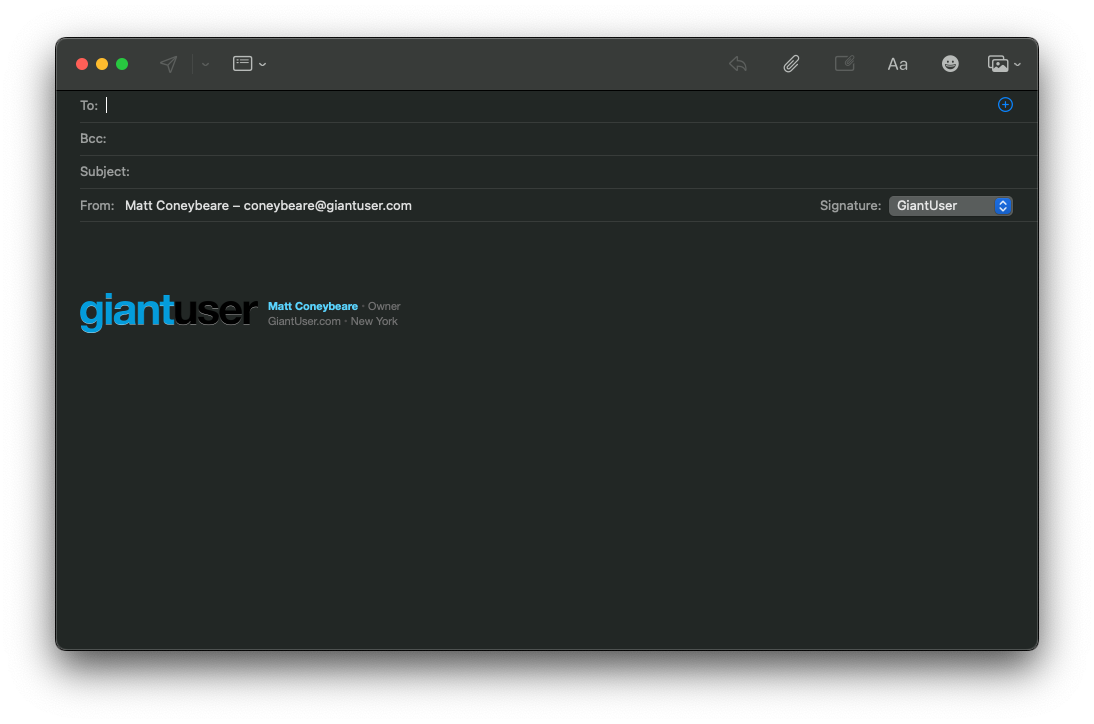
Apple Mail on 10.10.X (Yosemite)
Apple Mail has a pretty complicated process of installing your signature. Don't worry though! We will walk you through it step-by-step. You will be using the HTML file we provided to you for this process.
Add a Placeholder Signature
In Apple Mail, go to Preferences > Signatures and create a signature with any random content. Name it something meaningful in the central column. You will be swapping this out later.
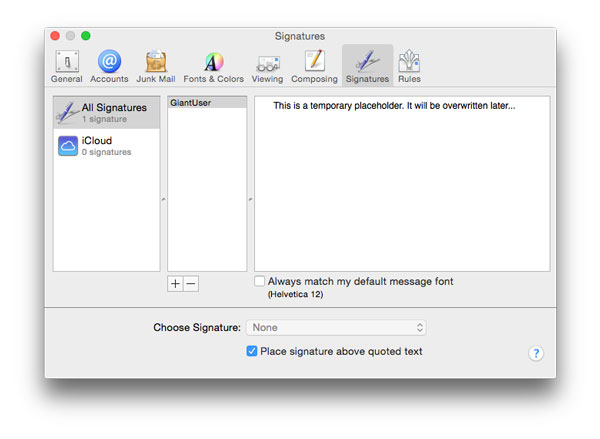
Connect the Placeholder to Your Account
Associate the placeholder signature with one of your email accounts by dragging its name from the second column in the Preferences > Signatures window to an email account in the first column.

Close and Quit
Close the Preferences window to save it, then quit Apple Mail.
Locate the Placeholder's File
We are going to need to locate the folder containing the placeholder signature. Unfortunately, you are not going to be able to use Finder to get to these folders.
Apple goes to great lengths to hide these files from people as they usually contain info that is not editable by hand.
Trying to navigate through by clicking in Finder will usually lead you to your visible iCloud Drive folder with nowhere to go.
Don't worry though, I will walk you through an alternative method of getting at those files.
The files can be in 3 different places depending on whether you are using iCloud Drive, iCloud without Drive, or no iCloud at all.
You are most likely using iCloud Drive, even if you are not using an iCloud email address.
Check by going to System Preferences > iCloud, then seeing if the iCloud Drive checkbox is ticked or not.
If you have figured out which one you are, great! If you don't, start with the top one and work your way down if you can't find the folder.
Using iCloud Drive:~/Library/Mobile\ Documents/com~apple~Mail/Data/MailData/Signatures/
Not using iCloud Drive, but using iCloud:~/Library/Mobile\ Documents/Mail/Data/MailData/Signatures/
Not using iCloud:~/Library/Mail/V2/MailData/Signatures/
Even if the text is wrapping above, ensure the command is pasted on one line.
Open Terminal.app, found in Applications > Utilities, paste the following line into the box and press enter:
Using iCloud Drive:ls -laht ~/Library/Mobile\ Documents/com~apple~Mail/Data/MailData/Signatures/
Not using iCloud Drive, but using iCloud:ls -laht ~/Library/Mobile\ Documents/Mail/Data/MailData/Signatures/
Not using iCloud:ls -laht ~/Library/Mail/V2/MailData/Signatures/
Even if the text is wrapping above, ensure the command is pasted on one line.
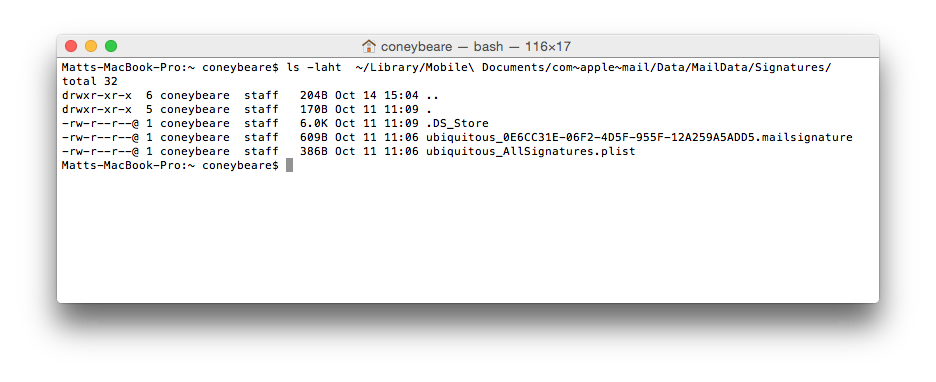
This line tells Terminal to list all the files in this directory along with some other file info, then sort it by date.
When you press enter you should see a bunch of lines, each of which corresponds to a file and some of its metadata.
Look at the right side column — the file names — and notice some that start with ubiquitous_ and end in .mailsignature.
These are the files we are interested in working with.
If you get an error, make sure you pasted the line in exactly like shown on one line. If you still get an error, try the next path on the list above.
As mentioned above, we could normally use Finder to view these folders, but Apple has hidden access to them to prevent direct editing, something we wish to do here. If you have only 1 ubiquitous mailsignature file, then this is most likely the placeholder file you created in step 1. If you have more than one mailsignature file in there, then you need to find the one you created in step 1. Because this list is sorted top-down by the most recently updated, it will most likely be the top one, but you can check by opening them all and seeing ther contents.
Terminal.app does not respond to double-clicking the file so how can you open the mailsignature files? You can copy/paste the following command on the keyboard, all on one line.
Using iCloud Drive:open -a TextEdit ~/Library/Mobile\ Documents/com~apple~Mail/Data/MailData/Signatures/ubiquitous_*.mailsignature
Not using iCloud Drive, but using iCloud:open -a TextEdit ~/Library/Mobile\ Documents/Mail/Data/MailData/Signatures/ubiquitous_*.mailsignature
Not using iCloud:open -a TextEdit ~/Library/Mail/V2/MailData/Signatures/*.mailsignature
Even if the text is wrapping above, ensure the command is pasted on one line.
This line tells Terminal to open all files in that directory that have a filename that starts with ubiquitous_ and ends with mailsignature, and to open them using the TextEdit application.
Once you have these files open in TextEdit, move on to next step.
Find the Right Placeholder File
When you created a temporary placeholder signature in step 1, Mail automatically created a ubiquitout_XXXXXXX.mailsignature file that represents it.
This placeholder now should be open in TextEdit.
If you have more than one ubiquitout_XXXXXXX.mailsignature files open in TextEdit, we have to find the right one.
To help ensure you have the right file, look the one you think is your placeholder in TextEdit.
You should see the placeholder text you entered in step 1, along with other code and metadata.
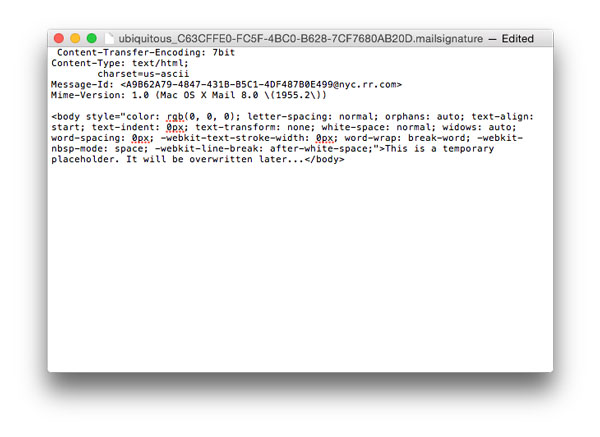
If you cannot find the placeholder, you may still be in "edit" mode on the signature. Try closing the Mail > Preferences Window, quitting Apple Mail and opening the files using the process outlined in the previous step.
If you still cannot find the placeholder, you may need to try one of the other iCloud Drive, iCloud or no-iCloud folders from the above step.
Select the Placeholder Code
When you have located the right placeholder .mailsignature file, keep it open and close all other TextEdit windows.
You will see a few metadata lines on the top of the file and some html code below it. Select the placeholder code.

Replace the HTML Contents
Keep the top metadata lines, but replace the HTML in the file with the contents of the HTML file we have provided for you.
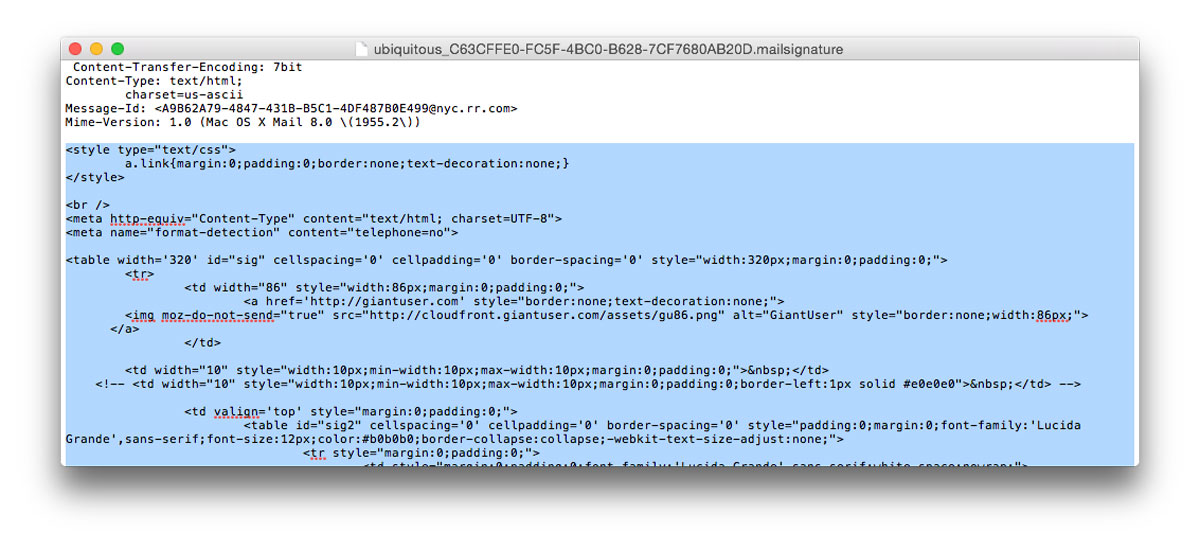
Save and Quit
Save and close the signature code file, then quit the TextEdit app.
Lock the Mail Signature File
If you are using iCloud or iCloud Drive, skip this step and proceed to the next step. You can determine if you are using iCloud for Apple Mail by checking System Preferences > iCloud. Still unsure? Skip this step — you can redo the steps and include this one if your signature is not working correctly at the end.Even though you save this file, Apple Mail may use the original version and overwrite your new signature unless you lock the file. With your text editor now closed and the file saved, find it again in Finder and press command-i to bring up the info pane for the file. On this info pane, mark the "Locked" checkbox.
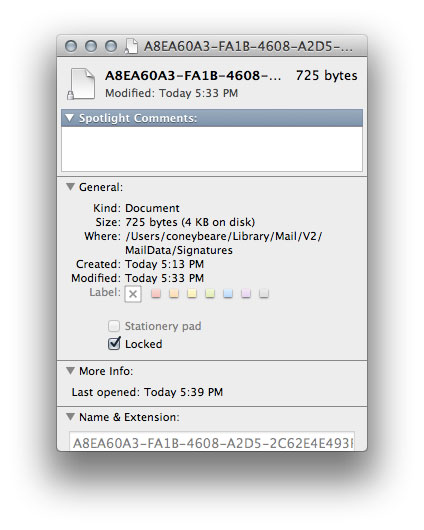
Restart Mail App
Open Apple Mail and go back to Preferences > Signatures. If you have images in your signature,
they will will not show here in the preview, but they will show in the real signature
once you compose a new email.

Send a Test Email
To test that it is working correctly, simply compose a new email using the account you associated this signature with in step 2, and set the signature (right side of screen) to be the one with the name you created in step 1. If the images show, and everything looks as it should, you have succeeded!